Followers

Friday 30 November 2018

12 Days of Christmas Gifts - Day 12 - Star Wreath

Dear Crafters

Well here we are Day 12, I never thought I would make it. The 12 Days of Cards plus the 12 Days of Gifts have taken up a great deal of crafting time over the past 2 months. I have enjoyed sharing all the projects with you, and hope you have been able to use some of the ideas for your Christmas crafting.

Today's project is one to brighten up the home. I saw the idea on YouTube with the 3D stars and they are so easy to make I had to have a go. I now use them for wreaths and decorative gift wrap.
Day 12 Christmas Star Wreath

Here is the inspiration
You will need
A 20cm wreath frame
A Hot Glue Gun
At least 3yards of ribbon to cover the frame
20 background stars and 12 - 15 top stars
The stars need to be 5 point and you could cut them by hand but for this number it is worth investing in the XCut stacking star dies for approximately £10
Buttons to match the colour of your top stars
For this Wreath my background stars are cut from the 2 largest stars in the set and took 5 sheets of A4 card in red
The top stars were cut from the two largest dies and took 2 sheets of 12 x 12 card from a Christmas First Edition stack

Here is the exact set I used but you may have some dies in your stash just as suitable, provided they are 5 point stars they will work.

Wrap the wire wreath in your ribbon - literally wrap around with no gaps between the ribbon. You will not need to secure it at this stage
When you have covered the whole ring glue the end down and take a piece of cord or ribbon, tied together, fold over the ring and pull through the front to make the hanger, you can cover some of the glue that fastened the ribbon base with this hanger

Using the background stars, as they are, (flat), place them around the ring on one side and using the hot glue gun secure them to the ribbon. Turn the wreath over and do the same on the other side. This gives you a colourful base.

Now select the best side to add your top stars.
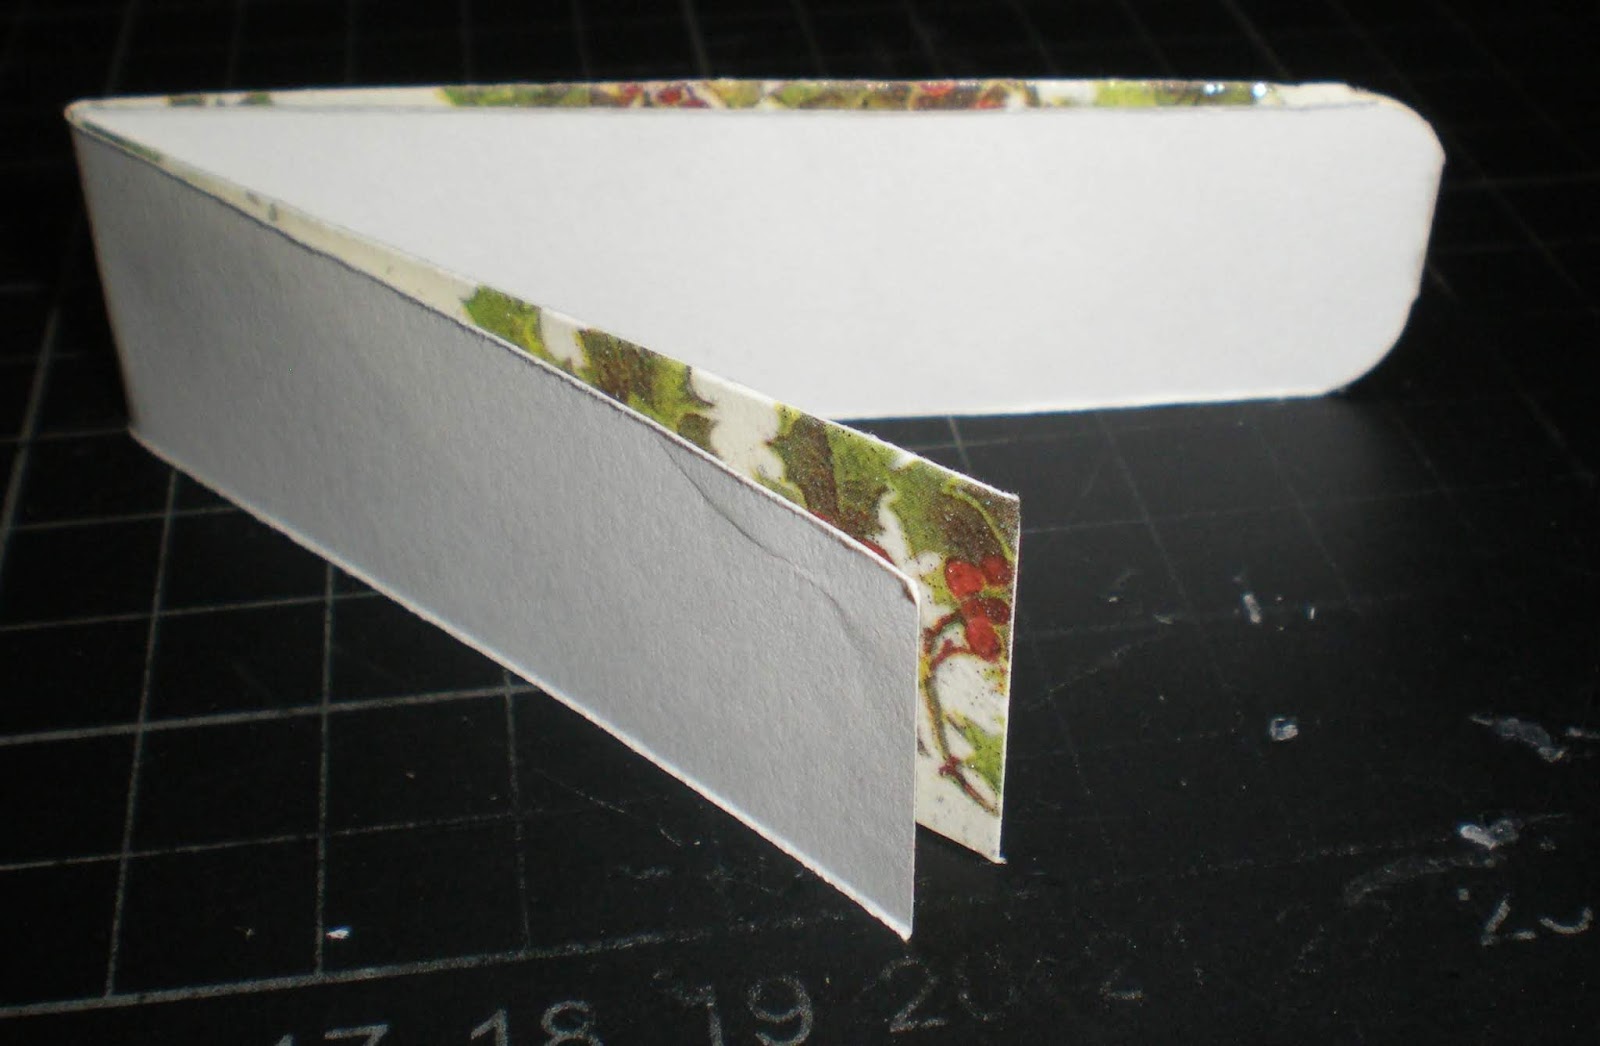
With all top stars cut out you need to score on all five sides from the dip of the V to the point the opposite side. Then burnish each line and fold one point up with the one next to it and the one next to that and then the other two to make the score lines more pronounced and give 3D to the star

Here is a smaller star before and after the scoring 

 You can see the difference it makes to the shape 

Once you have scored and shaped your stars place them around the wreath base until you have them how you want them, them glue each one in position with your hot glue gun you will  need to glue inside the rim of the star and gently squeeze down to attach them. I found one large and one the next size down all around the wreath worked best but you may want to mix it up with some smaller stars, there are no hard rules.

Once them are firmly in place select you buttons or embellishments and hot glue them to the centre of the star. 

If you are going to add a bow to the top or bottom remember to leave a little space when placing the stars.

Here is one I made using coloured paper from a basic paper pad. 


If you try this wreath I would love to see some pictures 

Check back soon when I will  be talking about the 2 Christmas Fairs I attended, what worked, and tips I picked up from the Fair and other traders.

Happy Crafting 
Dee

Wednesday 28 November 2018

12 Days of Christmas Gifts - Day 11 - Concertina File

Hi Crafters

Today is another day of crafting with my own design. There are many folders and files out there so I have not invented or designed the basic concept but I did adjust this from instructions that used A3 card to one that can be made from 12 x 12 papers, as this makes it more accessible to most crafters. 
Once you have made the file you can fill it to gift a friend or colleague or to say "Thank You"
Also ideal to keep in the closet as a last minute present 
I have filled these with:
Stationary - pads and notelets
Greeting Cards 
Recipes 
But let your imagination go wild

Day 11 - Concertina File


For This you will need:


2 sheets 12 x 12 papers (preferably double sided) cut 4" off each piece
Fasteners, magnets or Ribbon to secure the file

Piece one 8” x 12”  Forms the base of the folder
Score ½” either side
Turn and score at 4”, 5.5”

Piece 2 cut to 7” wide and 8"long  forms the flap of the folder

Turn and score at  3” and 3.5"


Fold over the side flaps and glue slipping in the top flap from the top of the base to the 3" score line 


Take the 2  x 4" strips and score at every inch along the length fold this mountain and valley style to form the sides of the file
At the bottom of the file the section 4" deep, glue a folded side panel to the folded section on each side of the file. You will now have a concertina file  


Now for the fastening
You can use plastic poppers if you have the tools
Magnets you will need a large heavy duty magnet
A belly band from 2 strips of card joined and decorated 
Or the simplest way is to Glue pretty ribbon to the middle of the back and base, that can be tied to close the file.


Here is one using a belly band 

And here is one using Ribbon
  

As you can see I make them quite often as they are useful for filing and storing all sorts of items.
I have just made one for my sister to store her die-cuts and with the different sections you can categorise the different die-cuts ready for use, a lovely gift for someone just starting out with paper-crafting.

Happy Crafting 
Dee


Friday 23 November 2018

12 Days of Christmas Gifts - Day 10 - Mini Photo/Brag Book

Hi Crafters

Today's Gift Idea is often called a brag book as it makes a lovely gift for a new Gran or Mum, who can add small photographs to the book and it will pop into a pocket or handbag to be able to share the joy with friends and colleagues. But it can also be used for notes, lists and photographs, and decorated with a specific person in mind.

The one I am showing today is a Christmas Theme and it would be great for shopping lists, Photographs of items you see of decorations when out and about and of course cuttings from magazines to remind you of the exact present requested.

Day 10 

Mini Photo/Brag book


You will need 

I piece of 12 x 12 heavy paper
Matching toppers and card to decorate in the theme of your choice
1 piece of matching ribbon approximately 12" 
Narrow heavy duty double sided tape
Pritt Stick

Fold the 12 x 12 sheet in half and then each side into the middle so it is in 4 equal sections 
Turn and score in half and each side at 4cm.  Fold over the 4cm sections


In the centre line you have just scored  cut up through the first 3 sections leaving the fourth section attached 


Starting from the right side fold the sections valley and mountain folds when you get to the end fold the top down and repeat for the other side 


The book will come together with a middle section that needs to be glued together 


Glue the middle section with your Pritt Stick and attach narrow double sided tape to the outside edges of the flaps and to the 2 centre flaps that you can see clearly in the picture above. 

Run a line of glue around the middle of the outside sections and place your ribbon over, then glue a decorative piece of card or topper over the top to secure the ribbon and decorate the book's front and back 
Add little decorations to the inside panels and a selection of tags/lists and embellishments to each section 


Other ideas for recipients are wine lovers with lists for REd, White Sparkling wine that they like 
Steam Punk or Train theme for budding or retired engineers
Seaside and sailing for holiday photographs etc
Cooking theme with recipes 
Gardening theme with seeds

Hope this has given you some inspiration

Happy Crafting
Dee

Wednesday 21 November 2018

12 Days of Christmas - Day 9 - Mini Box & card Set


Hi Crafters

Today we have one of my own designs 
The idea was morphed from an Index Box I have made. 
We make the box and cover it and then add 6  of the 3" cards and envelopes inside as a pretty  and useful gift. You could add some tags as well if you wished or a small covered notepad 


Required

I piece of card, preferably double sided 16cm x 30cm
I piece of pretty paper to cover 1  12 x 12 or 2 A4
6 x  3” square cards and envelopes

Score base card at 10cm,13cm,23cm,26cm
Turn and score at 3cm either side

Cut out top side panels and cut notches at the 2 panel sections
Before making up the box


Cut panels to cover the base box from the papers
Cut panels 9.5cm wide and from these
Cut 2 9.5cm squares
5 strips 9.5 x 2.7cm
2 pieces 9.5cm x 4cm these require the corner punch

When layering the front panel place a small magnet under the paper
When covering the inside flap place the other magnet to match up
You can do this by layering the magnet use a pen to draw on the outside of the magnet and then bring the flap over so it marks the card. Glue the second magnet to the ink mark and cover with the paper panel.

Use the remaining papers to cut 6 panels 7cm square to cover the cards so you have a matching gift set of cards, envelopes and box.


 These can be made to give at any time of year
For the Christmas box here I have used some pretty Tilda Nostalgia Christmas Papers, But I also made a box with First Edition Christmas paper pad and as it was much plainer cardstock I added a pretty red flower to the front of the box.

Tip:
If you have not used magnets before and cannot source them easily, add a length of matching ribbon by gluing it to the back ,top and bottom panel of the box before you add the paper panels. You will need approx 60cm.
I will definitely be making them for spring gifts.

Happy Crafting 
Dee 


Sunday 18 November 2018

12 Days of Christmas Gifts - Day 8 - Matchbook

Hi Crafters

Today is a simple gift
A stocking filler or handbag present

They can be made quickly and easily if you have a mountain of colleagues that you would like to acknowledge for the holiday season.

It is based on the old matchbooks everyone had in their pockets or purses.These can be made any size, but I will give you measurements for the one I am showing in the pictures


You will need

1 piece of card 22cm x 7.5cm preferably double sided or cut a piece of paper 1/5cm smaller all round to match and line the inside
stapler
Paper to make notebook
decorations to match your card


  1. Score the card at 4cm and 14cm, remember to check the pattern flow on your card the 4cm flap is the base of the matchbook and folds back up while the top will fold down
  2.  Fold the 4cm fold up to form the base and staple near the bottom edge. Put the staples so the smooth side of the staple is on the back of the matchbook and the folded part of the staple is on the front. This way you can cover up any sharp edges with your embellishment.
  3. Next cut some lined papers 6cm wide and 17cm long, fold in half and staple the middle  


  • Decorate the front as you choose this could be with toppers or die-cuts and cover the staples with one of your decorations. As you can see I have used a paper bow for this. 
  • Slide the paper pack into the matchbook under the flap 
  • Cut the top corners with your corner punch (or scissors). The front cover will tuck inside the flap and hold the notepaper in place. 

And here you have a little gift made in a moment
Notes: You could add Sticky Notes instead of papers and for this you just have to make the width and length adjustment to hold the pad of Sticky Notes.. Still give a 4cm flap and allow enough card for the top section to be 2cm shorter than the base panel as this is enough to tuck in.For example if your sticky note pad was 6cm x 6cm the card strip would need to be 7cm wide by 18cm long (4+8+6) scored at 4cm and 12cm. 
 

Happy Crafting 
Dee


Saturday 17 November 2018

12 Days of Christmas Gifts - Day 7 Photo/Journal

Hi Crafters

This project is great for using up the ends of ends of your paper pads and when finished make pretty gifts for friends and family

The inspiration for this came from Lyriclover on YouTube, check out her items for Christmas 2017 Christmas Craft Fairs.


You will need:
at least 8 sheets of 12 x 12 papers preferably double sided
Plain white or cream card to make the photo mats
coordinating decorations for the pages

Take 4 of the 12 x 12 sheets and and score them at 7cm from the base and then fold in half
Fold and burnish the scored lines to form for double sided pages


Choose the sides you like the most to have as the outside pages and the then select the best side for the inside pages I have put the single sided papers in the middle as the plain side will not show once they have been glued together
Stick down a narrow strip on the outside edges of the folded flaps

Layer the pages on top of each other glue the inside pages together. So in the picture shown I would glue the plain white sheet and layer the second folded sheet on top.
Do this until the 4 sheets are together and form your journal.

Decorate the flaps and make photo-mats to pop in the flaps, which will also hold journaling and memorabilia, such as ticket stubs, programmes etc

I have chosen to leave the photo-mats plain so that the photographs stand out. They can be any size provided they fit into the journal and coordinate with it.
Here are the photo-mats that are then popped into one of the pages.


As you can see I have also added a set of little round card circles as I thought these would be lovely for mini photos

All of the card stock I have used comes form a First Edition Christmas Paper Pad

I have added a strip of coordinating card to make the binder, you do this by cutting a width of card that allows cover both sides, glue well and lay half on the front of the journal. Fold over the edge allowing some room for movement ad then stick down on the back.

You could make these for Bridesmaids to collect all their memories during the run up to the wedding.
For friends or family who have a special event coming up.
With the six pages there is plenty of room for 20 or so photo-mats, notes and keepsakes.

Hope you enjoy making this and using some of your stash. It is a good way of clearing some stock to make room for new.

Happy Crafting
Dee


Friday 16 November 2018

Christmas Chaos

Hi Crafters

As you can see in my hurry to catch up  with the 12 Days of Christmas Gifts I have posted day 6 before Day 5, not sure how I did that and probably could not do it again.

But never mind we are all set at Day 6 , and I can spend today photographing and getting the next post ready. As tomorrow I am off to my next Christmas Fayre, at Winscombe, it is a morning Fayre finishing at lunchtime, so if you are in the area why not check it out. There is a very good fish & chip shop in hte village and also the Woodborough do lovely meals.

 Back on Sunday with Day 7

Happy Crafting
Denise


Thursday 15 November 2018

12 Days of Christmas Gifts - Day 5 - Photo-Card

Hi Crafters

Here we are with Day 5 of the 12 Gifts of Christmas.

This is another gift that can be made all year around, particularly good for new parents, first Christmas or Mothers Day.


Day 5 Photograph Card


You will need 2 pieces of good quality craft paper 12 x 12 cut to 11 x 11
2 coordinating heavy card stock A4 or 1 sheet A4 & 1  6 x 6 card and envelope
Take the two printed papers and cut to 11” squares and then fold into a frame shape 
See how to make this on YouTube,  'Red Ted Art' - Easy Paper Photo Frame -
As watching the video gives easy instructions

Cut 2 squares 14cm of black card to place in the middle of the frames

The piece off the end 2cm wide fold in half and cut approx. 9cm long to use as a binder for the 2 frames. You will need to cut a diagonal each end and make the length to fit so it can be placed into the recess of each side of the frame. 
Cut another piece of card 16 m x 12” and gently fold in half over the 2 frames
Or if using a 6 x 6 card place the frames inside the and 

Decorate the front of the card or cover with fabric before adding the frames to the inside
Glue the frames to the inside of the cover
You may wish to make a fold over flap to close up the photo frames in  which case cut a piece of card 6” x 5cm and score at 2.5 and 3”
Glue the short end to the back of the cover before gluing the frames inside
Use a magnet or velcro dots to hold the strap in place

As you can see my photo-card is not made with a Christmas Theme, but you can use papers and decorate according to your theme, and with photographs of friends or family these photo-cards can make special personalised gifts, great for those normally difficult to buy for.

Happy Crafting
Dee

Wednesday 14 November 2018

12 Days of Christmas Gifts - Day 6 - Wallet Paper Set

Hi Crafters

Today is a pretty and practical gift for a neighbour, friend or colleague. Excellent Teachers Gift.
I make them all year round in pretty papers and with different stationary items inside although the mainstays are small cards, tags and a shopping list

Today's has been made with Christmas papers and it holds a shopping list, 4 cards and envelopes (notelet style) and 4 tags. 

Day 6 Wallet Gift Set


You will need
2 sheets of 12 x 12 card coordinating card and one sheet should ideally be double sided as this makes the wallet
Ribbon
Embellishment to match paper for the front of the wallet

Double sided sheet of 12 x 12 
Fold the four corners into the middle 
Tip: Fold the square in 2 softly and pinch the middle turn and fold again pinching the middle and this will give you guidelines to the centre of the sheet
Now with folded sides out fold in half 


Bring both the top folds tot he front and stick the 2 together. 


From the 2nd sheet cut toppers for your cards, the tags and the covers for your shopping list or any other pieces you are adding to your gift
I have used 7.5cm square cards and have cut 4 squares 7cm to add to the top
I then cut 2 strips of 7cm wide by 9.5cm long to make the tags and measuring the notebook cut 2 pieces slightly smaller to cover both sides 


The shopping list went into the envelope section at the back and the cards & envelopes and tags in the front

I then used the same ribbon as I put through the tags to wrap around the wallet and added some decoration 

And hey presto a useful little gift, using up your stash. 


If you were making these for nieces and nephews or grandchildren you could make the cards inside "Thank You" notelets, making it very easy for them to write their thank you notes.

If giving to Teachers or Teachers Assistants as a gift why not add a roll of wrapping paper and some tape and this message:

Since November you've been shopping,
barely sleeping, hardly stopping,
Now its late you're in a scrape, out of paper, out of tape
Hope this gift helps save the day 
Have a Happy Holiday


This idea came from itsalwayscrafttime.blogspot.com, take a look to see her gift idea.

Dee

Tuesday 13 November 2018

12 Days of Christmas GIFTS - Day 4 - Gift Box

Here we are back from a craft day at North Petherton

Really lovely day with 30 other crafting ladies all making Christmas Ribbon tree decorations a large star decoration and on my table, a Teepee card and Favour (see Day 1 for Favour and Day 7 of cards for the Teepee Card.

So here as promised a pretty box using the ribbons made on Day 3.

DAY 4 GIFT BOX

This box is cut from a Tonic Die Diamond Favour Squeeze Box, There are other box dies on the market that can be used  


You will need:
1 sheet of A4 card 
cut 2cm along the 21cm side and use the remainder to cut the die 

Fold along the scored lines and put the box together 
Then using the instructions for the ribbon on Day 3 of the 12 Days of Christmas Gifts, make the matching ribbon, from the 2cm strip you cut earlier. Decorate the box with the ribbon.


This box is ideal to use as a gift for teachers, neighbour or work colleague. 
Fill with:
Chocolates
T-Lights
Bath Bombs
Sweets 
Travel toiletries
Stationary items 
etc

Back Soon with more Christmas Gift ideas

Happy Crafting
Dee

Monday 12 November 2018

12 Days Of Christmas Gifts - Day 3 - Paper Ribbons

Hello Crafters

I am sorry it has been a few days since I started the 12 Days of Christmas Gifts, I have been so busy preparing for my first Christmas Fair. More about that when I finish the gift series.

The kitchen is being re-fitted and tomorrow I am helping at a £ Craft day, where we will be making Teepee cards and Favours, so I have also been busy packing 30 packs of goodies for the attendees.

Today is not a gift in itself, but I have used it on so many items this year it is a useful crafty item to make all year round. I have shown it to you before but it is worth doing again and giving you fuller instructions.


Day 3 Paper Ribbons


I first saw this being made using an envelope maker (We R Memory Keepers board), and so nearly bought the board just to make the ribbons. But them thought I would try them by hand. So ideal for anyone just starting out with paper crafts or who enjoys wrapping gifts.

It also uses up scraps of paper and card and has the added bonus of making your ribbons match your projects

You will  need:

A strip of card 1" x 12" (so it can be scraps from a piece of A4 or 12 x 12 paper pad.
Corner punch
pretty button or bead to decorate the centre
strong double sided tape


  • Fold the piece in half lightly and using your corner punch trim both sides of the folded edge
  • fold the open ends up to about an inch off the top and crease the fold. 
 

  • Unfold and make a tail on the open end, by cutting half an inch up in the middle of the two pieces and curving a cut 
  • Run your scissors along the middle sections to curve them


  • Turn the ribbon upside down and fold down the creases so the tails touch the table 
  • Put double sided tape just inside the crease 


  • Fold and stick just before the curved edge 
  • Turn over and decorate the centre
I have used buttons flowers bead s and for many Christmas decorations I have used bells such as in this picture 

Day 4 will show how I have used the ribbon on  a pretty box

Back soon 
Dee

Monday 5 November 2018

12 Days of Christmas Gifts - Day 2 - Candy Tag

Hi Crafters

Day 2 of 12 Days of Christmas Gifts.

Christmas Candy Tag
This is a great way to personalise your gift bags and boxes
A gift tag with the gift of a candy cane attached. I have used ribbon that says do  not open until 25th December, but the candy cane can be used to bribe to recipient in the meantime.


Suitable for a non crafter and for the children to make for their friends.

You will  need
1 sheet of Kraft Card A4
Red Felt pen
Candy Canes - I have used mint Candy Canes from B & M, but I have seen them in other supermarkets including Lidl.

1 sheet of Kraft Card will make 6 Tags

  • Cut 6 pieces 2" wide by 5" long  keep the odd pieces left as you will need them later
  • Trim the top corners with your corner punch or round off with scissors
  • Using the red felt pen mark all around the edge with little stitch marks. I do not use a ruler as I want it to look like hand stitching, but if you are not very steady you can use a ruler and just hand mark the curved areas 
  • Punch a hole in the top
  •  
  • Take a ribbon of your choice about 12-14 inches long thread through the hole and put over the candy bar before tightening
  • using the oddment cut strips 2 1/2" by 1/2". Curve these pieces by running your scissors along the length and fold back the ends nearly 1/2" glue these section and place over the Candy Bar
Personalise them by putting the name of the gift receiver in the right hand corner 


Happy Crafting
Dee

Thursday 1 November 2018

12 days of Christmas Day 1 - FAVOURS

Hi Everyone

Here we are the 1st November and as promised I am starting the countdown to my 12 Days of Christmas Crafts.

This series of posts has been put together to share some of the ideas of paper-crafts I make for Christmas. Many of them I  take to Craft Fairs and after I have done 2 in November I will give you feedback on what went well. Some items I will make to use on the big day or for parties, and this is what I am starting with today.

We will be making these at the Craft Day I am helping with o the 13th November and I am also making 30+ for the WI Christmas party, one for everyone to have with their coffee after the meal.

Day 1 Favours

These are really cute but take no time at all to make and will brighten up any table.
They can be made in any size just start with a square of heavy paper/light card stock, preferably double sided.


  This one has been made from a piece of Christmas stock 6" x 6" 

1. Fold the piece of paper on the diagonal 
2. Bring the two sides in and pinch the middle along the bottom edge 

3. Fold the top point down to the mark you have just made and burnish the line 
4. Lift it up again, and bring the side points to line up with the burnished line 

5. Glue the points down and then bring down the top point again and glue down  over the the flaps you have just done 

6. You now have a pocket to add your chocolate or present and can decorate the front in keeping with the occasion.

As well as having them on the table, you could pop them in as stocking fillers or fill them with Christmas chocolates to hang on the tree, they make a nice keepsake for anyone visiting and if you go to the tree to give them the treat it makes it even more special.

The 6" size produces a favour with a 4" pocket top and this will take a couple of chocolates such as Heroes or Roses, or for something special, Green & Blacks mini bars. Look out for your favourite bars that will fit . I cover the wrappers in some Christmas paper scraps 
I also make lots of smaller ones from 10cm  x 10cm paper packs currently available in the Range and The Works. These are not double sided but are thin enough to put 2 pieces together. No need to glue until the end just place the 2 pieces together with the patterned side out. Fold as above and then when gluing down the flaps glue the 2 pieces together and the top flap together before adding your favour..

Here are the two sizes made up with chocolates in. The small size is perfect for Twilight mints or Elizabeth Shaw Mints.


If making in numbers the basic favour will store slotted into each other 

You can see the smaller favours grouped together on the right.

A really cute and easy project. I hope you enjoy making them.

 Happy Crafting
Dee