Followers

Sunday, 25 October 2020

Shabby Chic decoration from old book pages

 Hi Crafters

I like to read, and have revisited reading regularly since lockdown. Most of my books are from Charity shops, and I then recycle them, I also look out for books that I can use specifically for recycling with craft projects and music score books are particularly good should you find any in your local Charity shops.

Today I would like to share a recent make.


Shabby Chic Rosette Decoration

This is made using 2 pages from a paperback book
A vintage Christmas picture
Lace

Cut 2 pages to 3” wide (these pages were approximately 10” tall)
Score every cm, or half inch, whichever you like to use, and fold back and forth to concertina the pages
Join the 2 pages together. It gives a neat finish if you glue a mountain fold over a mountain fold to secure the pages together. Then join the 2 outer edges in the same way. I use Pritt Stick for this stage.
With your hot glue gun press the folds gently into the middle, place hot glue in the centre and hold until secure
Decorate the centre adding a piece of rope or string to the back of your decoration to hang the item when finished.

Imagine these decorating the Christmas tree or mantel 
You can make them all sizes and decorate with any centres, old buttons, small paper doilies etc.

Back soon with more Book recycling projects 
Dee


Sunday, 18 October 2020

Gift bag/Folder

 Hi Crafters

Whilst we are unlikely to be able to attend any craft fairs this year,I have been conscious of keeping my packaging to a minimum so that items that can be sold on EBay or Etsy do not have to pay parcel postage costs. This is especially important for card crafters as anyone purchasing an item under £5 is reluctant to pay £3.10 postage. 

I am making my items into bundles and also reducing the size wherever possible.

For this years Craft Fairs I had purchased some lovely scarves with the idea of making some pretty gift bags and boxes to go with them. The buyer chooses a gift bag, and a scarf for a set price. The boxes were made quite chunky so they could be recycled for even better value, and the scarves were covered with tissue paper. Unfortunately to sell these on Ebay or Etsy would cost £3.10 parcel post. So I set about designing new packaging and came up with a gift bag/folder. The scarf can be presented in the pouch and the recipient can then use it as a stationery folder for bill, receipts etc. 


To make the folder you require 

1 sheet of 12 x 12 card

A popper setter

Strong double sided tape or glue

Cut the card into a piece 9” wide by 12”, leaving a piece 3” which you cut into two pieces 4.75” Long, leaving a small piece you can use for a tag

With the main piece score it along the 12” side at 4.75”,5.5”,10.25”,10.3/8”,10.5”,10.5/8” these tight score lines forms a folding flap.

The two pieces for the side score at .75”,1.5” and 2.25”, giving it 4 section fold in half and then back into the middle so you have a concertina fold with the pattern showing out, tape both sides of both pieces

Fold and burnish all the folds on the large piece and you folder will form it’s shape. Trim the top corners and mark the centre of the top flap with a pencil approx 1/2” from the top, make a hole with your pokey tool or a cocktail stick. fold up the other end and Line up the sides of the folder, put your pencil through the hole and mark the underneath (which is the front of your folder) make a hole where the pencil has marked the spot and add your poppers where you have made the 2 holes

Open the folder out (you will be viewing the inside) on your desk. With the side pieces, line them up at the side of the base of the folder, the folded edges outside, and stick down to the base. Next lift up the base section and line up with the back of the folder making sure it is under the line of the flap, and then stick it down.

Your folder is now ready to use as a gift bag and you can decorate it any way you wish. I will just add a pretty bow and label. 

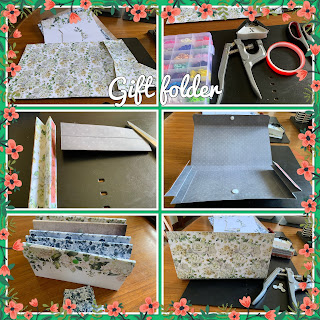
Here are the different steps for this project.

Top left: the card cut and scored

Top right: popper set and tools used for make

Middle left and right: the side panels taped and positioned

Bottom right: the poppers position

Bottom left” 5 folders completed ready to use

I am now ready to sell my scarves on eBay with pretty packaging that won’t cost too much to send.

Back soon with another idea for using your left over Christmas card kits to make gift boxes. 

Happy Crafting 

Dee.

Friday, 9 October 2020

Laminated folders and pouches

 Hi Crafters


Today I have a fun project and one that would make a useful gift for anyone. We all use storage folders to hold our bills, receipts, notes etc, and these are laminated for harder wear. 

It was fun to do some masculine styled projects. I have used a DCWV 12 x 12 paper pad. I love the bold prints and retro look to the papers.

Fist I made yet another gift bag, I seem to have to make one from every 12 x 12 pad I open. Then I decided to do some laminated projects, and thought it would be good to make a couple of sets for the men in my life. 


This is a quick and simple project  and you could use up any odd sheets of 12 x 12. I am giving instructions on using 2 sheets of 12 x 12 as it is the most economic way use of papers and laminating pouches. You will get 1 folder and 2  pouches and even a small card holder from 2 sheets

You will need:

2 sheets of 12 x 12                                                                                2 A4 laminating pouches                                                             Either some sort of popper set or you could use velcro dots.

Cut each sheet of 12 x 12 the same way

1 piece 7.5" by 12" leaving a piece 4.5" x 12" 

With the pieces cut at 7.5" wide cut them both at 8" ,this will leave you 2 pieces measuring 4" x 7.5".With one of these pieces cut a 1.5" x 7.5" strip to make the flap of the folder and one piece 1" x 3.75" (this will make the flap for the card holder. 

You will also have 2 pieces 4.5" x 12" and these you cut into 2 to make the 2 pouches.

Plug in your laminater, and while it is warming up place the 2 folder pieces right side out and slide them into the sheet making sure they are exactly even all the way around, place the 1.5" strip ( you may like to curve the top corners with a corner punch) into the folder, placing it 1/8" above the other pieces and with the right side down.

With the 2 pouches place them outsides showing and lay them side by side in the laminating pouches .

When your machine is up to temperature put the 2 pouches through keeping them straight.For the folder cut around the shape leaving 1/4" gap to secure the seal. Now lay flat on your crafting surface and take a sharp pointed craft knife and nick into the top of the folder where there was a gap for the flap, there will be a natural air pocket here and your knife should slip into it. do  not press down or you will  go through both sides. Once your knife has found the slit, slip it along the width of the top of the card, this will form your folder.

 Happy Crafting

Dee


Tuesday, 6 October 2020

Making your own Tassels

 Hi Crafters


Today I thought I would show you how I make my paper tassels to decorate my bags and boxes.

I have done these before but I saw a great tip the other day, where the tassel had a strip of metallic tape added to the base of the tassel before cutting and this gave a lovely finish to it making it glitzy.


Take a piece of paper 9" x 4" You can use patterned paper or even upcycle a sheet from a magazine. I like to fold down the top by 1/2" to make it a little stronger . Place a 1cm wide strip of metallic tape along the bottom edge. Cut up to within 1 1/4" from the top so the paper has the frilled look all along it. Fold down the top by 1/2" and place a piece of strong double sided tape along the folded edge, it is better if the tape straddles the folded edge.

Place a piece of ribbon or string at the top left hand corner, with the ribbon loop above the paper . Use a cocktail stick or pokey tool to wind up the edge, roll a little way along before taking out the stick, continue rolling it tightly around to form your tassel. Make sure the edge stays straight and the winding is tight, add a little extra tape at the other end to make it sit flat when you have finished rolling it.

If you like you can add another strip of metallic tape to the top of the tassel. 


These are some of the first tassels I made from magazine pages and these has washi tape along the bottom edge 

    
Here is the new version of the tassel made with the metallic edges 


Her it is added to a gift bag.
I think it finishes off the bag well , and can be made using papers that coordinate or even papers from the same pack.  


I have enjoyed making all of these tassels they are simple to make and would make a lovely item to add to happy mail envelopes, or box up with some other hand crafted embellishment for a craft friend. 

Why not purchase some pretty wrapping paper and make some tassels with a piece of the paper and then gift the set to a friend or Teacher, we all need gift wrapping and this takes some of the work off a busy person.


Happy Crafting

Dee