Hi Crafters
Whilst we are unlikely to be able to attend any craft fairs this year,I have been conscious of keeping my packaging to a minimum so that items that can be sold on EBay or Etsy do not have to pay parcel postage costs. This is especially important for card crafters as anyone purchasing an item under £5 is reluctant to pay £3.10 postage.
I am making my items into bundles and also reducing the size wherever possible.
For this years Craft Fairs I had purchased some lovely scarves with the idea of making some pretty gift bags and boxes to go with them. The buyer chooses a gift bag, and a scarf for a set price. The boxes were made quite chunky so they could be recycled for even better value, and the scarves were covered with tissue paper. Unfortunately to sell these on Ebay or Etsy would cost £3.10 parcel post. So I set about designing new packaging and came up with a gift bag/folder. The scarf can be presented in the pouch and the recipient can then use it as a stationery folder for bill, receipts etc.
To make the folder you require
1 sheet of 12 x 12 card
A popper setter
Strong double sided tape or glue
Cut the card into a piece 9” wide by 12”, leaving a piece 3” which you cut into two pieces 4.75” Long, leaving a small piece you can use for a tag
With the main piece score it along the 12” side at 4.75”,5.5”,10.25”,10.3/8”,10.5”,10.5/8” these tight score lines forms a folding flap.
The two pieces for the side score at .75”,1.5” and 2.25”, giving it 4 section fold in half and then back into the middle so you have a concertina fold with the pattern showing out, tape both sides of both pieces
Fold and burnish all the folds on the large piece and you folder will form it’s shape. Trim the top corners and mark the centre of the top flap with a pencil approx 1/2” from the top, make a hole with your pokey tool or a cocktail stick. fold up the other end and Line up the sides of the folder, put your pencil through the hole and mark the underneath (which is the front of your folder) make a hole where the pencil has marked the spot and add your poppers where you have made the 2 holes
Open the folder out (you will be viewing the inside) on your desk. With the side pieces, line them up at the side of the base of the folder, the folded edges outside, and stick down to the base. Next lift up the base section and line up with the back of the folder making sure it is under the line of the flap, and then stick it down.
Your folder is now ready to use as a gift bag and you can decorate it any way you wish. I will just add a pretty bow and label.
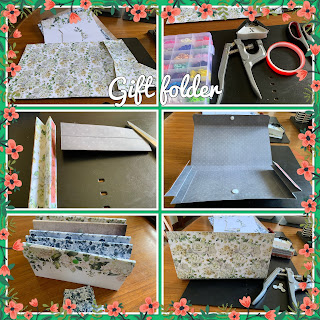
Here are the different steps for this project.
Top left: the card cut and scored
Top right: popper set and tools used for make
Middle left and right: the side panels taped and positioned
Bottom right: the poppers position
Bottom left” 5 folders completed ready to use
I am now ready to sell my scarves on eBay with pretty packaging that won’t cost too much to send.
Back soon with another idea for using your left over Christmas card kits to make gift boxes.
Happy Crafting
Dee.


No comments:
Post a Comment
Make a comment