Recycling your Christmas Cards
Project 5 - Mini Brag Book & Folder
For me I have saved the best til last, not that they are necessarily the best projects but because I used my favourite pictures on the folder and the Mini Brag book is so versatile.
NB All the projects show in this series of recycling your cards can be made using your scraps, or papers and cards you have in your stash or been sent etc
First of all the Mini Brag Book
This is an old project but I often go back to it for including in letters and parcels as happy mail. They are quick and easy to make with no special tools and a way to use up scraps.

For this project you need one sheet of A4 card and your decorative “card” topper.
I chose a red card to go with the card i was using to cover the front.
Simply fold the card in half lengthways, unfold, turn and fold the card into half widthways, unfold and then fold each side to the middle score line so you have 8 sections.


Next cut up the middle score line for 3 section, and then fold each section in on itself.


Glue the middle section together to form a book. I have headed each section with Christmas jobs. Cards received and sent, presents to buy and food ideas.
Then add a narrow piece of ribbon to fold around the book and glue under the front topper. Do not glue to the back or the book will not open.
Idea: Ifyou want to add photographs, tags or notes to the pages simply fold over an inch of card both
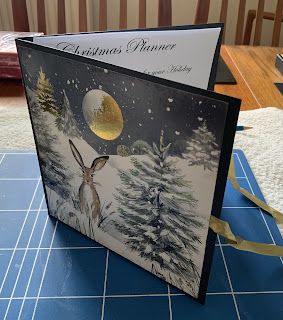
The Christmas Planner / Folder
This is a great way to collate all the information for Christmas, and a good time of year to prepare. Make a simple folder and decorate with a favourite card, inside you can store your lists for next Christmas, starting with cards received this Christmas and cards sent, addresses etc, and then throughout the year you can add presents collected or ideas for presents as they become known to you.
All you require for this project is a sheet of A4 card or larger if you have it. I have used a piece from the coloured pads sold in Lidl and they measure 13.5” x 9.5”
Lay the card landscape and fold up approximately 3.5cm
Fold the card in half
Put a fine line of glue or tape to the outside edges of the flap to glue down
Next lay a piece of ribbon across the front that is long enough to go around and tie the folder together glue down to folder and place your chosen card over the top
Glue your card to the front, if you are adding another card to the back do the same with the ribbon before adding the card

You can add your planning lists into the flaps


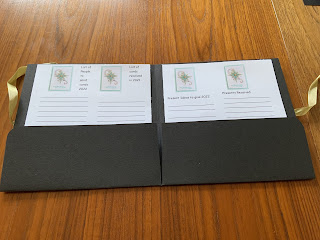
You could decorate the inside flaps if you want. I love to have this in my desk drawer and when a family member or friend mentions something they like I can add it to the planner for next birthday or Christmas.
This concludes the January projects for recycling your Christmas cards.
If I have time I will add an album I have made in the last week before the February projects start.
Happy Crafting
Dee
No comments:
Post a Comment
Make a comment