Followers

Friday, 23 September 2022

Smashing a card Kit Final part 4

 Part 4 The last of the Card Kit 

So here we are with the last bits and pieces from the Create and Craft Bear Card Kit.

I started with 

17 cards and envelopes
23 sheets of A4 papers
5 sheets of sticky back ribbons with bears 
4 sheets of ribbons with embellishments

8 sheets of embossed tags and topper stickers

So far I have made 

11 Birthday cards (7 5”x 7” cards and 4 stepper cards)
A lovely Memory book with flip photo mats, storage box and 2 wallet folders 
2 Memory Envelopes large nearly A4 size 
1 smaller envelope for memorabilia
A Gift Bag


Today I am finishing the kit by making two medium gift boxes- the top flap is decorated with a ribbon panel. 
And two laminated folders to store paperwork or memorabilia. 
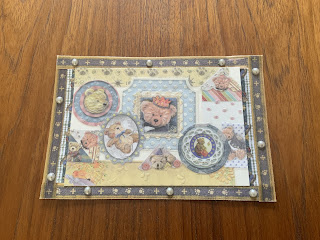
Plus a Collage picture made from the stickers and ribbons 
This uses the last of thee A4 papers and most of the ribbons and stickers. When I have finished these makes I will show you everything that is left and everything produced from the half of the card kit.

First the boxes
The smaller box is made with one sheet of A4 white card
Decorated on the side with ribbons and the top has 2 laminated stickers with a ribbon bow


While the larger box is made with 2 sheets of white card A4 and was made the right size to hold the album 


The 2 folders are made from one sheet of laminated paper, simply folded into the 3 sections with concertina panels at the sides of the front and back sections. I then used a button attached with narrow ribbon, with the button and ribbon becoming the closure.


Lastly the picture:-
 I decided to use some of the ribbon and stickers by making some collage pieces. I took some blank card  4” x 6” and added the stickers building up the collage until I had good covering,. When I was happy with the card  I laminated it to seal the stickers in. While I was laminated this I also laminated some of the other stickers to use as embellishments, including the top of a gift box. 


I then added some of the decorative ribbon around the edge.
I was going to use the pieces as toppers for some more cards and then I  found a white picture frame on half price in B&M and thought I would make a picture. I am really pleased with the way it came out. I had to cut the mount a little and I added the card with WASHI tape.


It was a great way to use up the stickers and and I have a great picture for the nursery for £1.


After all these makes there were very few  bits left from the kit 
1 sheet of paper and a few ribbons .


So here is picture showing all the makes apart from the cards that I have already given away.
These are all off to a friend who sells them for charity 


Happy Crafting 
Dee


Tuesday, 13 September 2022

Smashing the Card Kit Part 3

Part 3 Using up the papers

Create and Craft Bear Card Kit

In my previous posts I used the cards envelopes and some of the papers.
Now I wanted to see what else I could make from he remaining items in the kit, to get maximum use.
What other items would complement the album?
A Gift bag to place the album in.


So I chose 2 matching papers and cut them down to measure 20.5cm square, this gave 2 pieces for the side panels measuring 8cm wide 
From other scraps I had I cut 2 pieces 20.5cm x 8cm to make the bottom panel
I have shown gift bags many time before so check out my instructions for an 8 x 8 bag or look at a Sam Calcott video on how to make up pretty gift bags for your projects. 
I will tell you that the base pieces I glued together to make a firmer bottom for the bag and then scored at 1.5cm along the 20.5cm side
The side panels I.5, and 4.5cm from the bottom turned and scored at 1.5. 6.5cm and then in the centre at 4cm I scored down to the first score line at the bottom.    
As these are the measurements for this size A4 paper

All the pieces cut ready to assemble


Adding the front and back to the base

Adding the side panel

I use a wet glue on the base and to attach the side panels, Then when gluing the sides in place I use a double sided tape with a wet glue on top this allows some wiggle room and gives a strong attachment.

Glue the printed panel of the paper for the side gussets and pull the sides up to the line up with the top of the front and back doing one panel at a time.

Next punch your holes in the top of the bag to add your ribbon handles. I measured in 5cm from each side and placed my holes there
Rather than have a knot showing on the inside of the bag, I sellotape the ends down and then made panels to cover them, this also adds a little strength to the top of the bag
The panels were cream heavy paper and measure 20cm x 4cm scores at 1cm. 

The bag used up 2 full sheets and 2 scraps of paper, leaving me lots more tags ribbon and papers. 

Next I decided to make some Keepsake Envelopes
I love these large envelope folders for storing paperwork and they work as well to store baby memorabilia. 
I made 2 full size Envelopes and 1 small one 
The 2 full size used 2 sheets of paper for each while the smaller version used just one sheet
To make them more sturdy I laminated the outside of each sheet, this coating also allows them to stay clean and therefore wear better.


Whilst I was laminating the papers to make the envelopes I also laminated some of the stickers As many of the stickers are shaped the same, I put 2 together and laminated them to make embellishments and tags. 


This left me a couple of sheets of papers and some ribbons. I will show you the last couple of items made with these next 

Happy Crafting 
Dee


Wednesday, 7 September 2022

Smashing A Card Kit Part 2

 Memory Book/Baby Album

Part 2 of using up a card kit


This project was more involved and it was what prompted me to purchase the kit
I wanted to make a baby album/memory book and I had in mind to use some of the cards and papers to achieve a coordinated album 


I decided to make a folio album as this suited the size of the card available 
To make the album I used

2 pieces of A4 black card with a coated finish which made it suitable for the cover
2 pieces of heavy black card 
2 pieces of white card stock 
The 5 cards remaining 
About 9 pieces of the A4 paper that came with the kit 
With the coated card I cut one piece in half along the length to give me 2 pieces of A5 
I then cut 2 pieces from the other piece 
one to make the binder this measured 21cm x 7cm score along the 7cm side at 2cm,5cm
One to make the front fastening that measured 21cm x 8cm sore along the 8cm side at 2cm,5cm giving a flap for the front of 3cm.
Attach the front and back to these 2 panels and then cover the inside. 

I cut 2 pieces from the papers to fit the front and back of the album and laminated them so they are now wipeable. 
For the inside Right
I cut the 5 cards in half and then cut the full half into pieces measuring 12 x 14cm . Score 2cm along the 14cm edge making the finished flip card 10cm x 14cm . These form the flip photo mats. 
Burnish the score line and lay the flip card onto the right side starting with the folded panel near the top edge of the panel lining up the remaining cards under each scored section. As you are layering them line up the sides so they stay even.
For the bottom of the right hand side I made a pocket with a fold over lid, using a three sided box template, and a single piece of card scored to fold over as a front flap. 
This makes a useful storage area for photographs or journal tags.
Before placing the box base and flap onto the right panel I covered them using another of the papers and also covered the back of the photo mats. You don’t have to cover the back as the cards used to make the flip sections were printed on the outside and white on the inside, but I wanted the bear theme to be on show. 


On the Left panel”
Using the remainder of the cards I cut up to the die cut section and then cut the full section to 11cm x 8cm Scoring along the 8cm side at 1cm leaving 5 flip phot mats 8cm x 10xm 
I used 2 of the die cuts to line underneath the photo mats and cut another sheet of paper to cover the backs . 
This left a slightly bigger bottom section and so I decided to make an open pocket that could hold a couple of wallets . One would have 3 good sized photo-mats on and the other would have sections to store tags and more photographs. 


For the base pocket and the folders I used the other black card 
Each of the wallets measure the full length of the card and 12cm wide so I could only get one wallet per piece the rest of the card was used for the pocket and the storage sections on the tag wallet. Both were scores at 5”, 10” (sorry to change to inches but this fitted the pocket size).
The fronts and flaps were covered with papers from the kit and the pocket edged with the paper borders. 


I am really please with the way this album worked out and it utilised the remaining cards and half the papers. 

Back soon with the other  projects that used up more of the papers 

Dee


Saturday, 3 September 2022

Smashing a Card Kit

 Using Everything in a Card Kit

Part One Contents and Using the Cards

Here we are in September, I am in between summer crafting and really getting my Christmas crafts, and was looking for the next project. I have had a good summer crafting and found some great buys fro the summer sales as well as Ebay. 
I recently purchased a Create and Craft Card Kit on Ebay, as I particularly liked the papers included and had some ideas for projects I could make. This particular kit has been around for many years and I have had parts of it before. It’s theme is Teddy bears and there are some cute papers and stickers in the kit.


The contents included:
38 cards and envelopes
43 sheets of A4 papers
9 sheets of sticky back ribbons with bears 
9 sheets of embellished ribbons with buttons and pearls 
19 sheets of embossed tags and topper stickers 

As I did not need all the kit I decided to divide it into 2 and sell on the other half, which is now back on Ebay. 

Items left for me to use were:
17 cards and envelopes
23 sheets of A4 papers
5 sheets of sticky back ribbons with bears 
4 sheets of ribbons with embellishments
8 sheets of embossed tags and topper stickers

Now to see what I could make from these lovely papers, cards and stickers.

The first part I made up were the cards. Not all as I had a use for 5 of them so I made up the other 12. Now it should be said the one part of this kit that I am not keen on are the cards, not because the prints or quality of the card but because they all come with a section die cut out the front. As they are covered with a printed scene I struggle to find a design with the die cut part removed that utilises other parts of the kit without being “too busy” . Now this is a personal choice, I know, but I tried to keep the design simple, and with some I stuck down the die-cut section and did not remove it, before decorating the card. 

Of the 12 cards,  I made up 7, using the ribbons and stickers to add to the base card. The other 5 cards I started to experiment with a different design. I cut the card in half and took out the die cut piece, thinking I might try an easel card. This did not work as the section of the card under the die cut piece was too small to really make use of the front section of the card. 
I then started to look at the 2 pieces and consider designs that would work with the shapes in front of me. 

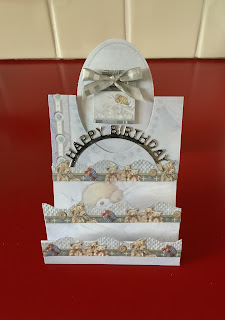
I came up with this step card design.


I really liked the way the borders can be added to decorate the steps and the die cut section popped back in to place a sticker, or tag & embellish the centre .

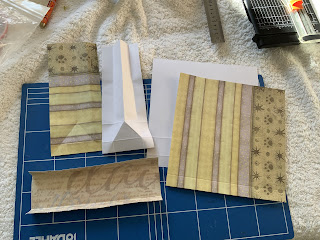
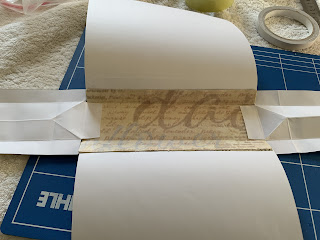
Here is the process for the step card using a base card that measures 11cm x 19cm 
Cut the card in half down the fold line
Pop out the die cut and set both pieces aside
Piece 1:- With the whole side score from the bottom of the card at 2.5cm,5cm,9cm and 13cm 
Burnish all the score lines 
Piece 2:- With the die cut side, fold in half. This will give you a narrow piece either side the die cut shape. Try to keep these even when you fold. 
Piece one has 2 steps and a 6cm back piece. 
Slide piece 2 over the front of the 6cm piece and see how the die cut area lines up 
Then before gluing the front 2 pieces together slide in the die cut piece in the aperture where it came out originally. As this piece of card is folded in half the die cut piece will sit proud
Glue the very bottom edge with a narrow strip of glue or red double sided tape and stick it in the aperture then glue the rest of the front down.
Do not glue the back as this form the back of the 3rd step. 
The card is now ready to decorate.


That was the cards and envelopes completed.
So I have a pack of 7 Birthday cards for sale and 4 individually wrapped Step cards. 

I still had a whole lot of kit left and so my next post you can follow me through my journey with this kit as I take you through the album I made.
 
Happy Crafting
Dee