Part 3 Using up the papers
Create and Craft Bear Card Kit
In my previous posts I used the cards envelopes and some of the papers.
Now I wanted to see what else I could make from he remaining items in the kit, to get maximum use.
What other items would complement the album?
A Gift bag to place the album in.
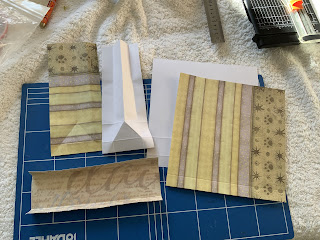
So I chose 2 matching papers and cut them down to measure 20.5cm square, this gave 2 pieces for the side panels measuring 8cm wide
From other scraps I had I cut 2 pieces 20.5cm x 8cm to make the bottom panel
I have shown gift bags many time before so check out my instructions for an 8 x 8 bag or look at a Sam Calcott video on how to make up pretty gift bags for your projects.
I will tell you that the base pieces I glued together to make a firmer bottom for the bag and then scored at 1.5cm along the 20.5cm side
The side panels I.5, and 4.5cm from the bottom turned and scored at 1.5. 6.5cm and then in the centre at 4cm I scored down to the first score line at the bottom.
As these are the measurements for this size A4 paper
 |
| All the pieces cut ready to assemble |
 |
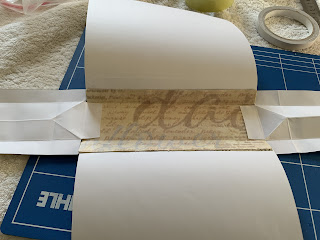
| Adding the front and back to the base |
 |
| Adding the side panel |
I use a wet glue on the base and to attach the side panels, Then when gluing the sides in place I use a double sided tape with a wet glue on top this allows some wiggle room and gives a strong attachment.
 |
| Glue the printed panel of the paper for the side gussets and pull the sides up to the line up with the top of the front and back doing one panel at a time. |
Rather than have a knot showing on the inside of the bag, I sellotape the ends down and then made panels to cover them, this also adds a little strength to the top of the bag
The panels were cream heavy paper and measure 20cm x 4cm scores at 1cm.
The bag used up 2 full sheets and 2 scraps of paper, leaving me lots more tags ribbon and papers.
Next I decided to make some Keepsake Envelopes
I love these large envelope folders for storing paperwork and they work as well to store baby memorabilia.
I made 2 full size Envelopes and 1 small one
The 2 full size used 2 sheets of paper for each while the smaller version used just one sheet
To make them more sturdy I laminated the outside of each sheet, this coating also allows them to stay clean and therefore wear better.
Whilst I was laminating the papers to make the envelopes I also laminated some of the stickers As many of the stickers are shaped the same, I put 2 together and laminated them to make embellishments and tags.
This left me a couple of sheets of papers and some ribbons. I will show you the last couple of items made with these next
Happy Crafting
Dee


No comments:
Post a Comment
Make a comment