Using Everything in a Card Kit
Part One Contents and Using the Cards
Here we are in September, I am in between summer crafting and really getting my Christmas crafts, and was looking for the next project. I have had a good summer crafting and found some great buys fro the summer sales as well as Ebay.
I recently purchased a Create and Craft Card Kit on Ebay, as I particularly liked the papers included and had some ideas for projects I could make. This particular kit has been around for many years and I have had parts of it before. It’s theme is Teddy bears and there are some cute papers and stickers in the kit.
The contents included:
38 cards and envelopes
43 sheets of A4 papers
9 sheets of sticky back ribbons with bears
9 sheets of embellished ribbons with buttons and pearls
19 sheets of embossed tags and topper stickers
As I did not need all the kit I decided to divide it into 2 and sell on the other half, which is now back on Ebay.
Items left for me to use were:
17 cards and envelopes
23 sheets of A4 papers
5 sheets of sticky back ribbons with bears
4 sheets of ribbons with embellishments
8 sheets of embossed tags and topper stickers
Now to see what I could make from these lovely papers, cards and stickers.
The first part I made up were the cards. Not all as I had a use for 5 of them so I made up the other 12. Now it should be said the one part of this kit that I am not keen on are the cards, not because the prints or quality of the card but because they all come with a section die cut out the front. As they are covered with a printed scene I struggle to find a design with the die cut part removed that utilises other parts of the kit without being “too busy” . Now this is a personal choice, I know, but I tried to keep the design simple, and with some I stuck down the die-cut section and did not remove it, before decorating the card.
Of the 12 cards, I made up 7, using the ribbons and stickers to add to the base card. The other 5 cards I started to experiment with a different design. I cut the card in half and took out the die cut piece, thinking I might try an easel card. This did not work as the section of the card under the die cut piece was too small to really make use of the front section of the card.
I then started to look at the 2 pieces and consider designs that would work with the shapes in front of me.
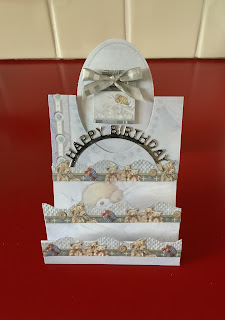
I came up with this step card design.
I really liked the way the borders can be added to decorate the steps and the die cut section popped back in to place a sticker, or tag & embellish the centre .
Here is the process for the step card using a base card that measures 11cm x 19cm
Cut the card in half down the fold line
Pop out the die cut and set both pieces aside
Piece 1:- With the whole side score from the bottom of the card at 2.5cm,5cm,9cm and 13cm
Burnish all the score lines
Piece 2:- With the die cut side, fold in half. This will give you a narrow piece either side the die cut shape. Try to keep these even when you fold.
Piece one has 2 steps and a 6cm back piece.
Slide piece 2 over the front of the 6cm piece and see how the die cut area lines up
Then before gluing the front 2 pieces together slide in the die cut piece in the aperture where it came out originally. As this piece of card is folded in half the die cut piece will sit proud
Glue the very bottom edge with a narrow strip of glue or red double sided tape and stick it in the aperture then glue the rest of the front down.
Do not glue the back as this form the back of the 3rd step.
The card is now ready to decorate.
So I have a pack of 7 Birthday cards for sale and 4 individually wrapped Step cards.
I still had a whole lot of kit left and so my next post you can follow me through my journey with this kit as I take you through the album I made.
Happy Crafting
Dee
.


No comments:
Post a Comment
Make a comment