Followers

Tuesday, 16 October 2018

12 Days of Christmas Day 7 - Teepee Card

Hi Crafters

Today is very different. It is a shaped card and colourful.
Called the Teepee Card as it stands up like a teepee.

Day 7 Teepee Card


It is very effective and yet simple to make. Also it requires no special tools so a great project to do if you are a starter, or with the children.
It also folds flat to post. 

You will need 
3 pieces of 4"  squared card stock, 180gsm or over 
1 6" square envelope
Fold each square on the diagonal

I have used the card in the pictures below as it shows the folds easily but you will want to avoid this style of pattern as it is too directional.


Next place two of the pieces flat on the table with the diagonal creases forming a pyramid 

Add the third piece diagonally in the middle lining up with the lines


Mark with a pencil where the card comes over the end and the sides as you will need to glue inside this section on the bottom two pieces of card
Take off the top panel, glue inside the pencil lines and place the top piece back on making sure there is glue all around the the edge 
The card will now fold up into a triangle 

You can either secure the back panel with velcro dots or glue it down and fold over so the card sits flat for posting


Now decorate as you wish. Here are other ones I did earlier (in the true Blue Peter fashion)
Hope you enjoy making these fun cards 

Happy Crafting
Dee

Monday, 15 October 2018

12 Days of Christmas Cards Day 6 More Star Cards

Hi Crafters

I said on Day 5 that I would be posting more star cards for day six, and whilst I may be cheating a little I hope you will see the benefit of using one die for a couple of different style cards.
You can do the die cutting in one go
You can use the blank pieces of card as layers (check out the star cut out card)
You can mix and match more colours when making your stars

Day 6 More Star Cards 
A)
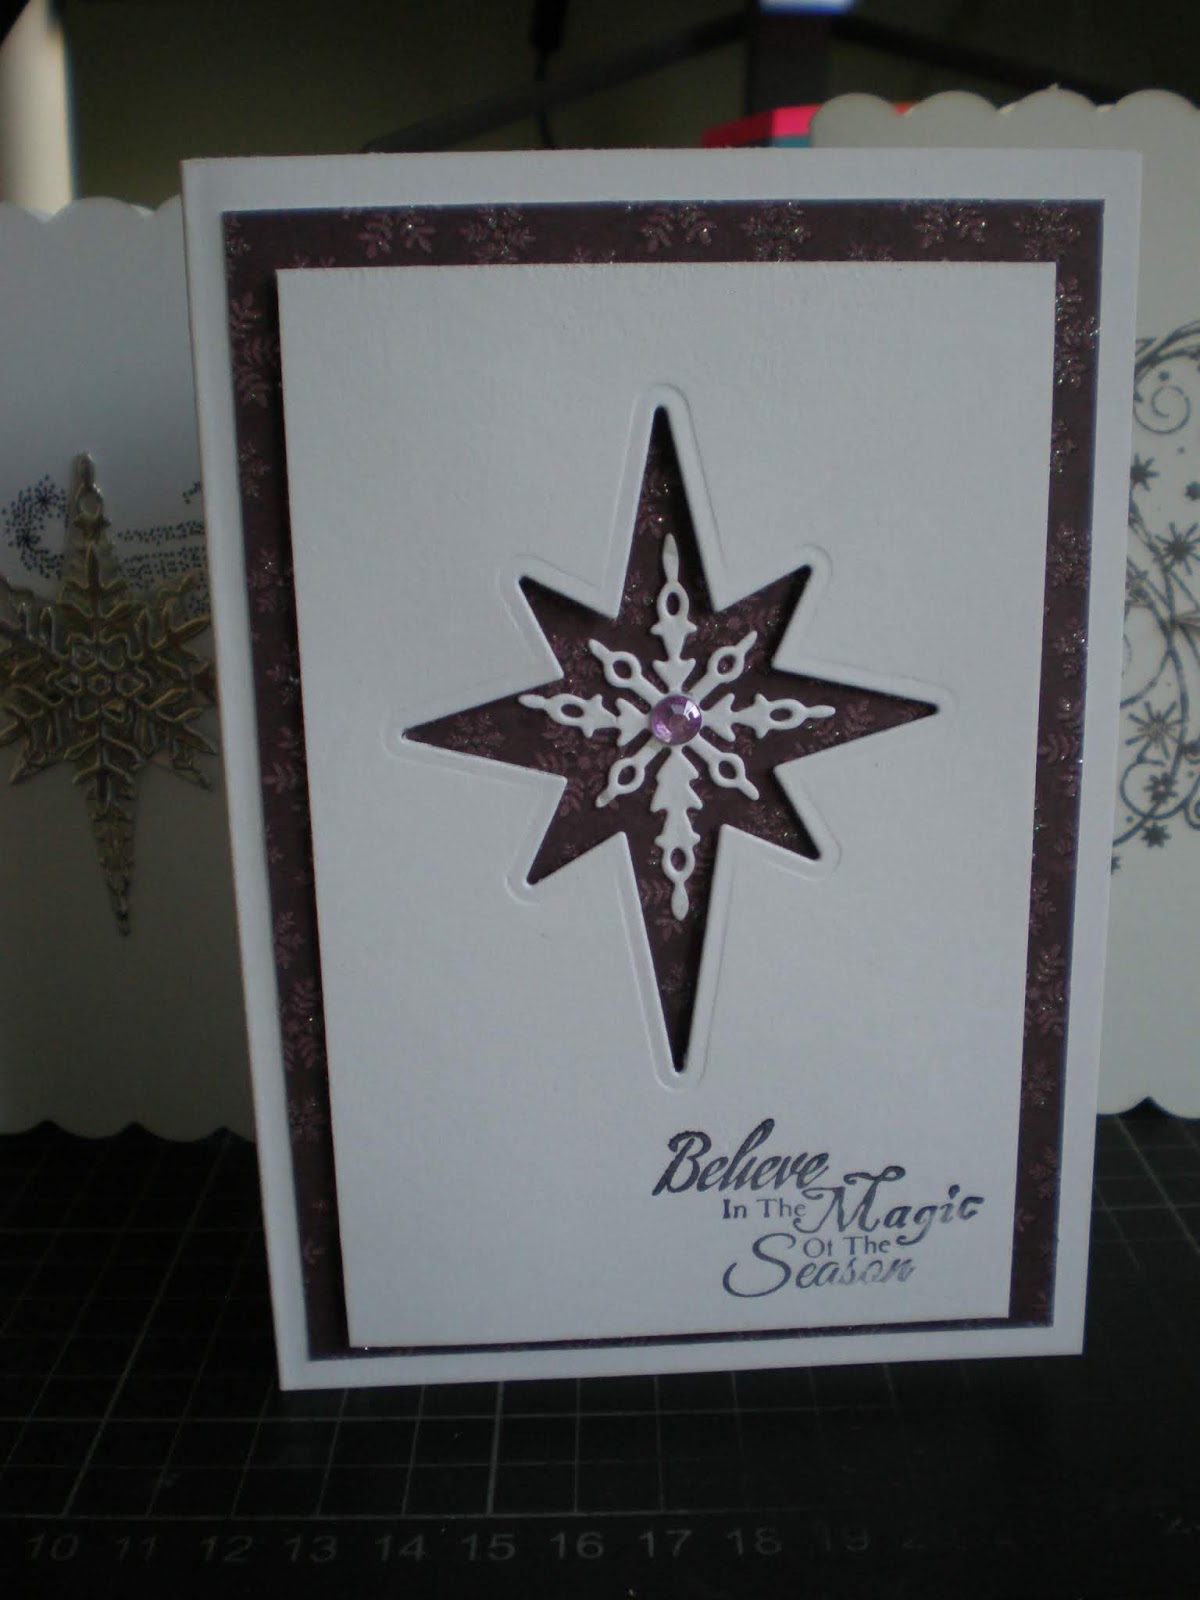
The first one was a happy find when making the original star card. I wanted a white base for a star and cut it out of a piece of white card I had in my scrap pile, seeing the blank card with the star shape cut out; the design just came to me, and I set about using the blanks and scraps from the desk.


You will need

A6 card and envelope (10.5cm x 15cm)
piece of white card 8.5cm wide by 13 deep
background card/paper 14 x 9.5cm of your choice and to compliment the white card 
Star die (the die will need concentric pieces so that you have a star that fits in the cut-out)
centre embellishment
sentiment stamp
  1. Place the star die on the piece of white card to a position you want the finished card I have centred it vertically and placed it to ward the top leaving room to stamp the sentiment in the bottom right corner.
  2. Cut out the star set aside the star for use on another project
  3. Stamp the sentiment
  4. Layer the stamped piece onto your background  using foam pads around the outside edge
  5. Glue this to your base card
  6. Take the smaller star and place in the centre use a fine tip glue to adhere to the background paper and add your centre decoration


Day 6 Panel Card
B)

This is my take on a design I saw on YouTube, and I have adapted the sizes to compliment this particular card

You will need
1 Piece of card 21cm x 15cm (half of a sheet of A4)
1 envelope for a 6 x 6 card
Star DIe (you could use a snowflake die or bauble die)
1 sheet of 6 x 6 paper for background so it should compliment the card and star colour you have cut
Mirra card to cut the star
Greeting stamp


  • Take your piece of card and score at 6cm, 8cm, 13cm, 15cm
  • Cut the piece of paper to 14cm x 15cm (take 1cm off one side)
  • Cut along the 15cm width 3 pieces,  2 x  5. 25cm wide leaving one piece 4.5cm  wide 
  • Cut the Star out and layer 
  • Using the 4.5cm panel stamp your sentiment at the base
  • Fold the score lines on your card to raise the centre piece  
  • Glue the 5.25cm strips to the outside panels and the 4.5cm piece to the centre of the card 
  • add the Star to the centre panel
You could decorate the sides with small bows or other sentiments.
Your personal greeting can be written on the back
The card will fold to go into the 6 x 6 envelope

Hope you are on your way to making your cards now 
Don't forget to keep checking back for more Christmas Card ideas

Happy Crafting 
Dee


Saturday, 13 October 2018

12 Days of Christmas Cards Day 5 Star Card

Hello Crafters

Well if Day 3 was my favourite die from last year, this is my favourite set for this year. It is so versatile, and easy to use. I will show you a few different ways of using it over the next couple of days, so if you like the set you will be able to make multiple cards very quickly.


My set is unbranded, but I believe Stampin Up do a very similar set. I bought several sets as I thought it was so good and we raffled it at the Craft Day I did earlier this week. You can make it with other star dies and swirls if you have them in your stash, but I just had to have the soft atmospheric swirl, although it took me a while to source this stamp so my earlier cards were made with another flourish stamp.

So here is the most simple card I have made with it. It is my favourite and I will be making it my main card this year.


Day 5 Star Card

You will need:
A Star die set
Swirl and greeting stamp
6 x 6 base card   (I told you it was simple)

Stamp the card with the swirl and message
Die cut a set of stars and layer up to make a 3D star 
Place on card and move around until you get the position you like best 
Fix to the card

Ring the Changes : 
  1. Cut the star from a bright mirra card and by layer it for a clean stunning finish
  2. Add a small snowflake die cut to the centre for a different finish to your star.
  3. USe different colour card for the fancy die cut and the base star die cut 
  4. Add some bling to the centre of the star
Hope you enjoy mass producing these as much as I did.

Happy Crafting
Dee


Friday, 12 October 2018

12 Days of Christmas Cards Day 4

Hello Crafters

Sorry it has been a few days since my last post. The Craft Day on Tuesday was lovely and everyone made 5 cards, a gift card holder and a pouch box. It was a lovely indulgent day of crafting with no interruption, and the weather was warm and sunny, so we were able to sit on the green at lunch-time with our sandwich.

So here we are with;

Day 4 Snowflake Card


You will need
Base card I have used a 6 x 6 scalloped card
1 piece if silver mirra card 14cm x 14cm  
1 piece of white card 13cm x 13cm 
Snowflake layer die mine is unbranded but you can use one in your stash or of your choice, the one I have measures approximately 9cm 
Greeting Stamp
1 diamante centre piece 

I have cut the layers first and cut the middle from the mirror card to cut the outer die 
Next I cut the second layer of the snowflake from white card 
Layer the Snowflake 
Then place the snowflake on the white card, eye where you wish  to stamp your greeting, remove the snowflake and stamp the card 
Centre the snowflake on the white topper card 
Layer this to the silver frame 
Add the complete piece to the base card
As you can see from the picture I have made the topper a little big for the base card but the measurements I have given you should rectify this so it sits in from the edge a little more.

Tips: Use the base snowflake as an ornament simple make 2 and put back to back with foam pads, punch an hole in one of the tips and thread a cord through 


Happy Crafting
Dee

Monday, 8 October 2018

12 Days of Christmas Cards Day 3

Hello Crafters

Here we are on Day 3 of the 12 Days of Christmas Cards. The project is certainly keeping me busy and focusing my efforts to design cards that can be made in numbers. At the same time I am tidying my computer files and adding the cards (and later the gifts made for Christmas) to the files.

Day 3 Centre Step Card


Sorry the picture is a little dark, as the day is dark and dismal and if I use a flash the mirra card reflects badly in the light.

For this card I have used the same 6" square scalloped base card
plus: a 12 x 6" piece of background card of your choice - I have used a turquoise and silver card
My favourite die from last year the Reindeer with Merry Christmas, it is so elegant and pretty at the same time, it is difficult to make a bad card with this die. However I cannot think of the brand as I bought it on ebay, but I have checked it out and as of today you can still buy this die on ebay.

To make:
Fold out the card flat. Put your ruler 1" in from the side and cut 1" from the bottom to 7" 
Turn the card over and do the same on the other side 
Turn the card and score from the outer edge to the cutter edge at 1", 2", 7" both sides 
As the card I used is pre-scored I do not need to score the middle section but if you are using plain card measuring 6" x 12" as a base card score the middle of card at the 6" line from the cut edge to the cut edge only 

You will then need to cut the following sized card or paper to cover your card 
1 piece 0.75" x 5.5" for the base 
2 pieces 0.75" x 4.5" for the sides and 
1 piece 3.5" x 4.5" this fits well for the scalloped card, so there is a margin around the layers. If you are using a basic card stock for your card 6 x 12 these should fit but always  measure the panels before cutting and adjust the measurements if necessary

Add your layers with a Pritt stick or glue of your choice
add dimensional tabs to the reindeer and place on the centre of the card 
Decorate the sides and base as desired I have used 2 snow flakes for the sides and a white ribbon 
on the bottom panel as the greeting is already there.
I will definitely be making lots of these this year. 

Happy Crafting 
Dee

Saturday, 6 October 2018

12 DAYS OF CHRISTMAS CARDS DAY 2

Hello Crafters

Here we are on Day 2 of the the 12 Days of Christmas Cards

Moving forward with my theme of die-cutting and simple lines, this card is a simple die-cut layered onto background card and them onto your base card to add dimensional interest.

Use your favourite dies and keep it simple if you want to make multiple cards from the one design
My theme this year is the traditional outdoor Christmas, with trees, Polar Bears and stars and snowflakes.

Day 2 The Christmas Tree 


For this card you will need:

  • 6 x 6 card & envelope
  • silver mirra card cut 14 x 14cm square 
  • white card cut 13 cm square 
  • 1 die cut fancy tree - i cannot remember is this is 'Tattered Lace' or' Sizzix' but you can use your own favourite
  • pearl embellishments


 Simply layer up the tree onto the white card and then onto the mirra card 

  • You can see in picture 1 I used smooth card for the white background and stamped a greeting in the top right hand corner. Lay your die cut onto the card and before adhering with dimensional foam,  stamp your greeting and then add your tree.


Tips: You may need to cut your dimensional foam pieces very small if using a lacy tree die. Make sure your foam adhesives are good quality and you will not need too many to get the raised effect you want, by cutting the tape into small pieces you can hide them in the wider parts of the tree.

In the second picture I have embossed the background white card with small dots and with this card you will need to add a greeting stamped onto a separate piece of card 


This picture shows an added greeting , and I have used another die I have. This die is smaller so I have cut the background card & mirra card to go with the size of the die, It still sits on the 6" x 6"  card, you just need to decide on the position of your layers.

Check Back soon for more Christmas card ideas

Happy crafting
Dee

Thursday, 4 October 2018

12 Days of Christmas Cards Day 1

Hello Crafters


I hope you are all getting ready to start your Christmas Card making, I know crafters out there who make for Christmas Fairs have probably finished now, but this series is for all of you who keep saying you are going to get around to making all your cards this year and have never quite managed it.

You should start by sorting out your Christmas craft stash and taking a good look at what you already have. I have packs of 6" square scalloped cards in white and cream and decided these would be my base card for my makes this year, as this would simplify things.

Then decide a theme for your Cards this year. I have done this by selecting my favourite dies, stamps and embossing folders and letting them fuel my imagination for the designs I am going to use.

You may wish to then set yourself a goal to the number of cards you wish to make and the amount of different designs to use bearing in mind every new design will add production time as you start the process anew for each new layout.

I soon realised that by deciding on mainly die-cutting designs I would be able to produce quite a few cards in a relatively short time. 

The 12 days of Christmas Cards are the designs I came up with once I decided the materials I would use, and I hope they will inspire you to get your stash out and start crafting.

Here is a really simple design to start Day 1


This card uses:
1 Scalloped card white 6" square or 15cm
1 piece of mirra card 14cm x 11cm
1 piece of white card embossed using a 'Crafts Too' embossing folder 13cm x 10cm
a few gems 

The size of the embellishment was decided by the size and shape of the embossing folder

When making in numbers 
Cut all your white card to size and emboss 
Cut all your mirra card pieces 
Take out the number of cards you require based on the number of embossed pieces you have cut
Layer using a wet glue I used Pritt stick 
Then add your gems 
To make another look use chalks or (if you prefer distress inks) to lightly colour the surface
Or add a white or silver bow to the left corner 

Tips: 
  • If you follow the sequence above you can put your embossing machine and cutting tool away ready to compile your cards, giving plenty of space on your craft desk
  • I cut my mirra card centre out to use on other projects for a thrifty use of mirra card which is the most expensive item used. My embossed card sits on a frame of mirra card
By making a production line of the process you can make 10 cards an hour in this simple and effective design


Thank you for stopping by and look out for Day 2, coming soon.

Dee