Followers

Monday, 28 December 2020

Tidying the Craft Room Scraps

 Hi Crafters

Well this is traditionally the time of year we get to tidy away all the bits in the craft room. Time off from work means we can finally put away all the things we used to make and decorate the presents.

I constantly tidy up my scraps and like most crafters hate throwing anything away, so I get them organised into usable sections

Largest pieces in one poly wallet and then 6” pieces. As well as these I keep long narrow strips and anything metallic or fancy finish. I also have a poly wallet of black, white and cream card.  All these are then stored in one canvas bag that sits under the craft desk, with the idea of going to the bag  first to see if I have appropriate pieces. This rarely works out in practice as we start a project with an idea of what papers we are going to use and the end result is usually more scraps rather than less. So at least once a quarter I get the bag out and make things from the scraps. My next couple of blogs are going to give you ideas of projects to use up the scraps, starting with folders, mini albums and pockets that are made from larger scraps.

Here are the items made in my latest tidy.


In the top picture there are 2 small folder wallets, 2 double pockets and a small concertina file.

Most of these were made with 12” strips folded. I will show you how i made the concertina file.


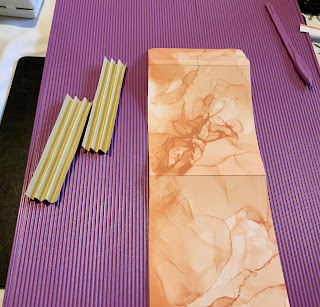
The first picture shows the 2 pieces of scraps used to make the file. The peach sheet measured 12” x 4 3/8”  and this I scored at 5”, 10 1/8, 10 1/4”, 10 3/8 and then cornered the end.
The second strip measured 12 x 2 1/4” and this I cut 2 pieces at 4.5” along the narrow edge i scored at 3/8”, 3/4”, 1 1/8” 1.5”, 1 7/8” and then folded them for the concertina side panels. As in picture 3.
These 2 panels are then glued to the bottom section of the large piece and a half circle cut in the base line
I used double side glue throughout the project for speed. 

We finished up with a useful file 5” high by 4 3/8” wide that will hold several pieces of cards such as addresses, recipes,receipts, bills etc

The second picture shows 5 money envelopes
6 notelets approx 2.5” x 2”      Ideal size to slip into a pocket or packet to leave a special message for someone
5  notelets 3 x 3” these are useful if you want to just say a quick Hello or Thank You note
1 wallet
3 pockets 
2 double pockets.    Pockets can be used to store receipts etc or to add to pages of journals or mini albums

Apart from these makes i managed a very cute mini album from these scraps 
This was made by gathering 6-8 pieces 4” x 12” and folding in half and then building the book with the hinge system. I then used scraps of cream card to make the photo mats, some narrow pieces of pretty card for the phot corners and other scraps to cover the pages and make pockets 


I really enjoyed making these items up and they are ready to send out as Happy Mail to friends and anyone who purchases my items on Ebay.

Back soon with items made from smaller scraps, so keep tidying, sorting and storing your scraps and be sure to check in again for the next list of ideas.

Dee

Sunday, 13 December 2020

Christmas Crackers for All

 Hi Crafters

Well December is marching on. Still we are unable to meet with family and friends and Christmas is going to look very different this year

As a member of my local Women's Institute I have been lucky to have the friendship of other members throughout the difficult months and lockdowns. We have had walks and kept in touch with each other, and once the summer was over the committee decided we wanted to give back to our members  during the coming months when we are unable to meet, but still have membership to the organisation.

October we delivered to all members a cheese supper with scones cheese and chutney.

November we produced our own magazine with news from members, County and National, along with recipes, a prize quiz and craft makes, and a tongue in cheek Problem Page.

December we wanted to give everyone a small box of Christmas goodies and decided to present them in a Cracker. So I set about checking out the cracker templates available on YouTube until I found one that I liked and could adapt for the size we required. However making a Cracker large enough for the goodies meant the presents needed to go into a box, or they would be in danger of falling out. So I made a box that fits inside the cracker. I then set about cutting  and embossing the sheets of A4 card for the box and the 12 x 12 sheet of card for the outer Cracker. We have 27 members and were looking forward to getting together to complete and fill the boxes and crackers with a glass of mulled wine and mince pie to keep us going. Unfortunately Lock-Down meant we were unable to do this so Gill and I shared the job of making them up.

And here they are...


The decorations were quite different from the 2 makers but that just added to the interest. The Crackers were then divided up amongst 4 of us for the delivery to members on Thursday 10th December, which would normally be our meeting day. 

If you would like to make these for your family or guests over Christmas here are the instructions for the Cracker and Box 

Requires:

1 sheet of 12 x 12
1 sheet of A4
Ribbon
Outer Decoration
 
For the Outer Cracker
 
Take the 12 x 12 and score @
1 7/8”, 3 ¾”, 5  5/8”, 7 1/2” , 9 3/8” , 11 ¼”
Turn and score both sides @ 2”, 2 ¾”, 3 1/2”,
Fold and Burnish all your score lines
For the 2” side fold concertina style and cut a V notch at each of the down score lines This gives fold lines to shape  the crackers ends
 
For the Box inside:
 Cut the A4 card to 10.5” long and Score @
1 ¾”, 4 ¼” , 6”, 8 ½” along the 10.5” side
Turn and score 1 ¾” both sides of the 8.25” 

Fold up and cut in the side panels to the score line to fold into a box
Cut the top corners off.

I would love to see any of your crackers 

Happy Crafting
Dee
 

Sunday, 6 December 2020

Something for Nothing

 Hi Crafters

Today I have something different for you to try. You need nothing more than toilet paper, water, embossing folders and your favourite dies to make 3D embellishments and toppers

Take 4/5 pieces of toilet paper and fold them over. As you are folding spray the paper with water, and let it get absorbed into the paper as evenly as possible but not too wet

Take an embossing folder and place the dampened paper into the embossing folder and put through your machine, I chose a snowflake folder as I wanted to use it for Christmas shapes.

Allow to dry and then use the paper to cut out your shapes.


You can then decorate and use the shapes as they are as they make great embellishments, with lovely dimension, not flat like card. 


I would add these to cards or parcels 

Or layer them with your glue gun or silicone glue to make 3D toppers 


Here we have 2 flat bears and one that will actually stand up as the centre points have been glued leaving the legs to spread and make a standing position.

These die-cuts are not only good for Christmas shapes but lovely for flowers and butterflies as the paper can be delicately coloured while the paper is wet, for a subtle, soft look. 

This is a quick craft session and suitable to try with the children. You could even make bunting with the cut out shapes, or if using snowflakes or small die cuts why not add them to some sparkling ribbon and drape around the tree.

Stay safe and enjoy your crafting.


Dee 

Thursday, 26 November 2020

Great Last Minute Gift Idea

 Hi Crafters

Today I have one of the quickest boxes to make, and an idea to use it to make a great last minute gift or super gift for a work colleague or Teacher.


For this project you will need 2 pieces of 12 x 12 card

Ribbon

4 medium size Scented T Lights

Take one sheet of the 12 x 12 and score 4" and 8" on both sides so you have 9 squares. Now score from each corner to the corner of the centre square.Cut the corners on the diagonal As below 

With the 2nd sheet we are going to make a lid to fit, as this base is 4" we need a square of card that is 81/4" square. Score at 1" and 2" all the way around and cut the ends top and bottom for a standard lid. If you are not familiar with this please see the example below. Cut the shaded areas off and put small V notches into the edges of the folds.


Burnish all your score lines. Fold in the sides and glue down the glue the top and bottom flaps on the outside of the card and the top and bottom seams on the inside of the card. Fold the flaps in and the top over and glue down. The same for the bottom section 

Using a hot glue gum glue the base of the metal T Lights to a section of the base, and add a message to the centre panel. 


Wait for the glue to set really well before folding up and placing the lid on top. Decorate the with the ribbon and add your tag. 

Look back soon or please subscribe to be sure to see my Christmas Crafts.  

Dee


Sunday, 22 November 2020

Self Closing Pouch Box

 Hi Crafters

Well the run up to Christmas has begun.

So today I am revisiting one of my early boxes.

It is simple to make and can be made any size that you have paper for. They look good as Table favours when made from 6 x 6 papers, and here I am making them for a larger gift such as Toiletries.

You will need 2 pieces of 12 x 12 


Piece 1

Cut 8” wide by 12” long

keep the 4” piece and cut into 3 4 x 4 pieces

With 8” side to the side of scorer score at 2” and 10”

Turn and score from the bottom to bottom score line at 4”


Piece 2

Cut 9” wide and 12” long

Score ½” both of the long sides ( so with the 9” side at the top)

Turn and score at 2” and 10”

Again turn and score bottom to the score line at 4.5”

Cut the ½” sections off the bottom up to the 2” score line


Fold over the bottom section put on the score board with this at the top of the scoreboard, and place your score tool on the centre score line at the 2” mark. Holding the card in place with the scorer, turn the card until the outer edge at the base is on the same line, (I use the 6” line on the scoreboard  to line up)

For the wider piece take the diagonal score lines to the edge of the 1.2” score line


Burnish all score lines

Fold in the ½” side panels and add tape to the top

Place the 8” piece on top, lining up the sides as carefully as possible

Fold over the bottom flaps forming a square, glue down

You then place one of the 4” squares over the bottom.

Glue another square and slide it inside to firm the base even more   

These can be stored with the bases not stuck down, for use when required. They stack well flat 


Make them in advance. They make great boxes to give gifts to colleagues and friends.

Back soon with instruction how to make a last minute gift that is so simple.

Dee

Tuesday, 17 November 2020

Making the Most of your Stash

 Hi Crafters


Sometimes the ideas for crafting are not about making a card from scratch or reproducing a card you have seen on YouTube, Pinterest or one of the Craft Channels, they are about checking out what you have in your stash and finding a new way to use the materials. It gives me great satisfaction when i re-purpose something and increase it's use. 

Today I want to share what I have made using Christmas cards I had in my cupboard. They were bought cards that I thought were a great design, and that had potential.


This card is from a box of 10 cards sold in aid of NSPCC, a lovely red front with board card stamped with the greeting that you can see through the branches. 

I can use the card like this or I can send them as an easel card. To make this I have stuck down the opening of the card allowing the greeting to show through . I have then used a sheet of card stock to make the easel card base and added a greeting section at the base of the easel card.


And lastly I have use the card to make the lid of a box.

The box base can be made from any of your stash, and then cut the card 1cm down the back, and score the right side of the card by 1cm. With the back piece of the card trim the other side  by 1cm to make it even.

Attach the front of the card with double side tape, using the 1cm of the back as the hinge. You may be able to make out that I rounded the closing side, that was just my preference. Glue the greeting to the bottom of the box so you can see it through the lid, this way when the gift is lifted out the greeting will be seen by the recipient. 


Above the box is closed 
You can make out the rounds flap on the right side


To the right the box is open and the greeting can be seen in the base. This would work very well with a plain base in gold or black as well as the Christmas paper from a First Edition card stack, that I have used 


I have also used cards from kits to make gift boxes. This picture below show a large card from a Create and Craft card kit, I has used the kit to make many different things (see previous posts from last years), and with 10 or so cards left I decided to make them into gift boxes. You an do this by opening up the card flat and then scoring 2cm down the right side of the front of the card and 2 cm from the middle crease on the back side of the card and then 2cm top and bottom. 

This gift box fits a large bar of chocolate perfectly , and I have decorated it with some of the leftover embellishments from one of the other Create and Craft card kits. 


 I hope this has given you all some ideas to use up those odds and ends you have in the craft boxes

Happy Crafting

Dee


Monday, 9 November 2020

Exploding Christmas Card

 Hi Crafters

Sorry it has been over a week since my last post, I have been busy putting together a small magazine for my Wi, as we are trying to keep in touch with members during the lockdown and give something to members each month that shows we continue to be an active Institute even if we cannot meet up in the conventional sense. 

October we delivered a cheese scone supper to all memebrs and this month we have produced a magazine with greetings, recipes, crafts and a Prize Quiz.

So just a quick post to show you how I have used the Exploding Card I posted on 24th August to produce some very different Christmas cards for family and friends this year.

Instructions to make the card can be seen on the August post, and here is the Christmas version.


The middle picture show the 2 cards folded ready to pop into an envelope while the 2 either side are the finished cards. The greeting can be written on the blank card at the base.

As you can see I have made these smaller than my original Exploding cards as I wanted the Christmas cards to be understated but still cute and colourful.

Back soon 

Dee


Sunday, 1 November 2020

Shabby chic Butterflies from book pages

 Hi Crafters

Project 2 of Recycled book pages

Today I have some more recycled projects.

Having decided to use one of my paperbacks for crafting, I took out several pages and tidied the edge ready to use for projects, my previous post was project 1, a Rosette, and today I am going to share some butterflies I have made. 

I started with very basic butterflies some design papers and some book pages to give layers. Whilst I was happy with the end result, I wanted to try other styles and decided to use my distress inks to colour the wings and just use book pages.


Lastly I used a die to cut several layers of butterflies and marked the wings by stamping onto the top layer and also colouring the top with inks. These are more styled and less shabby chic


So we have 3 styles of butterflies from simply cut, to die cut, stamped and coloured. All different looks, all use recycled pages. You do not need any equipment for the basic butterfly cut-out, and the finished item can be made in all sizes to decorate cards, gift boxes or even interior design settings. Imagine large butteflies hanging from the ceiling of the childrens bedroom, or simply used as a mobile. Back soon with more recycled pages, next time it will be paper purses and pockets for your journals.

Dee

Sunday, 25 October 2020

Shabby Chic decoration from old book pages

 Hi Crafters

I like to read, and have revisited reading regularly since lockdown. Most of my books are from Charity shops, and I then recycle them, I also look out for books that I can use specifically for recycling with craft projects and music score books are particularly good should you find any in your local Charity shops.

Today I would like to share a recent make.


Shabby Chic Rosette Decoration

This is made using 2 pages from a paperback book
A vintage Christmas picture
Lace

Cut 2 pages to 3” wide (these pages were approximately 10” tall)
Score every cm, or half inch, whichever you like to use, and fold back and forth to concertina the pages
Join the 2 pages together. It gives a neat finish if you glue a mountain fold over a mountain fold to secure the pages together. Then join the 2 outer edges in the same way. I use Pritt Stick for this stage.
With your hot glue gun press the folds gently into the middle, place hot glue in the centre and hold until secure
Decorate the centre adding a piece of rope or string to the back of your decoration to hang the item when finished.

Imagine these decorating the Christmas tree or mantel 
You can make them all sizes and decorate with any centres, old buttons, small paper doilies etc.

Back soon with more Book recycling projects 
Dee


Sunday, 18 October 2020

Gift bag/Folder

 Hi Crafters

Whilst we are unlikely to be able to attend any craft fairs this year,I have been conscious of keeping my packaging to a minimum so that items that can be sold on EBay or Etsy do not have to pay parcel postage costs. This is especially important for card crafters as anyone purchasing an item under £5 is reluctant to pay £3.10 postage. 

I am making my items into bundles and also reducing the size wherever possible.

For this years Craft Fairs I had purchased some lovely scarves with the idea of making some pretty gift bags and boxes to go with them. The buyer chooses a gift bag, and a scarf for a set price. The boxes were made quite chunky so they could be recycled for even better value, and the scarves were covered with tissue paper. Unfortunately to sell these on Ebay or Etsy would cost £3.10 parcel post. So I set about designing new packaging and came up with a gift bag/folder. The scarf can be presented in the pouch and the recipient can then use it as a stationery folder for bill, receipts etc. 


To make the folder you require 

1 sheet of 12 x 12 card

A popper setter

Strong double sided tape or glue

Cut the card into a piece 9” wide by 12”, leaving a piece 3” which you cut into two pieces 4.75” Long, leaving a small piece you can use for a tag

With the main piece score it along the 12” side at 4.75”,5.5”,10.25”,10.3/8”,10.5”,10.5/8” these tight score lines forms a folding flap.

The two pieces for the side score at .75”,1.5” and 2.25”, giving it 4 section fold in half and then back into the middle so you have a concertina fold with the pattern showing out, tape both sides of both pieces

Fold and burnish all the folds on the large piece and you folder will form it’s shape. Trim the top corners and mark the centre of the top flap with a pencil approx 1/2” from the top, make a hole with your pokey tool or a cocktail stick. fold up the other end and Line up the sides of the folder, put your pencil through the hole and mark the underneath (which is the front of your folder) make a hole where the pencil has marked the spot and add your poppers where you have made the 2 holes

Open the folder out (you will be viewing the inside) on your desk. With the side pieces, line them up at the side of the base of the folder, the folded edges outside, and stick down to the base. Next lift up the base section and line up with the back of the folder making sure it is under the line of the flap, and then stick it down.

Your folder is now ready to use as a gift bag and you can decorate it any way you wish. I will just add a pretty bow and label. 

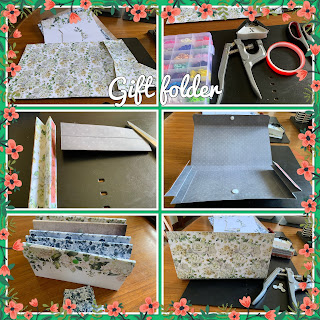
Here are the different steps for this project.

Top left: the card cut and scored

Top right: popper set and tools used for make

Middle left and right: the side panels taped and positioned

Bottom right: the poppers position

Bottom left” 5 folders completed ready to use

I am now ready to sell my scarves on eBay with pretty packaging that won’t cost too much to send.

Back soon with another idea for using your left over Christmas card kits to make gift boxes. 

Happy Crafting 

Dee.

Friday, 9 October 2020

Laminated folders and pouches

 Hi Crafters


Today I have a fun project and one that would make a useful gift for anyone. We all use storage folders to hold our bills, receipts, notes etc, and these are laminated for harder wear. 

It was fun to do some masculine styled projects. I have used a DCWV 12 x 12 paper pad. I love the bold prints and retro look to the papers.

Fist I made yet another gift bag, I seem to have to make one from every 12 x 12 pad I open. Then I decided to do some laminated projects, and thought it would be good to make a couple of sets for the men in my life. 


This is a quick and simple project  and you could use up any odd sheets of 12 x 12. I am giving instructions on using 2 sheets of 12 x 12 as it is the most economic way use of papers and laminating pouches. You will get 1 folder and 2  pouches and even a small card holder from 2 sheets

You will need:

2 sheets of 12 x 12                                                                                2 A4 laminating pouches                                                             Either some sort of popper set or you could use velcro dots.

Cut each sheet of 12 x 12 the same way

1 piece 7.5" by 12" leaving a piece 4.5" x 12" 

With the pieces cut at 7.5" wide cut them both at 8" ,this will leave you 2 pieces measuring 4" x 7.5".With one of these pieces cut a 1.5" x 7.5" strip to make the flap of the folder and one piece 1" x 3.75" (this will make the flap for the card holder. 

You will also have 2 pieces 4.5" x 12" and these you cut into 2 to make the 2 pouches.

Plug in your laminater, and while it is warming up place the 2 folder pieces right side out and slide them into the sheet making sure they are exactly even all the way around, place the 1.5" strip ( you may like to curve the top corners with a corner punch) into the folder, placing it 1/8" above the other pieces and with the right side down.

With the 2 pouches place them outsides showing and lay them side by side in the laminating pouches .

When your machine is up to temperature put the 2 pouches through keeping them straight.For the folder cut around the shape leaving 1/4" gap to secure the seal. Now lay flat on your crafting surface and take a sharp pointed craft knife and nick into the top of the folder where there was a gap for the flap, there will be a natural air pocket here and your knife should slip into it. do  not press down or you will  go through both sides. Once your knife has found the slit, slip it along the width of the top of the card, this will form your folder.

 Happy Crafting

Dee


Tuesday, 6 October 2020

Making your own Tassels

 Hi Crafters


Today I thought I would show you how I make my paper tassels to decorate my bags and boxes.

I have done these before but I saw a great tip the other day, where the tassel had a strip of metallic tape added to the base of the tassel before cutting and this gave a lovely finish to it making it glitzy.


Take a piece of paper 9" x 4" You can use patterned paper or even upcycle a sheet from a magazine. I like to fold down the top by 1/2" to make it a little stronger . Place a 1cm wide strip of metallic tape along the bottom edge. Cut up to within 1 1/4" from the top so the paper has the frilled look all along it. Fold down the top by 1/2" and place a piece of strong double sided tape along the folded edge, it is better if the tape straddles the folded edge.

Place a piece of ribbon or string at the top left hand corner, with the ribbon loop above the paper . Use a cocktail stick or pokey tool to wind up the edge, roll a little way along before taking out the stick, continue rolling it tightly around to form your tassel. Make sure the edge stays straight and the winding is tight, add a little extra tape at the other end to make it sit flat when you have finished rolling it.

If you like you can add another strip of metallic tape to the top of the tassel. 


These are some of the first tassels I made from magazine pages and these has washi tape along the bottom edge 

    
Here is the new version of the tassel made with the metallic edges 


Her it is added to a gift bag.
I think it finishes off the bag well , and can be made using papers that coordinate or even papers from the same pack.  


I have enjoyed making all of these tassels they are simple to make and would make a lovely item to add to happy mail envelopes, or box up with some other hand crafted embellishment for a craft friend. 

Why not purchase some pretty wrapping paper and make some tassels with a piece of the paper and then gift the set to a friend or Teacher, we all need gift wrapping and this takes some of the work off a busy person.


Happy Crafting

Dee


Saturday, 26 September 2020

Version 2 of the Big Bag

 Hi Crafters 

When I shared the large gift bag that Sam Calcott showed on YouTube, I mentioned that I would be making my next lot with 2 handles. This bag measures 9" x 12" x 3", a very useful size as it will take a jumper, collection of cosmetics etc

As promised here are the pictures of the new version

Version 2 

You Need

2 pieces of patterned 12 x12 

1 piece of coordinating 12 x 12 (plain is good) 

Check out the instructions to make up the bag from my previous post, with the exception of the plain 12 x 12 which should be cut into 3 strips of 4" x 12". Use 2 of the strips for the side as previously.

Once the main body is made, take the 3rd strip and cut into 2 making 2 pieces 2" x 12". Score each at 3/4" . You will need to take off about 1/8" off one end so the folded piece fits nicely over the top of the bag

I like to trim the corners before adding the piece. tape and glue the panels and fold over the top of the bag with the wider side over the front. It is easier to do this by placing the fold over the top and then firming the back down first and then the front. Run your bone folder over the front and back to secure. 

Mark the panel about 3" in from both sides and make your holes. Fold the bag together and make holes the other side so they line up. Add your ribbon and knot at the back to secure. 

Here are my makes: 


I love these and I am busy making more for my Etsy shop and for Christmas as well as other sized bags I will need to make some with more masculine card stock as well, so lots to do in the next few weeks
As all the bags I make fold flat I can store them easily. 

Hope you have a go and as always I would love to hear from you and see any of your makes.

Happy Crafting 
Dee


Tuesday, 22 September 2020


Hi Crafters

Today I am sharing my own designs for a Gift Box & Bag from one piece of 12 x 12 cardstock 

For this project you will need:

1 sheet of heavier cardstock 12 x 12

Ribbon

Start by cutting the 12 x 12 in half                                                       If it has a pattern you want it to remain vertical so cut at the 6” line on the vertical.

For the bag:

  • Along the long side score at 1.5”,5.5”,7”,11” 
  •  Turn and score at 1.5” (this is the base of the bag)   
  •  Burnish all the score lines 
  •  Along the bottom cut off the right hand side section up to the score line This 1” section is the edge that will join the bag together        Cut up the other score lines and nip a little either side to form the base of the bag  
  • Glue or use tape down the side seam and join together               Fold up the bottom tabs and glue in place for the base of the bag, ensuring they line up and keep the bag square
  • Hot glue and add handles, or make holes in the top of the bag and thread ribbon through knotting them on the inside to hold
  • Pinch the top together and run down the sides until it folds over flat for storing
  • I decorated my bag with a bow made on my bow-maker
  • The Box
  • For this cut 1” off the width of your card leaving a piece 11” x 6”
  • Score along the long side @ 1.5”,5”,6.5”,10”
  • Turn and score 1.5” either side
  • Fold and burnish all your lines
  • I clip all my corners with a corner punch but you do not have to do this
  • Cut up the side score lines to the first score line Using the 1.5” marked section as the front of your box fold the box up folding in the flaps as you go.

If you want the box to be opened multi time just fasten with a ribbon, as I have. If it is to be used once you can glue the sides together and leave the top flap free to add the present before gluing it down into place.

 You could make lots of these bags in Christmas card and decorate for hanging and placing on the tree.

Or decorate them with guests names and use as place, settings as an alternative to crackers.

Happy Crafting 

Dee