First Blog of 2023
Recycling your Christmas Papers
So by now we have all taken down our Christmas decorations, Christmas cards and packed away our gift bags and wrapping that the goodies came in. But don’t let it all sit in the cupboards for 12 months, lets start now to re-use and re-cycle some of these items and then store them away.
I am sure we have all recycled our cards into tags and new cards, check out my posts for January 2022 to see other ideas such as
Christmas Planners
Brag Books
Gift Bags
Gift Boxes
Sticky Note pads
Here are my ideas for this year
Using last years Calendars
It does not have to be just Christmas cards we think about recycling, and my bird calendar for 2022 has been turned into Notelets with a matching box or folder
I cut the pictures from the calendar before setting them down to have a good look at size and structure for each picture. As I wanted to make Notelets using A6 cards I noted the pictures would cut better to use width ways. As A6 cards are 6” x 4” I cut each picture to 3.25”H x 5.25”W and cut layering mats in gold at 3.5” x 5.5” before placing them on the cards.
I then made a folder for them using one sheet of 12 x 12 and covering with an owl picture that i fussy cut .
My cards sat perfectly in the box and I had a set of notelets made from the calendar that I would normally have binned.
Idea 2 for this Years Christmas items
Making cards from a Christmas Gift Bag.
Often the gift bags themselves are very pretty and finished with a good gloss, and they do not always recycle with the paper products too well. So cut them up and make 6 Christmas cards for next year. You should be able to cut 3 from each side (perhaps more ) and mount them onto your base cards.
Idea 3
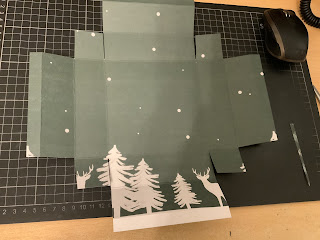
This does use cards but not rehashed as cards. I have selected a couple of favourites to make a great gift box 5” square and 1.5” deep it is large enough to take a lot of different gifts.
Body Care products, scarf, chocolates to name a few.
This has been made with
2 sheets of 12 x 12 Double sided card I have used First. Edition Christmas pad.
Sheet 1
Score on all f
4 sides at 1/2”, 2” , 3.5”
Fold and burnish all your sides
Glue the left and right scored areas first ( not including the corner square)and hold together the 2 1.5” sections with the 1/2” outer section edging the main centre square.
Now glue the outer sections of the square and the inside of the top and bottom panels, folding the 2 1.5” sections over the glued squares and lining the inner square with the 1/2” panel
Glue the base of the box and stick it onto the first section of the scored sheet, glue the back piece onto the next section, leaving the next section to act as the lid.
Next the fun bit, choose the cards you like and cut them either 4.75” square or 5” square depending on what border you want, before adding them decide on your closure. A ribbon pull can be slipped under the piece of card layering the inside of the lid, while a magnetic or Velcro dot fastening will require a flap to be attached under the lid.
Happy Crafting
Dee


No comments:
Post a Comment
Make a comment