Followers

Wednesday, 27 February 2019

Woven Ribbon Gift Bag

Hi Crafters

I am currently busy putting together my items for Craft Day on the 23rd March, but as usual I was waylaid by something I saw on YouTube.

This lovely unusual gift bag.
So a big thank you to "Mixed Up Craft" for her great tutorial on YouTube

I am not going to give instructions as the video is much more helpful than written notes.

Just to say it takes 3 sheets of 12 x 12. In the video the paper used come from a Trimcraft paper pad, I have used First Edition, but you can use any from your stash.


I used a velcro dot fastener. and added a matching bow to the front flap 

It took about 2 hours from start to finish and I was learning as I went along, plus folding washing and admiring hubbbies progress with the tiling, so the next one should take about an hour . I am very pleased with the finished item and I will make it a little stronger in the base with a piece just under 3" x 6". No doubt I will be making more of these as I need them. They do not fold so take up  a little bit store room. Ah the joy of being retired I can make as I need it. 

Happy Crafting 
Dee

New Flower Collection

Hi Crafters

Something a little different today. A box of origami flowers. These are called Kusudama flowers. I sit folding them in the evening and them put them together with the hot glue gun when I have a few ready. It takes 5 petals per flower.

This is my first attempt to make then in the basket but I will be making more for personalised gifts, as they would be great for wedding anniversaries or Mothers Day gifts etc.


I also like the idea of using old book pages and recycling wallpaper. Although the wallpaper is more difficult to fold, they can be decorated with buttons from your button box to make a very eco-friendly gift, using mainly recycled materials, that would otherwise be discarded.


When I make the next couple of bouquets I will post the variations for you to see.

Happy Crafting
Dee

Thursday, 21 February 2019

All from 1 sheet of 12 x 12

Hi Crafters

I was checking out YouTube the other day and came across a pretty little triangular box, which with Easter coming up I thought would be useful to give little chocolate eggs or some jewellery as an alternative. So I made the box (It is a Stampin Up idea).

I then got to thinking about the card left over as the box requires 7" cut from a 12 x 12 sheet, and thought why not make a matching card. Then when making the box you cut off 4 sections and I thought why not add a tag so then I had a cute little set all made from one sheet of 12 x 12 stock.


There is also enough card to make the bellyband, to make the decorating simple and close the box securely. 


I love these little sets and think they will be great for all sorts of occasions.
I will probably add this to my list of demonstrations as it can all be made in about hour and 15/30 minutes.

Must go now as I have seen a great item on YouTube to make pages for a 6 x 6 album and I would like to make a few to add to my repertoire. I have made a few mini-albums recently, so to have some useful page ideas is great. 

Happy Crafting 
Dee 

Wednesday, 20 February 2019

The Day After a Craft Day

Hello Again

Following the full day of crafting on Saturday lies a full day of tidying away all the materials, and equipment used, filing completed items and finding homes for components constructed but not used on the day. 

So my desk has had another tidy up and cards have been added to my box for selling and using. 

However it does not all get put away without some playing with bits and pieces found in the tidy up 

Here is a simple card constructed from some parts lying on the desk and flowers made at the craft day.

The stamped iris's have been layered and then mounted on blue card before being added to a larger base card which has a silver die-cut made to check a new die when it arrived a couple of weeks ago.

You could use a word stamp down the side.

I have also clipped the corners to give a soft look that goes with the silver strip.


I also made another folder. I had demonstrated a single layered folder on Saturday, but you can build up the folder to booklet size by putting up to 4 layers together. 
Several ladies were interested in the folder I had with me on the day, that I used to hold the sample parts for the demonstrations and I promised to give them a written sheet with the instructions.

Check out my next post and it will show the various folders you can produce using up your 12 x 12 paper pads. 

Dee

Lovely Craft Day

Hi Crafters

Sorry but I do not have pictures to share with you from the Craft Day on Saturday 16th Feb.
We all gathered together at 10am and spent the day making flowers and cards .

Everyone had the materials to make the 4 standard cards in the morning

We started by making little paper roses by hand and then used them for
Card No1


A simple clean card using a die I was about to sell on ebay but have now decided is really cute and useful.

Then I demonstrated the potential of foam and how the petals shaped using heat from a heat gun to make a very natural looking flower.
Card No2 was a 4 x4 card with a stamp down the side and and a single poppy with a narrow ribbon bow at the base.

Next we used stamps and matching dies, the demonstration showed how to stamp and use water pens and 3 ways to use the set to produce a card
First a simple stamped flower and greeting
Next a layered stamped image with the greeting die cut
Then cutting out the flowers and layering them 3D style onto the card
You can see these cards from the post on 30th January.

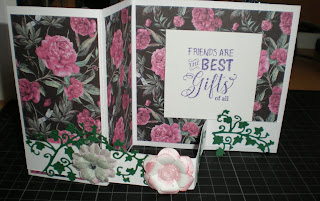
Card number 4 was a Z card 
The card in the picture is not the one made on the day,  this used stamped and die cut flowers to decorate the front strip. I gave the samples to my sister who was unable to make it to the craft day.

We had a break for lunch and in the afternoon used my Heartfelt Creation stamps and dies to make a Tuxedo card. 
I  also demonstrated how to make a simple folder for stamps, embossing folders and thin dies, while the others  were busy completing their cards,  before everyone finished a full day between 3.30 and 4pm.

It was a lovely day indulging in our favourite pastime and exchanging ideas.

Many of those present will be joining me again on the 23rd March when we are going to be looking at different basic stamping techniques and backgrounds, Making 2 cards for men and a pretty pop-out card in the morning and in the afternoon we will construct a really useful box file to store craft items, recipes or completed cards ready to use. 

Happy Crafting
Dee


Wednesday, 13 February 2019

Cute Mini Album

Hi Crafters

Today we have something quite different

I was sorting through a box in the craft room and came across the last 2 mini-albums made as a fold up wallet style.


The flap is secured with velcro and when you open it up there are several pages to add 12 full size photographs plus some little pockets to add tickets or other memorabilia or some mini photographs.  
Whilst a lot of people keep their photographs on computer nowadays I still love to see hard copies of photographs and enjoy making mini albums to capture a particular event. 

They also make a pretty and personal gift to mum or grandmother on Mothers Day to keep them up to date with what the family have been doing.

This one has a bird cage theme and I have included some flower sticker, and a pretty paperclip  


  As well as some little flaps that lift up to allow pictures underneath and give additional space for little extras.

These 2 will go on my ebay listing as there are only 2 they will not be suitable for a craft fair. 

The other album has a butterfly them with additional butterfly inside as well as butterfly and dragonfly stickers and some plain tags for journalling.

Happy Crafting
Dee

Saturday, 9 February 2019

Flower Basket made with foam flowers

Hi Crafters

Following my post a couple of days ago, here is a basket of flowers, where the flowers have been made with foam, instead of paper

They are all cut using dies and then heat treated with a heat gun to get the movement on the petals. the petals are then placed into a FLEUR shaping tray for easy finish.

I invested in the tray as it was well demonstrated on TV, although at that time I had not bought any foam.

Although I do not use it often, my preference still being for card, I do love the shape of the flowers when made this way.


These flowers and leaves are made using unbranded dies.
The basket is a 6" square made up in the same way

The foam gives a more vibrant colour, whilst the paper have a more earthy look 
I like the idea that a basket of flowers can be made with dies and your tools or entirely by hand if you are not a ardent crafter, giving an opportunity to make the baskets with friends, children and groups who come together socially.

Dee


Tuesday, 5 February 2019

Greeting Card Folder

Hi Crafters

While preparing cards for the Craft Day I made the 8 section folder (see post 1st Feb) and mentioned a card folder that I had seen on YouTube

Here is my version


The folder is very simple to make
it used just one piece of double sided 12 x 12 card stock
Or 1 piece of card stock and another piece of 12 x 12 paper to cover
I used double sided card


  1. Cut the 12 x12 sheet to 12 x 8.5" Score the card at 6", turn and score at 2.5"
  2. Fold the 2.5" up, and this makes the basic folder shape
  3. In the centre of the 2.5" flap cut a small V to make it fold up tidily
  4. Using extra strong tape or wet glue stick the side of the flaps down
  5. This folder will hold 4" square cards and envelopes easily.The ones used on this project are 12cm cards and matching envelopes which is the largest size to fit .
  6. I have used a pad of 12 x 12 card from the Range, where I managed to find coordinating paper pads to cover the cards to match
  7. To hold the front cover together I have used the strip of spare card attached to the back and brought forward
  8. Then attached a scalloped circle punched piece of card on raised on one side by pads so the flap can be tucked underneath
  9. The scalloped circle measures 6cm and is weighted down by the Santora enamel frame
  10. You could simply use ribbon or a magnet catch if you have them in your stash.
  11. I have covered 6 cards 3 with the same print as the folder and 3 with a coordinating paper from the same pad.   

It makes a lovely gift and at Christmas I will make them with Thank you Cards in so young ones can write their Thank you cards quickly and easily.

Happy Crafting
Dee

Monday, 4 February 2019

Basket of Flowers

Hello Crafters

I have been preparing different flowers for my Craft day on the 16th and as usual my imagination wandered to other things I could make with the flowers

Several of the styles are made by hand cutting and do not use a die, and I sit in the evening making the layers before putting them together on the craft desk.

I thought of an Easter basket of flowers and using the off-cuts of the flowers to fill the base of the basket I then arranged the blooms in the basket.  You could use shredded paper if you have one in the office, and it would be good to mix some leaves in, but I have not cut any for this project.

The basket would be ideal for Mothers Day, Easter or to take to someone in hospital instead of, or as well as, a card.

The basket was made with a piece of card 9" x 9" scored at 3" & 6" on both sides and them lift the sides to the middle and stick down.

Now I have made one, I may try another to perfect it a little, this time using colourful foam flowers and leaves. So keep an eye out. 

Happy Crafting 
Dee

Friday, 1 February 2019

Useful Folder/Memory Book

Hi Crafters

As I am preparing for the Craft Day on the 16th, I gather up templates, stamps and dies, make samples and then have a desk full of tools and samples that need storing for the workshop.

I came across this folder on YouTube, I first saw it made by Lyriclover, for her Christmas Fayre and it is a great way of using up scrapbook paper pads. All crafters have their stash of paper pads and after making a couple of projects the remainder of the pad gets put back in the cupboard.

These Memory Books or files are very useful to store dies by themes, gather up tools and templates for a crop or workshop like I am doing, or if you have a friend or family member that you want to make a gift for, make the file and add matching photo mats and personalise for the recipient. The files will hold plenty of standard  size photographs, so perfect for a special occasion memory book.

The one I have made has a simple ribbon finish as I am filling it up so need the folder to be expandable, the ribbon allows me to close the folder no-matter how much  I add. If you were doing it as a gift you could decorate the cover, and add little extras to the inside pages, such as decorated paperclips and die cut words & phrases for their journalling.


This folder requires 4 sheets of 12 x 12 card preferably double sided although you could decorate the inside if you had single sided.

If you are making it into a memory book you will need 8-16 pieces of coordinating card 5" x 8"


  1. Take each sheet of 12 x 12 and score in half turn and score at 9" make sure any pattern is in the right direction before scoring. Do this for all 4 sheets
  2. Fold and burnish all score lines so that the flaps fold up 


  1. At the centre line of the fold up flap cut a  small V as this will allow the flap to sit well when the folder is closed. add strong tape or a thin line of wet glue to all the insides of the flaps and glue down
  2. Next sit each piece on top of each other so that the 4 pieces make into a book. Choose the prints you like best to sit on the outside of the book. Glue each piece to the next so that the 3 inside pieces are glued together 
  3. Cut a coordinating piece of card 9" but 2" card . Fold in half and glue all over the inside.
  4. Placing the folded line in the middle of the back-seam of the book; glue one side down turn over and folding the strip over glue down the other side. This just adds some strength to the book edge. 


If you are making photo mats and decorating the inside, layer plain card with the matching pieces of 5" x 8" as this give somewhere to write the date and details of the photograph. Add decoration as desired.

The pictures above show the folder being filled with items needed at the workshop.

Happy Crafting 
Dee