Followers

Tuesday, 31 March 2020

Crafty Journal Envelopes from my 8 x 8

Hi Crafters

Yesterday I showed you the mini clipboards and stationery sets I made from an 8 x 8 pad.
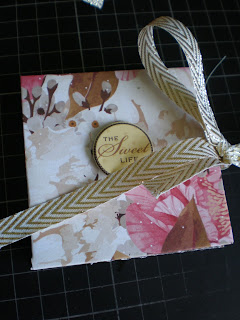
Having made the 3 sets I finished off the pad by making some Journal Envelopes.

These are easy to make and great to add to Junk Journals or for storing your ephemera 

I did not distress these papers as they were pretty printed sheets, but had I been using old book pages I would have distressed and stamped on the pages for interest.

ALthough I used a scorebosrd you can make these without any equipment.

Simply fold your paper in half but do not meet the opposite edge, instead leave a half inch panel on the left side.
Unfold the paper and fold up an inch from the bottom and fold down an inch from the top
With your panel on the left side cut out the corner pieces and folding over the panel and  glue it down 
Fold up the bottom piece and glue it down
Next cut the top panel so that it tapers in a little either side and round the edges if you  have a punch.
This is your envelope flap 

Stamp or distress if you wish.


You can use up any of your scraps making these little envelopes, that  will add interest to your journals.

Back tomorrow with more ideas

Dee


Monday, 30 March 2020

Clearing Your Stash

Hi Crafters

Well today I blitzed a whole pad of paper. 
Whilst clearing the cupboards over the past week I came across a pack I bought on Ebay thinking it was a Card kit, when it arrived it had 3 cards some ephemera and a whole 8 x 8 pad. I have never used it, but today I decided I would make use of the pad and see what I could make.

I made 4 x 4 notelets and matching envelopes, using my We R Memory Keepers envelope punch
Next I covered some cardboard with 2 sheets, I made this 5.5" x 7"
I had some notepads in the drawer that would fit and I covered with matching paper to add to the set.

I had seen some large paperclips that were made for Junk Journals and had a pocket for secret messages so I made one of these as well. 

Altogether I made 3 complete sets, which contained a notebook, notelets and envelopes, a large paper clip and small clipboard.

When making the envelopes I had cut the paper pieces down to size as stated on the envelope board so I used up these strips to make a bellyband to wrap it all together 


And some more of the strips to make paper bows which I then added a pretty jewelled piece to the centre.


When the three sets were complete I had some sheets left so I made some journal envelopes. I was going to distress the sides but decided to leave them, as I am selling all the items on Ebay and the buyer can decide whether to distress or leave as they are.

Back tomorrow with instructions and pictures for the envelopes 

As the day was cold and windy the craft session was much appreciated and kept me busy. Tomorrow I may try another pad of 6 x 6, and see what I come up with. 

Now is an ideal time to try something new and use up your stash, hopefully should crafting get a little jaded your oddments will be gone and there will just your shiny new papers and pads to stimulate you with new ideas .  
Dee

Sunday, 29 March 2020

A Great LIttle Journal Folder

Hi Crafters 

I hope you are all keeping well and finding enough to do.
Today I have a simple  Journal Folder for you.
It is simple to make but a lovely addition to a Journal or Memory Book.

It uses one sheet of 12 x 12 for the basic folder and then some of your scraps and card stock to add Photo mats tags etc.


Take a sheet of 12 x 12 or any size large enough that when quartered the size is reasonable enough to hold a photo mat
I used a couple of sheets from Craft Consortiums  "Gypsy Gypsy". These pads have 40 sheets of really beautiful papers all double sided with sheets of tags for your projects in the pack.
Fold the sheet in half softly and pinch the ends to get a mark for the centre
Then fold the ends to the centre and with your bonefolder make a good fold top and bottom 
Next fold all four corners in 

You now have a pocket either side to add your photomats and tags etc
Glue down the corner flaps with a fine line of glue on the outer edge and then little notes can be slipped inside
I have added double tag holders to the centre as well
In order to have a closing flap cut another piece and little narrower than the width and about eight inches long , this you will slide into the right hand flap leaving a good 3 to 3.5" to fold over and use as a closure

I have added some wide lace to the front flap and back panel for some added interest and used cotton lace to wrap around the folder and tie, as I wanted a slight shabby chic look to match the papers.

I then palced some tags and more of the plain matching papers for photo mats, you could add several photo mats on each side 
Here are all the items included in my Folder

You can glue these into Journals or give as a pretty individual folder 
Lovely gift for Nan, with some pictures of the family, or why not add recipes.
You could also add notelets and a pad for Teachers gifts.

Happy Crafting
Dee

Saturday, 28 March 2020

Notelets and Tag holder

Hi Crafters

Todays post is all about a lovely project that was inspired by the Posh Paper Lady on YouTube.

It is a hardback folder with 3 x 3 notelets and some tags. It is not difficult to make and you can use up your stash to make this swap or gift.

I have made this one to give as a little gift to my Great Neice, and it has an Easter theme, with rabbits on the paper and embellishment.


You will need:
2 pieces of 4.5" x 4.5" cardboard and 1 strip of 1" x 4.5"
Papers to cover both sides
6 3x3 cards and envelopes either cover some cards or make the card & envelope from your stash
a few small tags to match
2 pieces of ribbon 8-10" long

GLue one side of the cardboard pieces ( I use cereal boxes for these projects
Lay on the back of your paper leaving a 1/8th" gap both sides of  the 4.5" squares, and the centre narrow strip, you should have 4.5" square, gap, 1" strip, gap, 4.5" square. Have an inch border all the way around. 
Fold over the paper and glue down putting your bone folder over the paper and smoothing down between the gaps. Cut another strips of paper to line the inside that measure 41/4" x 10"
glue down the ribbon pieces to the centre of either side of the folder on the inside 
Glue the lining paper down  well to the inside, again use your bonefolder to push the glue in the gaps and fold the sides up to make sure it is flexible and closes up within creasing the papers.

Next cut another piece of card 4.5" x 3 3/4"  
Score it on the bottom at 1/2" and 1"
and on the 2 at 1/2" and 1"  
cut the corner scored squares off and fold over the scored lnes to form a box frnt.
Use your small circle punch to cut out half a circle in the top 
Glue down the three sides and stick onto the left side of the folder
Make another box with 1/4" score lines and place on the other side

Put your cards in the left side and tags in the right hand side.

Great little giveaways or swaps.

Happy Crafting and stay safe
Dee

Friday, 27 March 2020

Vintage Seed Packets

Hi Crafters


Today is  a quick post. A coffee break make.  I have some pretty seed packets that can be downloaded from Pinterest 
They make a great little gift for the gardeners in the family to slip into a card.


All of the packets shown above can be found on Pinterest
The "seed saver" packets are from The Paper Mama
Bulbs and Plants pack are from EllaClaireinspired.com
ANd the pretty coloured packet is from Glenda's World

If you fancy making some seed packets for family and friends go to pinterest and search for Seed Envelopes, then click on any that say Free Printables. Download onto your printer, cut out and put together in minutes 

It is a lovely way to look forward to the spring and summer as well as share the bounty from your garden.

 Dee

Thursday, 26 March 2020

Time to Tidy up the Craft Room

Hi Crafters

Well here we are on day 3 of Lock down and I am taking the opportunity to clear out some of my craft stashes

At the base of the craft cupboard are 2 stacks of drawers each  stack has 5 drawers and over the last year they have had a couple of tidies but nothing like today, when I emptied every drawer and reorganised them.
I sorted one set of drawers aside for stacks of card starting with lose 12 x 12, then paper stacks, Specialist papers such as hand made and acetates, water-colour pads etc and Specialist card such as pearlised and mirror cards, and lastly 8 x 8 pads and some finished cards

The other set of drawers were then tidied into Christmas embellishments, Flowers, beads and brads, metal embellishments and some project stamps and dies and on the top minicards and some project emphemera.

Some items and papers were packed up to give away, and I am happy to say there is a little more room to move around the drawers.

I also sorted out the box that holds my 6 x 6 pads. This excercise took a couiple of hours but is a great reminder of all the things you have, and sometimes whilst tidying you get some inspiration of projects you want to try. I have decided to make some pretty clipboards with a set of notelets and a decorative clip for swaps and giveaways and I will post pictures when these are done.

I have started making a list of projects that I see on YouTube that I want to try, it is not very long at the moment because as soon as I list it I want to make it, and with all the self isolation lots of new makes are sitting on the desk.

More laminated projects
A couple of double frame cards 
A mini notelet and tag set 
Some seed packets I downloaded from Pinterest 

Also if you are taking the time to read this post, you may be interested to know that Lidl have some watercolour pens in their Easter Craft items, 8 colours for £2.49. I also bought some wooden decorations and have adjusted some of them to decorate the paperclips to go on the clipboards I am going to make.

If you are interested in seeing any of the projects please click on the FOLLOW button at the top of the page.You can then ask questions or comment on any of the posts. 

Happy Crafting and stay safe

Dee


Wednesday, 25 March 2020

2 More MiniBook - Nans Brag Books

Hi Crafters

Following on from yesterdays mini book I made the following Brag books. Real little treasures for all your mini photo's and memories.

Again these use one sheet of 12 x 12, although for the 3" book  you will  need some extra for the outer covers.


Book 1: 3" Book with covers

Score the 12 x 12 at 3",6",9" 
Turn and score the same again.
On the first and third score line cut up to the third/last score line
Turn the sheet 180 degrees and on the 2nd score line cut up to the third/last score line 
From the bottom right hand side fold the 3" squares bback and forth all the way around until you have a booklet.
Next ignore the first square as this will form the cover and then glue the next 2 pages together, continue gluing the pages together, some will be left to right and some top to bottom so do a trial before starting to glue to make sure you know how the pages go together.

Using scrap card (I use my cereal box card for this) cut 2 pieces of 3.25" square card  and cover with pretty papers, to form the book cover
Before gluing these onto each side of the book add ribbon around the book for a fastening.
These mini books have 16 3" x 3" pages just right for pictures of family and friends. It would make a great gift for granny or mum, or add your own fun pictures of outings and parties etc for school friends.

Book 2:Mini Book with flaps
For this Minibook,  fold the page in half top to bottom 
Open out and turn, and with the page on its side score at 2" and 10" 
Now, looking up the page you have a score line at 2" a fold at 6" and a score line at 10"
Turn the page and fold in half and then each half back to form 4 sections top and bottom 
Fold the scored lines  over so the flap is inside
On the centre fold cut up the fold along the first 3 sections
Starting on the right hand bottom side, fold the creases back and forth, when you get to the end fold up and then continue folding until the booklet is formed, run your bonefolder over the sections so they lay flat

Using a strong tape fasten the flap ends and glue the middle fold to hold the booklet together 
You now have 8 sections to store your photos and memorabilia, plus if you do not stick down the back of the booklet with ribbon fastenings, instead add ribbon that will go all  the way around but only glue to the front of the booklet , you  can add photographs to the 6 back pages.


As you can see I made 2 of these and have added a scrapbook phrase to the front of one and a 3D embellishment to the other 
If you need a video to follow check out brag books and mini albums using 12 x 12, on YouTube. 

Dee
  

Tuesday, 24 March 2020

Using your Stash

Hi Crafters

Well here we are and Day 1 of the tightened Stay at Home policies. There is only so much spring cleaning I want to do, so I have been on YouTube and checked out some quick ideas to use up your stash.

I wanted a couple of mini albums/books for swaps and giveaways and soon found some ideas. Nothing new I have made them before, but I enjoyed putting a few together and thought they were cute enough to share.


These are great mini-books using one piece of 12 x 12. 
Fold the paper in half and then in half again, lining up the edges as well as possible so as not to have any hangover. Use your bone folder to make a clean fold. Fold back each side to the centre, so that you have 4 sections across the page, making 8 sections altogether.
Open up the folds and where the centre fold is cut a slither from the 2 middle sections.
Push the centre sections outand then fold the first three sections together and the fourth one fold over to make the 4th section. Once you have them neatly lined up, open the page and glue around the edges and centre with a wet glue, I used Pritt Stick. and fold back up 
If you struggle with my instructions, check out the video from Lyriclover on YouTube.

This will make the mini books, as shown below. 


These are a great way of using up your paper stacks and lovely for giveaways, swaps etc. I like to pop these in as Happy Mail when sending anything out from Ebay sales or to friends and family. 

Happy Crafting 
Dee

Thursday, 19 March 2020

Crafting time is any time Now

Hi Everyone

Now that the government is asking everyone to stay at home as much as possible and directives have been given regarding those over 70, most of the groups I attend have suspended meetings. So 
No Craft Club, No WI, No dancing, and now No slimming club. 

Therefore the only thing left is Craft Craft Craft. I just hope I do not overdo it. Rather than sit and make a lot of items and have nowhere to store them, I decided today to finish tidying my dies.

I have purchased 50 magnetic sheets (as this was the most cost effective way of buying) and 100 plus laminating pouched, and before today had managed to sort and tidy onto sheets all my:

Christmas dies
Mens Dies
Projects dies
Build a card dies

And today it was time for the flowers, butterflies and birds 

The box was in a muddle and I sorted and removed at least 15 that went into the other boxes 
I then made 12 pouches and cut magnetic sheets to sort and pack all my flowers etc
It is a job well done and now I should be able to get any die out without wondering which of the 5 boxes it is in.

Going through the dies I came across several I have not used since they landed through my door, probably because they came whilst I was preparing for Christmas, so I have placed them on the top and whilst I am unable to dance, or group craft or weigh in I will go through them and make something after which I will post them on here to share my makes.

Happy Crafting Everyone, stay safe, and lets all make and share our projects on Pinterest and blogs whilst we are unable to share with friends, and perhaps take the opportunity to learn new tricks from YouTube ready to pass on in better times . 

Dee 

New Pillow Box Die from AliExpress

Hi Crafters

Following on from my post on the 15th March, I recieved a new die this morning from China.
It is a large Pillow Box die, which arrived within 16 days, in great condition. I thought I would have a go with it.

The die is large so you need the BigSHot Plus or equivalent as the bed needs to be A4 size.


As you can see it comes with dies to make decorating panels, tag, leaves and a paper flower for decoration, it also has a smaller pillow box, which I have not had time to try yet.

The die is easy to use and from the time I took the BigShot Plus fromthe cupboard to the finished box was around an hour, so a great addition to my die collection.

And here is the finished box


The box measures 7" x 8", and will hold a good amount.

Please email me if you have any questions about this post and be sure to click the follow button at the top of the page if you want to see more projects and ideas as I post them 

Dee

Sunday, 15 March 2020

Whats New at AliExpress

Hi Crafters


Another post about whats is new in March

With the Corona Virus in China lots of items are delayed from AliExpress. This is only to  be expected and I am sure many are wondering if items will come at all.

I order regularly from AliExpress ususally a minimum of 2 orders a month with up to 8 items on any order so there are always items outstanding. 

However I have only had 2 orders so far this year that have not come. The first was an embossing folder that I ordered at the end of January and when it had not been despatched by late February I cancelled the order, the credit was made immediately. 
The second order, I am sorry to say, was ordered in early January and was not despatched by the end of January, When I checked the delivery data it had been cancelled in transit, My message to the shop went unanswered and because of the virus and the fact I really wanted the dies, I decided to wait until the 60 days were up before closing the order. That was up a couple of days ago and again the refund is already in my account, so I have no complaints about the handling of my orders.

During the difficult time in China I made an order, quite prepared to have to wait for the goods to  be despatched, some items were despatched within a couple of days and some took longer to start their journey. I expect longer delivery times for a while but have actually recieved one item already, so I hope things are improving for the Chinese people and they are getting back to normal life. In the meantime I look forward to deliveries.

NB My postman is not  allowed to hand me parcels so any items are placed at the door and the doorbell rings to let me know they are there. Heres hoping all the postmen stay safe as well.

When new items arrive I will share the projects I make with you.

Dee

Whats New

Hi Crafters 

It has been a while since posting on my blog, as I have been busy getting ready for a Ladies eveing run by the Charity "Vine Councilling".

For the stall I made really pretty gift bags and the Trinket boxes and with these I had scarves and brooches to offer as a complete Wrapped Gift. I called my stall "GIFT WRAPPED" 

The boxes were lined with tissue and when you bought a scarf it was popped into the gift bag and ready to give, the same with the trinket box, you chose a brooch and it was popped into a pull string bag and then into the trinket box.

The idea was well received but alas due to the current problems the number through the doors were down, so it is difficult to tell if this is an idea worth pursuing. 

I forgot to take my ipad with me to the show and so here is a picture of the mock- set-up I did at home for the pre-show trial of the table.
At the show the boxes all had tissue inside.

And the stands were wider apart.

It is always a good idea to do a mock up of the table before the event as that way you can make the best possible layout to  present your items.

Happy Crafting 
Dee