Hi Everyone
Now that the government is asking everyone to stay at home as much as possible and directives have been given regarding those over 70, most of the groups I attend have suspended meetings. So
No Craft Club, No WI, No dancing, and now No slimming club.
Therefore the only thing left is Craft Craft Craft. I just hope I do not overdo it. Rather than sit and make a lot of items and have nowhere to store them, I decided today to finish tidying my dies.
I have purchased 50 magnetic sheets (as this was the most cost effective way of buying) and 100 plus laminating pouched, and before today had managed to sort and tidy onto sheets all my:
Christmas dies
Mens Dies
Projects dies
Build a card dies
And today it was time for the flowers, butterflies and birds
The box was in a muddle and I sorted and removed at least 15 that went into the other boxes
I then made 12 pouches and cut magnetic sheets to sort and pack all my flowers etc
It is a job well done and now I should be able to get any die out without wondering which of the 5 boxes it is in.
Going through the dies I came across several I have not used since they landed through my door, probably because they came whilst I was preparing for Christmas, so I have placed them on the top and whilst I am unable to dance, or group craft or weigh in I will go through them and make something after which I will post them on here to share my makes.
Happy Crafting Everyone, stay safe, and lets all make and share our projects on Pinterest and blogs whilst we are unable to share with friends, and perhaps take the opportunity to learn new tricks from YouTube ready to pass on in better times .
Dee
Thursday, 19 March 2020
New Pillow Box Die from AliExpress
Hi Crafters
Following on from my post on the 15th March, I recieved a new die this morning from China.
It is a large Pillow Box die, which arrived within 16 days, in great condition. I thought I would have a go with it.
The die is large so you need the BigSHot Plus or equivalent as the bed needs to be A4 size.

As you can see it comes with dies to make decorating panels, tag, leaves and a paper flower for decoration, it also has a smaller pillow box, which I have not had time to try yet.
The die is easy to use and from the time I took the BigShot Plus fromthe cupboard to the finished box was around an hour, so a great addition to my die collection.
And here is the finished box

The box measures 7" x 8", and will hold a good amount.
Please email me if you have any questions about this post and be sure to click the follow button at the top of the page if you want to see more projects and ideas as I post them
Dee
Sunday, 15 March 2020
Whats New at AliExpress
Hi Crafters
Another post about whats is new in March
With the Corona Virus in China lots of items are delayed from AliExpress. This is only to be expected and I am sure many are wondering if items will come at all.
I order regularly from AliExpress ususally a minimum of 2 orders a month with up to 8 items on any order so there are always items outstanding.
However I have only had 2 orders so far this year that have not come. The first was an embossing folder that I ordered at the end of January and when it had not been despatched by late February I cancelled the order, the credit was made immediately.
The second order, I am sorry to say, was ordered in early January and was not despatched by the end of January, When I checked the delivery data it had been cancelled in transit, My message to the shop went unanswered and because of the virus and the fact I really wanted the dies, I decided to wait until the 60 days were up before closing the order. That was up a couple of days ago and again the refund is already in my account, so I have no complaints about the handling of my orders.
During the difficult time in China I made an order, quite prepared to have to wait for the goods to be despatched, some items were despatched within a couple of days and some took longer to start their journey. I expect longer delivery times for a while but have actually recieved one item already, so I hope things are improving for the Chinese people and they are getting back to normal life. In the meantime I look forward to deliveries.
NB My postman is not allowed to hand me parcels so any items are placed at the door and the doorbell rings to let me know they are there. Heres hoping all the postmen stay safe as well.
When new items arrive I will share the projects I make with you.
Dee
Whats New
Hi Crafters
It has been a while since posting on my blog, as I have been busy getting ready for a Ladies eveing run by the Charity "Vine Councilling".
For the stall I made really pretty gift bags and the Trinket boxes and with these I had scarves and brooches to offer as a complete Wrapped Gift. I called my stall "GIFT WRAPPED"
The boxes were lined with tissue and when you bought a scarf it was popped into the gift bag and ready to give, the same with the trinket box, you chose a brooch and it was popped into a pull string bag and then into the trinket box.
The idea was well received but alas due to the current problems the number through the doors were down, so it is difficult to tell if this is an idea worth pursuing.
I forgot to take my ipad with me to the show and so here is a picture of the mock- set-up I did at home for the pre-show trial of the table.
At the show the boxes all had tissue inside.
 And the stands were wider apart.
It is always a good idea to do a mock up of the table before the event as that way you can make the best possible layout to present your items.
Happy Crafting
Dee
It has been a while since posting on my blog, as I have been busy getting ready for a Ladies eveing run by the Charity "Vine Councilling".
For the stall I made really pretty gift bags and the Trinket boxes and with these I had scarves and brooches to offer as a complete Wrapped Gift. I called my stall "GIFT WRAPPED"
The boxes were lined with tissue and when you bought a scarf it was popped into the gift bag and ready to give, the same with the trinket box, you chose a brooch and it was popped into a pull string bag and then into the trinket box.
The idea was well received but alas due to the current problems the number through the doors were down, so it is difficult to tell if this is an idea worth pursuing.
I forgot to take my ipad with me to the show and so here is a picture of the mock- set-up I did at home for the pre-show trial of the table.
At the show the boxes all had tissue inside.

It is always a good idea to do a mock up of the table before the event as that way you can make the best possible layout to present your items.
Happy Crafting
Dee
Wednesday, 19 February 2020
Using Your Scraps up Week 3
Hi Crafters
Over the last couple of weeks I have talked about crafting with your craft scraps.
Save money and make the most of your tools and paper by making sure the scraps you store, get used on your projects.
Today I am using the medium or smaller pieces in the left side of the sorted picture.
The most obvious use for these pieces is with your dies and to ensure that these pieces get added to your future projects, choose dies that are generic.
I have used them to cut out flowers and bows. The flowers will be used quite quickly when making my next birthday cards, Mother's Day card etc, while the bows can be added to parcels as well as large cards.
By using 2 dies together you can double your number of cuts each time you use your machine
Over the last couple of weeks I have talked about crafting with your craft scraps.
Save money and make the most of your tools and paper by making sure the scraps you store, get used on your projects.
Today I am using the medium or smaller pieces in the left side of the sorted picture.
The most obvious use for these pieces is with your dies and to ensure that these pieces get added to your future projects, choose dies that are generic.
I have used them to cut out flowers and bows. The flowers will be used quite quickly when making my next birthday cards, Mother's Day card etc, while the bows can be added to parcels as well as large cards.
 |

The Bow die is quite fancy and requires each pieces to be cut twice, so 6 pieces in all to make the bow, a little time consuming but worth it for the fancy bow it produces and I add these to my gift bags.
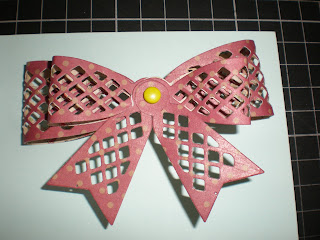 
Double bow Single Bow
Another great use of this size of scraps and also uses scraps from your basic colour pile, are greetings.
Using my basic layering dies I cut a lot of cream and white bases and stamped "Happy Birthday", these are the greetings I use most and I like them layered and slotted into the front design.
I then cut the next size up from patterned scraps and layered them

An afternoon well spent and these are real cute and ready for my next card making session.
Other ideas include:
small money envelopes
mini boxes
|
By using 2 dies together you can double your number of cuts each time you use your machine
Monday, 10 February 2020
Using Your scraps - Make Together Tuesday
Hi Crafters
Here we are in February and I have been crafting madly this year, already , this has made lots of pieces to add to the scrap box.
Last year I did a series on using up your scraps, as ideas for using up your scraps are so useful, I thought I would run another series during February, and expand on the ideas from last year.
First I start by sorting my scraps into piles.
These consist of:
Long Strips
Large Pieces
Smaller pieces up to 10cm
Kraft Card and heavier card
White, Black, Gold and Silver card
Christmas card
These are all put into their own polypage and then into a scrap bag
The first section I am going to be working with is the long strips
These have come from 12 x 12 pages when I have been making my scrapbook or other projects
The main makes with these will be
Mini Brag book and Beautiful Bows
For the Brag Book
This makes a pretty little brag book that will hold 12 small photographs and fit into pocket or handbag.
So lots of lovely bows from your scrap pieces.
Other ideas include
1. Binder strips - 3 strips of 3 different sizes with a 1cm scored centre. Glue together and use for scrapbook and mini album spines to add pages to your projects

Here are some I made from my strips and I will store them ready for use.
2. Rosettes to decorate your cards and projects and to add your greetings
3. Photo Corners
Next week I will use another section of the Scrap pile to recycle into projects so be sure to drop by and check them out
Happy Crafting
Dee
Here we are in February and I have been crafting madly this year, already , this has made lots of pieces to add to the scrap box.
Last year I did a series on using up your scraps, as ideas for using up your scraps are so useful, I thought I would run another series during February, and expand on the ideas from last year.
 |
| Brag book, binder strips and bows |
First I start by sorting my scraps into piles.
 |
| How they come out the scrap bag |
 |
| Sorted into the piles for use |
These consist of:
Long Strips
Large Pieces
Smaller pieces up to 10cm
Kraft Card and heavier card
White, Black, Gold and Silver card
Christmas card
These are all put into their own polypage and then into a scrap bag
The first section I am going to be working with is the long strips
These have come from 12 x 12 pages when I have been making my scrapbook or other projects
The main makes with these will be
Mini Brag book and Beautiful Bows
For the Brag Book
- I took 2 of the wider strips that measured 8cm wide and 30cm long
- FOlded them in half and then into the centre of each piece so they were concertina style.
- I then placed one on top the other and glued together
- Taking 2 pieces of scrap heavy card I cut to 8.5cm square and covered them in pretty coordinating papers (again from my scrap pile) You only need to cover one side, gluing down on the reverse
- Glue a piece of ribbon to the middle of the front section and to the middle of the back section to use for ties
- Then Glue one of your card square to the front and one to the back
This makes a pretty little brag book that will hold 12 small photographs and fit into pocket or handbag.
 |
| Selecting strips |
 |
| booklet made and Kraft card selected for covers |
 |
| Completed Book
Next I took the smaller strips and made paper bows, these are so useful for all your boxes and bags or to decorate your paper projects I am happy to make a big batch.
There are several tutorials on YouTube particularly for making them using your WeRMemory Keepers Envelope maker. I have one but I prefer to make them freehand as they are so simple.
  |

Other ideas include
1. Binder strips - 3 strips of 3 different sizes with a 1cm scored centre. Glue together and use for scrapbook and mini album spines to add pages to your projects

Here are some I made from my strips and I will store them ready for use.
2. Rosettes to decorate your cards and projects and to add your greetings
3. Photo Corners
Next week I will use another section of the Scrap pile to recycle into projects so be sure to drop by and check them out
Happy Crafting
Dee
Thursday, 6 February 2020
Great Little Card to Say hello, Get Well, Thank you etc
Hi Crafters
I have recently cleared out some drawers and boxes in the craft room and came across some sample cards I made that hold small bars of Chocolate
These are not a new idea and for the bigger bars there are Youtube videos.
My cards hold a small bar of chocolate that I love from Lidl, they come in white, dark and hazlenut, my favourite is the white and I usually have them in the house, although they are a temptation for sure.
I will be honest my cards are too flimsy and I should have stopped at one card, but I loved the idea so much I made about 10. So I am adjusting the instructions for you
You will need a sheet of A4 card white or cream 200gsm or more
Cut a strip 16cm deep and using the full width of the card.
Along the long side score at 10.5, 11.5, 21.5, 22.5, 28.5, 29.5
Turn and score up to the 21.5cm scoreline at 1,2cm each side of the card (this section form the box.
At the 21.5cm score line cut down with scissors to the 2cm line either side
Now dols and burnish all your score line
Round the corners at all four corners of the main card and on the outer edge of the box.
Cut the 2 1cm corners off the far right side of the card and then cut down to the 2cm line to make the box flaps
Fold the box over and glue down the sides leaving the end 2cm flap that will hold the chococlate in place
Decorate the front of your card and add the greeting of choice

 I am taking one to a friend as a get well card, and they would make perfect Thank You cards or Hello.
Useful to have a small stash (but don't eat the bars) for visiting etc.
Dee
I have recently cleared out some drawers and boxes in the craft room and came across some sample cards I made that hold small bars of Chocolate
These are not a new idea and for the bigger bars there are Youtube videos.
My cards hold a small bar of chocolate that I love from Lidl, they come in white, dark and hazlenut, my favourite is the white and I usually have them in the house, although they are a temptation for sure.
I will be honest my cards are too flimsy and I should have stopped at one card, but I loved the idea so much I made about 10. So I am adjusting the instructions for you
You will need a sheet of A4 card white or cream 200gsm or more
Cut a strip 16cm deep and using the full width of the card.
Along the long side score at 10.5, 11.5, 21.5, 22.5, 28.5, 29.5
Turn and score up to the 21.5cm scoreline at 1,2cm each side of the card (this section form the box.
At the 21.5cm score line cut down with scissors to the 2cm line either side
Now dols and burnish all your score line
Round the corners at all four corners of the main card and on the outer edge of the box.
Cut the 2 1cm corners off the far right side of the card and then cut down to the 2cm line to make the box flaps
Fold the box over and glue down the sides leaving the end 2cm flap that will hold the chococlate in place
Decorate the front of your card and add the greeting of choice

Useful to have a small stash (but don't eat the bars) for visiting etc.
Dee
Subscribe to:
Posts (Atom)