Followers

Tuesday, 14 November 2017

Butterflies Galore

Hi Crafters

A recent competition had a craft section, and the theme was flight.
I thought I would have a go, and the idea I came up with was butterflies flying out from a lantern

First I had to design the lantern, the sides were straightforward and I used a large box technique and die cut the four panels. The roof was a little more complicated as each section had to be angled with the point in the middle. But I started with the sizes of the side panels and worked the roof panels from this.

Next to make the butterflies I used an old flower arranging book that I had cleared off the book shelf and cut 40-50 butterflies with my dies. I added half to floral wires so I could manipulate them coming out of the lantern. The rest I layered to place on top.

Before putting the lantern together I colour waxed it to give it a weathered look.

Here is the result


Alas I did not get anywhere but it was fun planning designing and making it.
 

Monday, 13 November 2017

Exploding Box Workshop

Dear All

Well the day of the workshop has come and gone. It was lovely to  meet up with my  fellow crafters and we sat down at 10.30 on Tuesday 30th October to craft our hearts out.

In the morning we made magical pop out boxes which when the lid is taken off the embellishments pop up by magic.


After a break for lunch we made a bigger version of the pop out box from 12 x 12 card and these boxes were big enough to hold small gifts in the centre.

What I love about workshops is that while we are all making the same project the finished items all look so different. With time in the afternoon to decorate our boxes the finished boxes were bright colourful and very pretty.


Everyone seemed to enjoy the day, we had crafters from North Petherton, Lympsham and Wrington.
Hopefully in the New Year I will be able to run a couple of craft days to while away the winter days, and North Petherton ladies are hoping to run one of their craft days, which are always popular.

Happy Crafting
Dee


Thursday, 26 October 2017

Decoupage

Hi Crafters

I am a terrible flitter and seem to go from craft to craft. As you can see from my posts I make cards, and boxes, stamping,  die cutting and painting to paper crafts. I also make flowers and leather brooches etc. In between I sew a little, and I have been known to knit, but not for a while.

Recently on You Tube I found the envelope wallets, (see "shabby chic folders "), and some of these had been finished with decoupage. I love the vintage look so wanted to give it a try.

The very pretty napkins are difficult to source in stores nowadays, but I found some on-line and had a few happy hours yesterday gluing and covering all sorts of things
A covered notebook for keeping track of your Christmas lists
Menu, Recipes, Gift list, Card List, visits etc


A small gift card holder


Vintage decoupaged heart


Friday, 13 October 2017

More Leather Flowers

Hi Crafters

Thought today I would share with you a few more leather flowers I have made.

My crafting is getting geared toward Christmas Craft Fairs and I recently sold a few of my brooches and flowers at a Craft show in the Princess Theatre, Burnham on Sea, which was held with a coffee morning for McMillan nurses.

These are the more straight forward single flower style and I will  need to make more brooches and corsage style for the sales.


These will retail between £5 - £7

Dee

Tuesday, 10 October 2017

More Shabby Chic FOlders

Hi fellow crafters

Yesterday I posted a shabby chic folder 
I thought I would upload more pictures showing other folders

This is a paper depicting clocks with subtle hues of colour. It comes from a large pack of My Minds Eye and is lighter weight paper, so very suitable for this. The charm is a clock with a bubble bee.

The folders make great storage for receipts, or store vouchers, correspondence invoices etc.


Dee

Monday, 9 October 2017

Shabby Chic Folders


Hi Crafters

Saw these on You Tube and had to have a go as they looked so cute.

I had some manilla envelopes in the cupboard and everything else was from my craft stash

I made these with scrapbook papers but some of the very pretty one I saw used serviettes and modge podge.

A 12 x 12 sheet covered one envelope
Cut a piece 22cm deep making sure any print is the right way up when you put it on the envelope
Cut this piece in 2 making 2 pieces 15cm x 22cm

Glue each piece to the front and back

With the remaining piece of paper cut a piece to cover the flap (use the envelope flap for a template), and glue down. Keep the remaining piece to make an additional tag

I have then used distress ink to age the sides and five the shabby chic look.
Decorating with brown tags and string plus a tag made from the matching paper and an embellishment that compliments the paper.

I love the results and hope to make some for the Christmas Craft Fairs.

This one has a fairy and flower paper so I have added a young girl bag embellishment to the tags attached to the back flap. While the front has some glitter added tot he fairy dress and flower centre.
Dee


Envelope Cards/Wallets

Hi Crafters

I have not posted for a week or so , but have been crafting in meantime so am going to share with you my new makes over the past couple of weeks

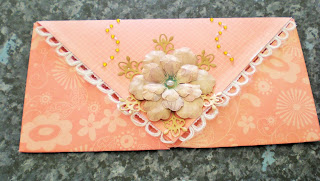
The first is an envelope card/wallet. Like a lot of ideas I saw this on You Tube. There are several posts regarding them and a couple explain how to make them.

The lovely part of this card is it can be used to give a voucher or cheque, (particularly useful for weddings as most couples are asking for money these days), and it present the gift of money or voucher in a pretty and thoughtful way.


This is the wedding envelope card. As you can see I have decorated the envelope edge with cotton lace and the centre with a silky flower and diamante. under the envelope flap is velcro to hold it down, but when you lift the flap there is a secret section to add the voucher or cheque.
This is the back of the card and in this sleeve is a piece of matching card, which is stamped on the back with the greeting, leaving lots of space to add your personal message to the recipient.

Here is one for a Birthday


Happy Crafting
Dee

Thinking Outside the Box 1

Hi Crafters

There is nothing I like better than getting a craft stash that someone else has finished with and sells off and I can then think of another use for the papers and card in the stash.

Today I had an EBay delivery and there were several packs of card and vellums with toppers and sticky ribbons, as well as 3d flowers and floral stickers. All in a Art Nouveau style.
The card stock was luxury metallic finish and there are matching vellums


As I unpacked the stash I was thinking of how I would use the items. I can of course make cards and it would take little to do this and produce a quality greeting card, which I will do with some cards, but the square cards gave me a piece of card 29cm by 15cm, as did the vellum inserts for them.

These I can make gift boxes which will be perfect for the festive season coming up. The card gift boxes are tied with ribbon and a vellum flower added from the kit completes the look.

The vellum boxes I have made a belly band for them put the 3D flower on the same,  and will add tea-lights for my craft sales.

This is the first idea from the stash, and I will follow up as I think of more.


I will also sell some of the cards and embellishments, where I have surplus to my needs, as a lot of the fun is in the ideas for the stash.
Dee


Wednesday, 20 September 2017

AND ANOTHER AWESOME BOX

Hi Crafters

Well I just had to have another go at the big box
Same dimensions as the previous one, but this time decorated with shabby chic papers and butterflies hanging from ribbon and cascading down the box

I am pleased with the result.


Back again soon
Dee

Tuesday, 19 September 2017

The Large Box Worked

Hi Crafters


Well the large box worked out well.
The box is 5.5" square and 7" high. It takes 5 pieces of A4 card for the basic box and 3 pieces for the decorating. I used mirror card to decorate the outside which costs an average of 50p a sheet and the main black card costs about 20p a sheet so the box without ribbon would be £3.50 to make.
Not too much if you want it to be a particular colour or theme, say to match the brides colour scheme or to fit the Christmas decor in the lounge.


Here is the finished item. I did not spend too much time on the finish, another time I would make an edging ribbon out of the decorative papers to edge the lid and the base., but this is a simple clean classy black and gold look with just a hint of colour in the red rose on the lid.

Monday, 18 September 2017

Boxes for Christmas

Hi Crafters

I was watching the craft channel at the weekend, and they were showing some really lovely large boxes made from card using a new set of Tonic Dies. The die set was over £50, but the demonstrations were lovely and made you want the possibility of making the boxes.

Checking the internet made me realise that the dies were obviously a new launch and not yet available anywhere else, which just made me want them more. But having just bought some Tattered Lace dies on sale I decided to be prudent and think about the Tonic dies before taking the plunge.

Today I was drawing up a design for a large bird cage, using the tools I have in the cupboard, The sides, base and domed lid are cut out but I would like to panel the sides before putting it all together and need to search out my panel dies that do not cut out the edges. However in composing the various parts to the cage I realised I could make a box with the same method. So I will try to produce a similar box to those shown on the craft show. Wish me luck!

Saturday, 16 September 2017

40th ANNIVERSARY CARD

Hi Crafters

Thought today I would share with you a commissioned card I made for a 40th Anniversary

The card was made with using a Jeanine background die, layered on red card for the Ruby Anniversary, decorated with a red flower and leaves. Most card designs benefit from layering, this is of course a matter of personal preference, but a little colour under the main layer makes the design pop. 

I made this an easel card so I could add the sentiment on the base of the card.
Fairly simple and very pretty.

The 40 was cut from a  set of Tonic dies that have 18, 21, 30, 40, 50 and 60 centres. I am not 100% happy with the 4o as it has a cup instead of a naught, but it fitted the card. I also added Together Forever which is a stamp from the Mr & Mrs set of stamps by Crafters Companion.


NEW MINI ALBUM JOURNAL

Hi Crafters

I have just finished a new mini album. I had forgotten how much I enjoyed putting these together
This one is an envelope album allowing each sheet to have a matting layer inside. So with 6 envelopes you have an album that has 24 sides for pictures, journalling and memorabilia to be added

I used simple hinges to compile the base album and the pages were decorated with papers from DCWV.

I also cut another kit out and am selling both the album and the kit on ebay, having laid out all the measurements and instructions in case anyone wants a workshop making memory books.


The last picture shows the kit.


Flower centre (Another Use)

Hi Crafters

I was putting away my crafts and clearing my desk down as usual and another use for the flowers centres came to me
So naturally I had to make another one, slightly smaller and decorate the centre to make it into a parcel embellishment

Here's the result


Can be made from any piece of pretty A4 paper to coordinate with your parcels
I will definitely be making them for Christmas

Friday, 8 September 2017

The Flight of The Butterfly

Hi Crafters

I have not posted for a few days but I have been busy crafting in between other things

I started a project up-cycling a book i had on flower arranging 

First I cut out over 50 butterflies from pages taken from the centre of the book
Then I added them to wires cut at different lengths
I was going to put them back into the book and arrange them in an arc but the book seemed far too big for the design and I ended up making a flower from a couple of other pages and placing the wires around the flower

I would love to know what you think of the project

Dee

MORE BOXES

Hi Crafters

Watching the Create and Craft channel over the holiday week and I spotted a demonstration using the foil card they were selling and making a triangular box.

I use to make quite a few of these as they are very quick to make and you can store them flat ready to use. making them very practical particularly if you make your own jewellery or gifts and sell them.

It works for a straight A4 sheet A5 card, you may struggle with A6
Instructions for A4 card

  • Fold in half as if making an A5 card
  • Lay flat and mark the centre of the top and bottom (the width of the card approx 10.5 cm)
  • Score from the outside edge of the middle line to the pencil mark centre at top and bottom on both sides 
  • Fold the card at top half bringing the right triangle across to meet the score line on the left triangle
  • Put a hole punch in centre of the two pieces of card where they cross
  • Now to the same for the other end of the card   
  • Thread ribbon through the two sides to close the box


    Triangular Box made from an A4 sheet of foiled card


    This Box was made from Tilda Christmas Card


Wednesday, 30 August 2017

Exploding Boxes

Hi Crafters

Had another play with the exploding boxes for my workshop
This has been made from a 12 x 12 piece of card and decorated with coordinating papers
The corners have been cut into hearts by hand but if you own an automatic cutting machine you could use that. I am still happy to pencil around a template and cut out by hand

The workshop is at the end of October and I have a magic exploding box this one and a Christmas themed box to give ideas along with the instructions for the two sizes.

The craft days are great fun and I enjoy sharing my enthusiasm for card crafting and flowers, they are also an opportunity to get back to basics with stamping, embossing, die cutting and shaping cards for special occasions.

The centre boxes give an opportunity to  add a treat or present
They can be made as a stack as this example shows or a taller box as shown below
Here's one I have made for my husband on the occasion of our 40th anniversary
I will probably add some chocolates from Hotel Chocolate Shh it's a secret  
 
 
Happy Crafting
Dee

Monday, 28 August 2017

Flower Centres as Gift Embellishments

Hi Crafters

This lovely weather has resulted in limited crafting while I make the most of the sunshine.

So I thought I would just show you an alternative use for the flower centres I made for my large flowers

The examples below are quick to make (now I use scissors instead of a cutting machine) and very eye-catching.


Wednesday, 23 August 2017

This Time A Very Large Flower

Hi Crafters

Well back to paper crafting and yet more flowers

This time it a very large background flower. Saw it on YouTube by a lady called Pearls craft, and loved the centre so had to give it a go.

On the video she said she sold the flower templates but I cannot find where, as I like several of her flower designs.

I made the centre and as they worked out well I made a petal template myself and finished the flower.

What do you think??

I love it, just do not have anywhere to store it, so it will probably go to the next car boot, in the hopes it will inspire someone else.
 

Tuesday, 22 August 2017

Jeanine's Art Dies

Hi Crafters

At the Taunton Show I purchased a die from Jeanine's Art, (they were on the Oyster Stamps stand)
and I said I would let you see the results, so here it is

I found it relatively simple to cut, it is intricate so required several runs though the machine, but then tidied up with my pokey tool quite easily. I thought it was worth the effort as this was a very straight forward card. What do you think?
Once I had cut the design I layered onto a scalloped card and added some sparkle to the ends of the stars and a poinsettia  to add colour.

I have since purchased a couple of other dies as I liked it so much and the dies are good value.

Monday, 21 August 2017

Recycling clothes into flowers

Sorting out the wardrobe and found an old pair of culottes/shorts that are old and now too big, hurrah.

A bit old for the charity shop so I cut them into strips to make flowers.
When I sit down in the evening I will sew some flowers from the scrap fabric and pop them into my box for decorating my craft items .

I enjoy checking out new styles of flowers to make on you tube and learning how to make different leaves from ribbon.

Here are some of the end results.


Hope they inspire you to recycle

Friday, 18 August 2017

New Stash at Basement prices

Hi Crafters

Today I had a delivery from EveryCraftsaPound

Needless to say not every craft is a pound but there are many bargains to be had from this company.

If you make particular items and do particular projects it is probably not for you, But doing workshops means I need lots of everything so this company is great. You do need to spend £40 to get free postage, but the delivery, packaging and service is excellent.

The items are named goods so for example I purchased a First Edition 12 x 12 stack of papers for £5.99 when it would normally retail at £15.99.

The £1 items included sets of Santoro stamps, small dies, and some really lovely sets of ribbon 6 reels of 1 metre. The ribbon would normally retail at minimum of £4 and the stamp sets probably more.

The one thing I would caution is that new items are added Thursday/Friday and if they are great deals they sell out very quickly so if you want it, do not hesitate.

I quickly worked out that the parcel today was approximately £130 worth of goodies for £41 so I am a happy crafter.

Check out the website at www.everycraftsapound.co.uk

Dee

Thursday, 17 August 2017

More Toilet Tissue Flowers

Hi Crafters

Having made a floral display from toilet tissue,(see previous post), I got to thinking about other uses and how it would be helpful to be able to make last minute corsages if you forgot to order one for a special occasion.

Using a carnation style and rose style flower I put together a floral pin/corsage. It needed some foliage and colour and although slightly cheating I thought it probable that everyone had some greenery available either in the garden, hedgerow nearly or from a houseplant, so cut 2 stems of foliage from a plant pot in the garden to finish it.

I would be happy to wear the result, so we have another use for toilet tissue flowers.


Tuesday, 15 August 2017

New Use for Toilet Tissue

Hi Crafters

Following on from my decision to do more workshops and demo's, I came across new flowers made from, yes you've guessed it, toilet tissue.

I had to give it a try as it looked do-able and effective, and it was. I was surprised at how well the bouquet came together. The YouTube video showed 6 styles of blossoms and flowers and I added the chrysanthemum making 7 in total.
To make the display below took 22 stems, and about 5 hours in total from start to finish, considering this was my first try, I can expect to speed up a little.

It is not without some cost as you need flower wires and tape, and some oasis to do the display, but this is considerably cheaper and longer lasting. Needless to say this has been added to my list of demo's.
I would love some comments if you have any

Happy crafting


Dee

Sunday, 13 August 2017

Craft Show Taunton

Hi Crafters

Today was the Taunton Sincerely Yours show, it is actually in North Petherton off junction 24 of M5, and has been showing there for a couple of years.

It is unusual to have the show in August, and I only hope this does not mean we will only get one a year as previously we have had one in April/May time and one in November

The show appears to be getting smaller, although stalls are larger. Each visit I tell myself I need nothing but end up spending more than intended, although always happy with my purchases.

First 2 minutes inside and the first stall was Oyster Stamps. I love this seller as they have Heartfelt stamps and dies which are superb for flowers, and I treated myself to the Cascading Fuchsia, which I have been thinking about for some time but always end up buying more practical stamps and die sets. The problem with the fuchsia it really is 3D and will easily be squished in storage. I also bought a new make for me 'Jeanine's Art' die, this was quite fancy and reasonably priced, I thought, at £10
I am going to try this as soon as I finish this post as it looks a wow die.

Next and more practically I purchased some red card for Christmas, some fine glue bottles and a pack of two ink blenders.

I checked out the many stamps available, but did not succumb, I do not know why, because there were so many on offer and some lovely collections, I think with stamps I have to have a project in mind. for some reason it seems more important to have a use for the stamp before purchasing, whereas dies I just have to like them.

Next it was Jelly Bean stall lots of lovely items for a £1 or 11 for £10. Being a frugal crafter this was heaven and I bought gems, ribbon, more card and tape pens, some really lovely bargains.

As always I ran into some other lovely crafters and we chatted mid purchase. They were inspiring and gave me some ideas for future crafting, so hopefully long may the craft shows continue. I guess as long as we all go and spend our money they will be able to continue to come to a town near you.

Back soon with some of my makes
Dee

Night Skies and 3D Cards

Hi Crafters

I have been updating the portfolio and saw that 3D cards were lacking. I had an idea, a card I first made many years ago with a pop-out centre and then a dangly item in the middle, so I looked around for some ideas and what I finished up with was very different.

Using an 8 x 8 scalloped card base, 1 cut a 7" layer to go on top
From this I cut a 5" circle
Then placed this on the base card, masked the outside edges and used my inks to colour the circle with a mixture of blues and a little purple
Next I added glitter glue sports for night-sky stars
Then cut a couple of trees and reindeer with my dies 
Under the circle I placed 2 pieces of card with wavy lines and slid the trees in between
more glitter glue was added to the hills and tree edges for snow
And the reindeer was layered and added to the front

As usual when trying something for the first time I made 2
The second one was even simpler with just one die cut scene, and which I like just as much so this is one of the designs I will use at Christmas  


This night-sky could be used for other greetings and would be lovely for a fairy silhouette, this has gone into my portfolio for workshops.