Followers

Wednesday, 27 May 2020

The Cutest Index Box

Using up your 6 x 6 papers

Hi Crafters

So today I have a great little Index box to show you.
It was inspired by the Posh Paper Lady, but I altered the sizes and design to suit an idea I had to make a recipe box that would hold 12 to 16 cards. That may not seem many but I wanted the boxes to hold personal recipes on a theme

For example 

  • Your 10 favourite family recipes - to be passed on to children and grandchildren etc
  • Your 10 favourite frugal recipes - to be given to anyone going off to college, or needing to tasty economic dishes 
  • Your 10 favourite Slimming World recipes - to help encourage you through the difficult times 
So you get the idea.

This design also allowed me to use up my 6 x 6 papers which I do not generally use for my projects, but cannot seem to stop buying when I see a bargain.

So here are the results of my re-design


The box is made using envelope instead of concertina sides 
The envelopes have been made from the 6 x 6 sheets of paper and then the top cut off and all glued together 
When it is glued to the sides of the box it forms a file 
Each envelope will hold 2 pieces of card A7 size, on which you can add your recipes 


I used 8 envelopes per box so it will easily hold 16 A7 cards
Of course you could use them to file other information, and you could swap them with family and friends, they would make great little personal gifts 

To make them you need:
10 pieces of 6 x6 papers I used Dovecraft Textured Arts & Crafts papers 50 sheets in the pad so it made 5
2 pieces of cereal box card 11.5cm x 8.5cm
1 piece of cereal boc card 11.5cm x 3cm 
An envelope maker 

I am very pleased with this design and would like to thank the Posh Paper Lady for sharing her great ideas, and inspiring me to make these little gems.

Dee


Sunday, 24 May 2020

My Best Ever Album

Hi Crafters

After making an album using Paul Ford's video on YouTube I decided to have a go at another album. This time I wanted to try the a method that would allow me to open out pages and flaps from the base page. This would require a hinge centre, which I have tried before but not quite mastered. So I watched some tutorials, and found a great tutorial from "Scrap and Create" , (in fact 3 videos altogether) that showed the construction of the album, different page configurations and some page decoration.  I would recommend these videos for a professional finish if you are starting out making your own albums. I have made quite a few in the past but this is definately my best.


I used Chipboard for the covers and a hinge centre as shown in the video. I decided to use a Craft Consortium pad of 12 x 12 papers called Gypsy, which I love and had used some sheets, but there were plenty left. I also needed 5 sheets of A4 card for the abse pages and Black card for the additional pages and flaps.
The hinges held 5 base pages each double sided and they act as an envelope on which your fold out pages are attached.
Page 1
Has a pocket that holds a mini book with 4 sections for photographs, a back page to the pocket and a top flap where smaller photos can be added both sides
Page 1 back
Clear page and then additional flap and slightly smaller flap that fold in.

Page 2
2 half page flaps open to reveal a pocket and inside the pocket I have added a little packet to hold memorabilia
Page 2 back
Clear page and then a double flap giving an additional 4 sections


Page 3
Flap with ribbon closure that opens to reveal the page and a smaller flap
Back page clear with a flap that has a ribbon corner to hold tags and 2 tags have been added that can be used for journalling or photographs


Page 4
SIde panel that holds tags,  2 tags have been added that can be used for journalling or photographs
and a half page flap with a pocket on the outside
Back page is clear with an additional flap that has a pocket and 2 more tags, a half page flap and a smaller outer flap that all fold in


Page 5
Another half page that opens with a pocket and 2 tags inside
Back is a full page with photo-corners

As yet I have not added anything to the inside of the front cover or back cover, I will also add some decoration to the spine. The front has been decorated with a simple postcard matching the many tags inside and a swirl of tiny beads.

The album will  hold at least 40 photographs as it is now, plus each of the five pages will take additional photomats 12cm x 15cm, another 10 pages or if 2 are added (there is enough room) to each section this would allow another 20 potographs.

This was a larger project than I normally tackle, but by making the album and pages in the same sequence as shown in the video it allowed me to be reasonably organised in my approach, so the whole album so far has taken about 4 afternoons.  It has inspired me to tackle another couple of albums for presents and as I have until Christmas I am looking forward to taking my time.

If you have children and grandchildren what a lovely way of capturing those precious moments. I know everyone takes photographs on their phones nowadays, but I do wonder how many of those will  be availble to  look back on in 20 or 30 years time.

If anyone knows of any other videos on YouTube that give good album tutorials please let me know.

Happy Crafting and stay safe
Dee

Saturday, 23 May 2020

Great Little Bunny Die

Cute Bunny Die 

Hi Crafters 

A couple of days ago I had a delivery from AliExpress. It was a single parcel with a cute bunny die, that i thought I would share with you .


As you can see it is a really cute little line of bunnies. Now as this is bunny season and I see many a fluffy bundle when taking my evening stroll I know I am really going to enjoy this little die, just a shame it took so long to get here it  missed Easter completely.

 Dee


Friday, 22 May 2020

Felted Butterfly

Combining Crafts 

Hi Crafters

Today I decided to try something new, combining a few different crafts, to see if it worked.
I used a Sizzix die from my card making craft, felting tools and wool and some embroidery techniques 


Both the butterfly and heart are made by cutting the base shape from Sizzix dies and then felting the coloured wool onto the base felt. I then used embroidery thread to outline all around the outside. For the buttefly I added mini beads to the top wings and seqins to the body part, and for the heart I did a running stitch inside the embroidered edge and then a flower outline with a sequin centre. 

I think the finished pieces came out well and if I wanted an embellishment for a sewing project these would definately add some interest. Or I could add a brooch bar to the back quite easily. 
I picked up some useful techniques while felting and cold expand on the embroidery side of the process if the project required. 

The process of combining different crafts allows you to utilise your craft items in a creative manner, and makes for a more imaginative design process. Why not look at your craft items and have a go at cross-crafting, you may be surprised at the results.


Dee


Thursday, 21 May 2020

Great Buys for more crafting

Hi Crafters

Hope everyone is feeling better now you can go out and enjoy the weather. I did really well for the first 6-7 weeks of lockdown using up a lot of papers in my stash and enjoying the time to craft, this tidies up the cupboard quite well and for the first time I could see little spaces in several boxes. However I hit a little low at the beginning of the week and that started me buying again. The first parcel came this morning so I thought I would share my haul with you all.


The goodies came from a company called Creative Expressions. They have some quality products at amazing prices .
I love Tim Holtz art/craft work, but have only dabbled a little, so when I saw the Compendium of Curiosities on C. E. website reduced to £5.80 from £20, I decided to buy the 2 books for inspiration and techniques. I then added the Christmas "Stampers Anonymous" stamps as they are a little different, a pack of metal sheets for embossing, as this seemed to go with the the Tim Holtz ideaology. One of the best buys was a stack of 12 x 12 papers from DCWV, if you are not familiar with DIe Cuts With a View, they are an American company who have been making great paper pads for many years, you have probably seen the papers even if you do not know the name. This pad is quite grungy and I thought it would be great for masculine projects. The pad has 48 sheets and would have sold originally for around £20, it was just £5. Then in order to get free p&p I added 7 bottles of Distress Stains. I have distress inks and pens, but no stains. These pots sell from £3 to £8 each on Ebay so for £1.25 they were a great buy.

I have already checked out how to use the stains on YouTube and  I am looking foward to trying the Tim Holtz look on a couple of projects.


I am working on an album at the moment and one of my future projects will definately be another album made from this pad. 

It is worth taking a look at Creative Expression, and I will add they are very helpful. I could not remember my password and ended up phoning the office, a very helpful lady reset my account. I was notified when the item went out and when the delivery was coming to the house, and this all happened in 3 days, so I can recommend them.

Happy Crafting and Stay Safe.

Dee

Sunday, 17 May 2020

Copy Paper Gift Bag

Great Gift Bag 

Hi Crafters

Well the Isolation Journal is finished and I am now on other crafts again. 
I will try to make a lot of posts about items you can make with items generally kept in the home, this project is a great example of adapting what you already have. It makes a super gift bag, and a reasonable size. 

Saw this on Posh Paper Lady – YouTube
 You can make this from bits you have in the house 
You just need 2 pieces of A4 copypaper
1 sheet of contrasting colour paper for handles and trim
Glue and if you have them brads 


From a contrasting piece of card cut 2 pieces 1.25” wide and score at 3/8each side. Fold over and run bone folder over for clean edge
Then run the whole piece over the edge of the desk or bend slightly with the bone folder to give a curve put aside to dry while you are making the bag. You will also need 2 pieces of contrasting card approx. 63/8” and  2 pieces 2.5” all 1.25” wide and simply folded in half 

Take a free printable from the web and print it out twice on A4 paper
NB You could print with a favourite stamp if you prefer or do not have a good printer
Score the paper at 2.5” both sides and at the base
Cut the bottom 2 corners off completely from one piece of paper and on the second piece cut up from the bottom in the corner and cut V into each side of the corner.

Using a wet glue, (I use Pritt Stick) put the two bases together and then the sides
Glue the contrasting pieces around the top rim and then measure and place the handles onto the bag. You can strengthen the base by adding heavy card inside.

Dee

Wednesday, 13 May 2020

Completed Isolation Journal

Isolation Journal Completion - Day 10 

Hi Crfaters

Well here we are at the end of the project.

I will just give you a couple of ideas for closure and finish on your journal and the project will be complete.


As you can see I have decided to finish the cover with a band over the binding section.
This was a piece of black card 3" wide and the length of the book.
Run the scissors over the card to give it a little flexibility
Place strong tape either side of the inside of the black card, and the edge of the front and back of the book. Before placing down, do a trial of run placing the card over the edge of the book to line up.
Take the tape off one side of the card and the front of the book, line up the card (if it is easier to get a straight line mark the end of the book with a pencil where you want to place the card), and stick down
Fold loosely over the end and stick down the other side.
I have a ribbon closure on here as it looks colourful and can be undone or slipped off, but I also use a button closure on  a lot of my journals and books.

So here is an example
If I was going to sell this journal I would decorate the front of the button, although it is a great vintage button in its own right.
To make a button closure you need a length of elastic and a pretty coordinating button.
Thread the elastic through the button and tie at the back in the middle of the elastic, then simply tie the two ends of the elastic together.
FOld the elastic around the book and slip the button through the middle. This method is quicker to use so if you are going to be opening and closing the book a lot, and adjusts to the size of your book as you add items.

So now we have the book finished here it is!!

Inside cover
First double page


Second Double page


Third Double page 
Fourth Double page

Fifth Double page


Back Cover 

It will take me some time to fill the book as I have to gather up my dates, incidents during the weeks and photographs, but when I have filled the pages I will photograph it again for you all to see.

Now that the album is finished I will be back to crafting many different things. I want to try felting and a couple of projects from the Posh Paper Lady. 
If you fancy seeing these projects why not press the FOLLOW button and check in to see them as I post. Or send me a comment or suggestion of items to make. 
If anyone would like to do a swap that would be fun too.

Dee

Tuesday, 12 May 2020

Isolation Journal - Inside and Outside pages

Inside & Outside pages - Day 9


Well here we are nearing the end of our project. I hope yours has come together and will give you hours of pleasure filling in the pages you have diligently made.

All of the ideas I am showing today are quick and simple as I am sure we are all eager to finish the project and enjoy using the book.

Inside Cover 

We had left the inside and outside cover to be finished and I had saved a piece of designer 12 x 12 paper for this job. I cut the paper in half and then each piece 7" tall, clipped all the corners to round them off and glued to the base, covering any earlier edges to neaten off.

This is the inside cover, and as you can see I have simply made a triangular flap to hold tags or information, photographs etc that can be later distributed to other pages
As this will be a well used storage area I have used a square of black card, folded in half and then covered with designer paper,  this makes the flap a little thicker and sturdier. once the trangle has been covered I used strong tape on the left side and bottom edge to attach it to the page.
I added tags made from the strips remaining.
On the right hand page I have added another flap, again folding over the outside edge and glueing it down to make it stronger. This piece has been cut long enough to fit the length of the page and wide enough that the flap of the envelope will tuck into the flap. There are 2 photo-mats in the envelope.

Outside cover


 As you can see the outside cover has been covered with the same designer page as the inside cover.
I am leaving this blank for now as I would like to add a scroll giving the date that Lockdown and Isolation finishes and some notes to finish my story.

On the left page this is a piece of designer paper 12" x 6"
Simply fold into the middle and trim all four corners
To make the closure I hae used my punches and punched out 2 circle 25mm and 4 x 10mm circles. I do not have a punch this size so i cut the 10mm circles from the designer papers
Layer 2 of the 10mm circles together and place a dimensional sticky pad on the back
Add some sturdy tape to the back of the 25mm circle. Put the smaller circle on to the middle and the dimentional pads will give you the space to wind around the string or ribbon for closure.
Place the circles either side of the opening on the flaps.

That completes the page layouts

My last post will give ideas on closures and decoration for the front of your album. I will also show pictures of the completed pages and journal.

If you have suggestions on any projects you would like to see on my blog please click on the FOLLOW button at the top of the page and send me your suggestions or comments.

Dee

Monday, 11 May 2020

Isolation Journal - Last double page spread

Day 8  of making your Isolation Journal
Double Page Spread 


Hi Crafters

Well here is the last double page spread for me to show you. After this there is only the Inside and Outside covers and opposite pages to show. So today I am showing 2 very simple ideas, which I hope you will find useful

This is what we are making:

The left side has a simple flap that will hold some journalling tags and any pieces of spare designer paper that you can use for matting photographs 
Again I have made this from 2 strips of the designer papers so have used contrasting pieces, The top piece I folded over to strengthen the edge as this will get wear, and then stick it to the bottom piece I have used my corner punch on the top 2 edges to round them off and fold the 2 sides and base in at  1cm, using this to glue to the page, to make the flap. I liked the idea of a simple flap as the paper behind can be seen. I have used some more  of the wider strips to make tags. 
If you felt it was neater, you could make the tags into a little booklet by punching a hole in the bottom end and adding a brad to hold them together.

On the right hand side I have made a mini clipboard. I used my last larger piece and laminated it, I then added a thin pad and clip and used the clip to add it to the envelope. You could put more photo-mats inside of the envelope but I decided to leave it empty and that way if I wrote notes on the pad I could peel it off and store in the envelope underneath until I wanted to use the notes.  As an alternative to the laminated paper,  you could use a piece of cardboard (more cereal box) to make the clipboard and cover it with paper, but I did not have enough designer paper to cover it front and back. I would still laminate the top paper as this makes it sturdier and wipeable, meaning you can replace the pad and the clipboard will still look good. 

My next post will be the Inside and Outside cover, and then the final post for this journal will be closures and a few ideas on decorating your Journal.

 If you like the project please click to Follow my Blog, at the top of the page  as it give encouragement for future posts, and if you would like to see more techniques or projects you can use the comment section for your suggestions.

Happy Crafting
Dee                                                              

Sunday, 10 May 2020

Isolation Folder - 4th Double Page

4th Double PAge - Folder & a little extra


Hello again everyone. I hope there are some of you joining me today to make more pages for your journal.
Today is day 7 of our project and I hope you are enjoying it as I am.. Not only am I liking the process of putting together the album I am looking forward to making the entries that will tell my story of the time we have been in Isolation and give a unique memory book of this time. 

Here is what we will be doing today


I would like to say at this point that the next few pages have been developed with projects that will use up the scraps from the sheets used to make the envlopes and some of the other page items, so that the papers match and do not leave a lot of pieces for my scrap box.

Left Page

Pocket folder made with a base of 1 sheet of A4 black card, and the die used for one of the previous pages. 
I folded the page in half leaving a 1.5cm edge, and marked down from the top of the page where I wanted the flap to start so that teh pocket was a good size and fitted the book page.
I then put the die on the side of the card where the flap was and put it in my machine just cutting down to the flap line, at this stage it does not matter if you go over a little. 
NB: If your edge die is not very wide shorten the piece of card before you fold so that the curve for the flap fits the sides of the pocket. Using a scrap piece of paper cut another piece that will fit over the flap.
On the side where the small fold has been made, cut from the fold to the top of the page leaving the pocket flap standing proud. 
On the other side cut from the flap edge to the outside edge of the card then fold this in half and glue to the small fold edge to make your base pocket. 
Again using scrap papers cut a piece that fits the under flap part of your pocket width ways and 2cm longer as we will fold this over the end to complete the pocket base. 
This is where I used up a couple of pieces of scrap paper, as I had no pieces of scrap that would cover the whole are , but had 2 widths that were long enough to do the job. In order to make the best finish I placed one piece on the right side and glued down, the second piece I folded over the length edge to strengthen it and used strong tape along the left side, top and bottom to add it to the pocket, this gave me another storage area on the front of the pocket for tags, as you can see in the picture above. 
I glued the design paper to the top flap and it was ready to place on the page
I could have used magnets or velcro to hold the flap but decided to continue with the ribbon theme and placed a piece around the length of the pocket before sticking it onto the page, that could be used to tie the flap shut.

In the centre of each double page spread is a little flap that allows extra spacing in the book, and in this page I decided to add one of my shaker keyrings to give a little more interest to the page.
(See previous posts of the shaker keyrings and bookmarks) 

On the right side is an envelope with 2 Photo mats. 


These mats have been made a little differently. Instead of tabs I have added photo corners to the card mats, photos can be slipped into the corners. 
You can make you own photo-corners using the matching designer papers. Take a strip of paper 4cm wide (any width will do the job but consider the width against the size mat you are covering) and fold as shown in the picture below.


As you can see I used my mat for this so I could line up the folds.
Once you have made the 2 folds turn it over as in the right hand side example and cut along the triangles edge . Make 4 of these and place them in each corner with the open parts at the back. Make sure they are tight into the corner and stick down on the back of the card only, allowing the front to take the photographs.
You can use these photo corners for any photo mats you make for this project or any other so it is worth having a go at making your own.
Well thats todays layout, I hope you have found something you wnat to make for your journal. 
Dee

Saturday, 9 May 2020

Isolation Journal - Double page layout 3

Double Page Layout 3


Hi Crafters

Continue throughout this process to think about your journal use,  and then select ideas that will deliver the pages you want..

Today I am adding two little booklets and a picture frame


The booklets can be made with a piece of A4 papers, I have used a pale blue swirl paper and a lovely heavy vellum,but you can use any papers you have or that coordinate with your envelopes, both fronts are decorated with coordinating paper from the Recollection pad. They will hold smaller photographs and notes or instructions for one of my craft projects.
I have not decorated the front as this will add bulk to the page

With your A4 paper fold in half lengthways and then each half back to the centre so you have 4 equal sections across the page, Then mark the centre of your page this will be on the10.5cm mark
Cut up this line through 3 sections leaving the top section attached
You then fold concertina style, flip over at the top and continue to fold. Where you flip over at the top glue the 2 pages together to form the booklet.

Decorate the front to coordinate with your journal theme.
Frame:
You can use any frame you like or cut one to fit the left page. You could cut one from your cereal board by cutting the size to fit and then cut out the centre. Decorate this frame by winding butchers string or fine light ribbon.  My frame is a Disney die cut, and I have kept it very simple. Having cut the frame and put foam pads on three sides to add it to the page I cut a piece of card that fits inside the frame that can be slipped in through the top. This piece of card gives the size ready for the picture to be added and slipped in without having to trial pictures for fit, once the frame is on the page.

That completes todays double page layout
Back tomorrow with more
I would love to see any of your makes as I know there are some great crafters out there.

Dee


Friday, 8 May 2020

Isolation Journal - Day 5 Double Page layout

Double Page Layout 2

Hi Crafters

Hope you are enjoying the process so far and now the journal  is coming together it is starting to look good.

My double page today takes into account the fact I do not want to make the whole book too bulky so I have used simple layering for interest.


So on the right half side with the open envelope I have added 2 photo mats made in the same way as yesterdays except both with the tabs on the side. The left side is layered and I have used dies to decorate.


I have used Tonic book dies, but if you do not have any dies you can still do todays project using pretty pictures instead
The base piece is a 13cm square of card
and the layers are 12.5cm wide and 23cm long scord at 7.5cm, 9.5cm cut at 8.5cm
If you want to curve the edges this can be done with a compass or any edge die that fits the size well


Using the measurements for the 7.5cm edges cut 2 toppers 7cm x 12cm and shape in the same manner layer on top of the bases.
Add a strip of ribbon to the middle of the base and just stick over the ends with double sided tape
Add strong tape to the scored under edges of all four flaps.
Place the 2 bigger sides onto the base first, then the smaller flaps
Place another piece of ribbon to the base of the finished square long enough to tie a closure and then add strong tape across the bottom being sure to cover all four seams and a couple of strips in the middle
Place to the centre of the page. Now when you have it in place you can open the ribbon and unfold the flaps to give you 5 sections to add photographs and notes plus some additional tags can be slipped under the ribbon on the base.


You can see from the finished picture I have also added a topper to the right side that will allow the envelope tip to tuck in.

So here you have ideas for the second double page spread

More ideas tomorrow

Dee


Thursday, 7 May 2020

Isolation Journal - Day 4 Inside pages

Isolation  Journal - Day 4 Inside pages

Hi Crafters

Today we start to add our decorations and pages to the inside of our journal. This is where the journals become personalised and should be finished to accomodate the type of information you want to hold in your book, so take some time to think about the types of pages you want.

Will you be adding journalling,
Photographs
Memorabilia  (this is where this journal will probably differ from a memory album as there will be few tickets and programmes to add to the pages as there is no-where to attend at the moment)
Do you want little pockets
Tags
Mini booklets
All can be added while making the pages up.

I want to add quite a few pictures of the crafts I have made as well as instructions for making the projects so I will use:
Photomats
Tags
Booklets and
Foldout pages

I have started by cutting 6 sheets of A4 card down to 6.5" wide and 5.5" along the sheets
Each envelope will have 2 photomats added
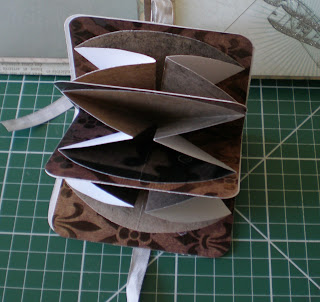
For todays double page layout I have decided to make a  mini book based on a Mexican album
that will fit into the envelope slot along with one of the photo mats
On the left side I am going to make a double holder the back section will be large enough for a photo mat and large tags  while the front smaller section will hold little tags which I can use to describe items I have made.


  • For the mini book I used scrap designer pieces and cut 3 circles 5" diameter I used a reel of tape to to draw around for the circles
  • I then folded the circle in half and in half again, and unfolded this part, then I folded the the 2 ends of the circle to the middle and unfolded
  • Lastly I tucked the side panels in so the whole thing folded back to a quarter circle
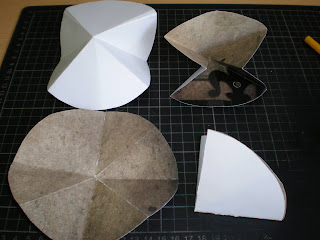


  • I then cut 3 pieces of scrap card 10cm x 15cm (sorry about the change from imperial to metric I use whatever suits my design for the quickest and easiest finish) and folded in half so it forms a book page 10 x 7.5. Each of the quarter circle fits into the page by gluing the outside and sticking to the inside of the double page and then gluing the top of the quarter circle and bringing down the other side of the page next glue the next side of a double page to the outside of the first and repeat the gluing to fit the other 2 circles. I clipped the corners with my corner punch and then cut a sheet of paper from my recollections pad 10cm by  15.5cm and punch the corners. Line up to the front of your mini book and glue down fold over the spine and glue the back side down
  • Lastly add a little ribbon to go all around the mini book and long enough to tie a bow
For the photo mats I simply added a piece of matching ribbon to the middle of the side and then put a coordinating piece of paper in the centre of the front side. The photograph can be added to the front while the back is plain card and can be used to write up any notes.

Here we have the mini book and photo mat for the right hand page

Next I made a simple holder to fit across the left hand page that would hold another mat (the other way up) and  andded a smaller layer to this, to take small tags for notes. 
I cut a piece of card from the reflections papers that coordinated with the page, that measured 5 1/2" wide by 3 3/4" deep and another piece 5 1/2" by 1 3/4", I used scrap paper to add concertina folds to the side this was a piece 3 1/2" x 1 1/2" folded in half and then fold each half back up to the middle so you have 4 sections with a valley and mountain fold. I wanted some room in hte holder to tage additional tags and this gave it some width. But you may have your own way of making a holder . I have used this method for the first pages as they require nothing other than a cutter and pencil and can be folded by hand so anyone can make them. 


Glue the concertina outside edge and glue to the underside of your paper on each side I then used a single folded piece of scrap paper for the smaller panel and glued them either side,  making sure they sat inside the top and bottom section. 
I folded up the bottom end of the smaller section and used strong tape along the folded bottom section 
I glued the small panel on top of the wider panel and added strong tape to the side panels 
Then removing the strong tape top, stuck the whole thin into place on the left page. 
I made another photo mat to match the one on the other page but around the other way with the tab at the top.

Here we have our first double page finished. I hope you have  found some ideas here that you want to use
Check back tomorrow for another double page layout.

Dee


Wednesday, 6 May 2020

Isolation Journal - Day 3

Isolation Journal - Day 3

Hi Crafters

Well here we are day 3 of our book. I hope you are all enjoying making the journal, it may not look like much at the moment but it will be lovely by the time we have finished and made some interesting pages to add to the envelopes.

Today is the cover


Take your cereal box or if you are an avid crafter and have micro board then cut 2 pieces 6.5" x 7.5" 
If you have used envelopes then cut the board 1/2" bigger on both sides 

Using your designer papers or A4 sheets place the board on the paper to make best use of the pattern allowing at least 1/2" around all four sides more if you have it. 


Cut notches on the corners and place strong tapes around the outside edges of the board. Glue the edges of the paper with Pritt Stick and fold over. Do the same for both pieces.


Next cut 2 more pieces of paper to make hinges 7" by 2" and fold in half with the pattern inside. for these pieces you will not be folding again.
Glue the outside and with the fold at the edge of the card lay the hinge onto the bottom line of the envelope, glue the top of the hinge and place your front cover onto the glued hinge lining up the edge with the hinges of the book .
Turn the book over and repeat for the back of the book.


Do not worry about the inside of the cover at this point as we can cover it with more papers or add a pocket later. 

This completes the main part of the book 


Back tomorrow to start on the pages. 

Dee