Isolation Journal - Day 4 Inside pages
Hi CraftersToday we start to add our decorations and pages to the inside of our journal. This is where the journals become personalised and should be finished to accomodate the type of information you want to hold in your book, so take some time to think about the types of pages you want.
Will you be adding journalling,
Photographs
Memorabilia (this is where this journal will probably differ from a memory album as there will be few tickets and programmes to add to the pages as there is no-where to attend at the moment)
Do you want little pockets
Tags
Mini booklets
All can be added while making the pages up.
I want to add quite a few pictures of the crafts I have made as well as instructions for making the projects so I will use:
Photomats
Tags
Booklets and
Foldout pages
I have started by cutting 6 sheets of A4 card down to 6.5" wide and 5.5" along the sheets
Each envelope will have 2 photomats added
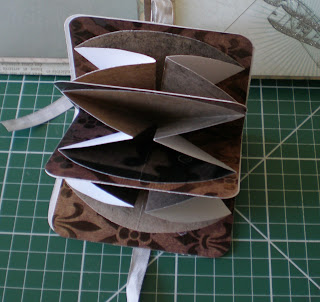
For todays double page layout I have decided to make a mini book based on a Mexican album
that will fit into the envelope slot along with one of the photo mats
On the left side I am going to make a double holder the back section will be large enough for a photo mat and large tags while the front smaller section will hold little tags which I can use to describe items I have made.
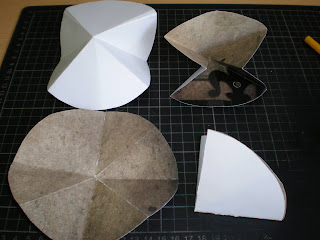
- For the mini book I used scrap designer pieces and cut 3 circles 5" diameter I used a reel of tape to to draw around for the circles
- I then folded the circle in half and in half again, and unfolded this part, then I folded the the 2 ends of the circle to the middle and unfolded
- Lastly I tucked the side panels in so the whole thing folded back to a quarter circle
- I then cut 3 pieces of scrap card 10cm x 15cm (sorry about the change from imperial to metric I use whatever suits my design for the quickest and easiest finish) and folded in half so it forms a book page 10 x 7.5. Each of the quarter circle fits into the page by gluing the outside and sticking to the inside of the double page and then gluing the top of the quarter circle and bringing down the other side of the page next glue the next side of a double page to the outside of the first and repeat the gluing to fit the other 2 circles. I clipped the corners with my corner punch and then cut a sheet of paper from my recollections pad 10cm by 15.5cm and punch the corners. Line up to the front of your mini book and glue down fold over the spine and glue the back side down
- Lastly add a little ribbon to go all around the mini book and long enough to tie a bow
For the photo mats I simply added a piece of matching ribbon to the middle of the side and then put a coordinating piece of paper in the centre of the front side. The photograph can be added to the front while the back is plain card and can be used to write up any notes.
Here we have the mini book and photo mat for the right hand page
Next I made a simple holder to fit across the left hand page that would hold another mat (the other way up) and andded a smaller layer to this, to take small tags for notes.
I cut a piece of card from the reflections papers that coordinated with the page, that measured 5 1/2" wide by 3 3/4" deep and another piece 5 1/2" by 1 3/4", I used scrap paper to add concertina folds to the side this was a piece 3 1/2" x 1 1/2" folded in half and then fold each half back up to the middle so you have 4 sections with a valley and mountain fold. I wanted some room in hte holder to tage additional tags and this gave it some width. But you may have your own way of making a holder . I have used this method for the first pages as they require nothing other than a cutter and pencil and can be folded by hand so anyone can make them.
Glue the concertina outside edge and glue to the underside of your paper on each side I then used a single folded piece of scrap paper for the smaller panel and glued them either side, making sure they sat inside the top and bottom section.
I folded up the bottom end of the smaller section and used strong tape along the folded bottom section
I glued the small panel on top of the wider panel and added strong tape to the side panels
Then removing the strong tape top, stuck the whole thin into place on the left page.
I made another photo mat to match the one on the other page but around the other way with the tab at the top.
Here we have our first double page finished. I hope you have found some ideas here that you want to use
Check back tomorrow for another double page layout.
Dee
Check back tomorrow for another double page layout.
Dee


No comments:
Post a Comment
Make a comment