Followers

Thursday, 30 April 2020

Something New - Blizzard Books

Something New - Blizzard Books 


Hi Crafters

Today we have something new, well new to me, they have been around for many years now, but I only came across them the other night when checking out YouTube during my 'Can't Sleep' cup of tea. 

It is basically a credit/gift/store card holder. It is just so useful as most of us carry around store cards business cards etc

This will hold 16 or so cards easily and fold up to go in  a pocket of bag 


This is made with a sheet of paper and origami folds, there is no glue used in the basic book
I have decorated the outside of my books as:-

  1. It was a way of adding ribbon and I had only used plain coloured paper 
  2. Also it is a great way of using up your scrap designer papers.
It is not difficult to learn how to do this I was able to do it first time (i used a piece of kitchen paper for my trial attempt as that is all I had at that time of night in the kitchen), but I will give you the YouTube instructions I found as they also tell you how to size your paper to hold the size cards you want to store.
Paula Beardell Krieg 

Generalizing Paper Size for Hedi Kyle's Card-Carrying Blizzard Book

Will give you the sizing and her previous video will show you how to fold the book 

It is well worth having a go, I will be making these as giveaways and for family and friends.

Dee

Wednesday, 29 April 2020

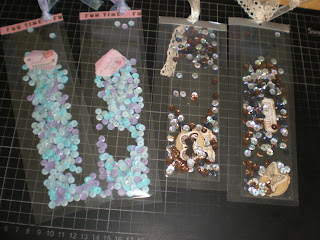
Shaker Bookmarks

Shaker Bookmarks 


Hi Crafters

If you saw my Shaker embellishments post a few days ago here are some Bookmarks made with the same method

Using an A5 laminating sheet cut 2" strips by the 8" length and trim the tops
Turn them inside out and place these into an A4 laminating sheet  
You can get 2 lengthways and one across the bottom 

Cut a 1cm band on one side and 1/2cm the other and trim the top so it is open
Fill with beads sequins etc and then sellotape the top over 
cover the tap with washi-tape, I put a layer of red firm hold double sided tape between the sellotape and washi-tape as washi-tape does not hold down well. 
Punch a hole in the top and thread your ribbon through.


You can see the 1cm piece to the side, if you wanted to use this as a page divider, mark the 1cm side where the binder slots neeed to go (some binders have 2 holes some have 8) and then make a small punch hole where marked cut up to the hole with sissors and that will allow you to pull the page divider in and out of the binder to place it in different parts of the folder

See NurseTara04 on YouTube to see these being made and how they fit into a journal.

Tuesday, 28 April 2020

Ribbon Flower 2 - Simple sewing with effect

Ribbon Flower 2 -  Simple sewing with effect

Hi crafters 

Still on my ribbon flowers. The latest style I have tried has probably been the easiest and yet the most effective. It takes a lot of ribbon , but is worth it for the fullness of the flower,  particularly if you want it for a hair adornment, wedding etc


To make this you will need 16 pieces of 2.5cm wide organza ribbon each piece should be 16cm long.
That is 256cm in total or approximately 102" .
Matching strong thread and centre decoration to enhance the colour ribbon you are using.
Felt circles for backing

Fold a piece of ribbon in half lengthways and sew up the short side along the top and down the short side in running stitch, pull it up into a petal and then start on the next piece. 
When you have 8 together, on your thread,  even out the petals and join up, sew off .
Do the same with 5 pieces and then 3 pieces to form the layers
Before placing them onto a circle of felt seperate the two layers to "fluff up" the petals 
Hot glue to the felt from the bottom up and then add your centre adornment.
Use a second piece of felt if you want to make this into a hair slide or corsage, fold the felt circle in half and make small cuts to hold the pin or clip. Slide the clip through the slits and glue the whole lot to the back of the flower.

I will definately be making more of these as they are very effective.

Happy Crafting 
Dee

Monday, 27 April 2020

Satin Ribbon Flower

Satin Ribbon Flower 


Hi Crafters 

In my post yesterday I said I would be having a go at more flowers using the burning method
For this you need Satin ribbon 
 A candle or night light 
A pair of long handled tweezers 

I first saw the method on YouTube and although I have made flowers with satin ribbon before, burning the ends to seal the thread, I have not used the heat to give movement in the petals, and wanted to try it.

I had a few attempts with narrow ribbon, the video I saw used 4cm wide, the one I had in cream was only 2.5cm. This did not work well and I could not get good enough petals to produce a flower
So I tried a 4cm in blue with stars on. This was better and with practice would make reasonable flowers. 

And lastly I went back to the narrower ribbon cut the corners off the top ends and held them over the flame to singe the ends, then instead of twisting them to get petal lines I folded the bottom end in  a concertina fashion, put them in my tweezers and held them over the flame to pinch in the bottom of the petal, this also gave a small amount of shaping to the petal. I then put the top end back over the heat to get the petal top too curl a little. 

For the finished flower I used 7 pieces of ribbon 2.5cm x 6cm and 5 pieces 2.5 x 4.5cm long 

I laid the larger petals flat and sewed them with running stitch, at the bottom end, onto thread and pulling them round in a flower shape, overstitched the centre flower and laid flat. I did the same for the 5 smaller petals.
I then cut a 2.5cm circle of felt and hot-glued the larger petals onto the centre, then the smaller petals in the middle, finishing the flower with a pretty pearl and diamante embellishment centre 


This would make a lovely bridesmaid's hair adornment and you could make it to match the dress
Or a cortage for the summer ball, add it to an elastic wristband 

Why not have a go, and sned me a picture of your flowers, I would love to see them.

Dee

Sunday, 26 April 2020

More Ribbon Flowers

Ribbon Flowers 

Hi Crafters

As I said in my previous post I have made lots of fabric flowers before and the one I showed in my post was made from a recycled silk tie.

I decided to make more flowers using ribbon as I have 3 storage boxes full of satin, chiffon and grosgrain ribbons. It took me several attempts to get the flowers right this time as I was using organza ribbon that was obviously made from viscose instead of polyester and therefore could not be sealed on the edges using a flame. The pieces of ribbon needed to be sewn and then the individual petals sewn together before gluing onto a felt base and decorating.

After several different attempts I finally hit on the right structure for me and cut out many strips of ribbon using 4cm wide ribbon cut to 8cm lengths 

Sew around three sides with running stitches and pull up to make the petal. I tried adding the petals while I was sewing them but struggled with the shaping of the flower so in the end I sewed each petal seperately then strung them together, using 7 petals for the base and 5 petals for the top of the flower.


I can use these for gift wrapping, or hair adornments,brooches etc

The first flower I made I used 3 layers 9 petals 5 petals and 3 petals, which I pulled up to look like a centre cluster, and this one I placed a crocodile clip on the back


The other lavender flowers including the small 3 petal flowers I  have just placed on felt ready to be used as needed.

I want to try some satin ribbon flowers I saw on YouTube using the heat method so maybe I will have these made for my next post 

Hope you are all Safe and Well
Happy Crafting 
Dee 

Saturday, 25 April 2020

Recyclable Flower Embellishments

Recyclable Flower Embellishments

Hello fellow crafters
I just had to pop in to see the new show on tv with Kirstie Allsop. It is being shown everyday at 5pm, and is all abut crafting at home with things you have in the house.

Kirstie showed a neat way to make flowers and I have made many similar flowers myself, but this inspired me to make some more that could be used for embellishing boxes and gift bags. By adding a loop to the back of the flower, curling ribbon, string etc can be threaded through to attach the flower to the parcel, then when the item has been opened the flower can be slipped off the ribbon for re-use.

Here is my first make, using this loop idea.


I am very pleased with the result and will definately be making more. Particularly as this has been made from a silk tie and is therefore recycled as well as recycleable.


Here is the back showing the lace loop that I sewed into place.

And here is the flower with the ribbon removed ready to use again


I am heading off now to find more suitable remnants to make more, if I cut some out this afternoon, I can sew them this evening while watching the tv.

Happy Crafting

Dee

Wednesday, 22 April 2020

Love These Shaker Embellishments - Keyrings

Laminating Crafts


Since finding out how to make storage folders with my laminating punches I have been fascinated with laminated craft items

Obviously bookmarks and book covers are high on the list, but the other day I saw a great Shaker idea using your laminator and just had to try it.


The item I saw was a shaker insert for a journal or planner  but I ended up making embellishments for planners and keyrings, I still have shaker bookmarks and planner sections to make. ( see NurseTara 04), but I am really happy with the way these have turned out.


Now is a great time to try new things so look around your craft room and see what tools and papers you would like to experiment with while you have the time.

Happy Crafting 
Dee

Tuesday, 21 April 2020

Coffee Break Craft - Toppers/Tags Junk Journal embellishments

Toppers/Tags Junk Journal embellishments

Hi Crafters

Whilst I am calling this a coffe break craft, it came about from a much longer job, to be sure.
I was inspired by another bloggers post to have another tidy up of my desk, and when I had finished putting away lots of die cuts and tidying up generally, I then went a step further and emptied the many pots of bits I have my desk. These have all the oddments such as  beads, buttons, flowers, etc and any cut out pieces I have not used in the projects and do  not know where to put them.


So I ended up with 2 pots less and a couple of pots ready to use, plus a tidy desk 
As you can see there is also a pack of punched scalloped circles and in the bag are some lovely vintage hearts cut from a sheet of 12 x 12 First Edition papers 


Having recently seen some Junk Journal Embellishments that used up scraps, buttons etc I decided to lay out some circles and see if I could produce some with my cleared items.
The actual production of the embellishments took little time as the items were all ready to go, the only addition to the stash shown in the picture were some K & Co word stickers, which worked very well with the designs I had in mind 
I laid out my die cut shapes, mainly cicrcles, added  a section from the hearts, buttons, flowers and ribbon and put them together with my glue gun. The production took about 30 minutes so a great little craft sessions and more items tidied away.
I have packaged 2 lots for Ebay and put them into clear bags 


Great for Junk Journal or Scrapbook pages 

Happy Crafting Dee

Sunday, 19 April 2020

Coffee Break Craft - Making Tassles


Making Tassles 

Hi crafters

As promised back with a coffe break craft

These tassles are very quick and easy to make, and can be made from paper, fabric and leather.

Simply cut a length of fabric or paper
I use an average of 25cm long and 5-6cm deep 
cut thin strips from the bottom to within 1cm from the top.
Take the strip on the end and fold it up and over the top then back to form a loop.
Then keeping the edge tight roll up the top keeping the edge in line and the paper or fabric as tight as possible. Unravel and dot glue along every 4or5cm with a good quality glue giving a good dot at the end to secure and roll back up tightly

If you have used paper run your bone folder over the ends carefully so s not to break the tassle 
If you have used fabric you can try fraying the ends a little before wrapping up (for a shabby chic look) 


With the look at the centre of the tassle you have an opportunity to add a clip to allow you to attach your tassle to your projects. 
I make little leather tassles to add to the zips of bags 

Dee

Saturday, 18 April 2020

And now for Something Completely Different - Sew a Bag

Hi Crafters

I have been crafting most of my life and when I was a young girl my mother would show my sister and I how to make craft items for out friends for Christmas, (very useful as we could  not afford to buy very much so we would get some nice soaps, and bath items and make a pretty "Dolly" bag to put them in).

I have always enjoyed simple sewing, although my mum went onto do beautiful quilting and machine embroidery work. A couple of years ago I went to a craft day with the WI and one of the items we made was a tote bag. I enjoyed it so much I went and bought myself a good basic sewing machine when I retired

I love to recycle fabrics and look out for pieces in charity shops or sometimes shops selling curtains etc have remnants in a bucket for sale during the simmer.

I make Nightdress cases, shoe bags, makeup bags etc and whilst we have been in isolation I have made a few more bags from my fabric stash.

The are made from some fabric I bought to make paper crafts with in the days when we use to cut the squares out cover card sections with the picture and then use them to embellish cards and projects.
It has some lovely beach and seas scenes and has made a great set of bags for travelling 


All the bags are lined and have ribbon threaded through with bead ends to tie up for closure.

This next bag is made from a cushion cover bought new in pack from the Hospice shop. I loved the embroidery and though I could make something with it. 

By just folding it in half and adding ribon to the front for the tie the bag was lined and embroidered and ready to use. This will be a pretty makeup bag.


Back soon with the coffee break crafts I mentioned yesterday

Stay safe and keep crafting
I for one will be checking out the new Kirstie Allsop show on Monday , shown every day with ideas to craft at home using items in the home.

Dee

Friday, 17 April 2020

First Folio ALbum

Hi Crafters

I have now finished my first Folio Album, using the construction tape method for the cover.
The method is relatively easy for the outer case, however I could do with more practice to improve the inner sections that open up.

I took the Album made by Paul Ford on YouTube for the basic album and then built the inside pages
What I like about Paul's method is the construction tape and very good instructions on the video, also the clean look to his pages as he puts a photo mat on each page ready to take the photograph. This has two advantages, it gives the user a flat colour mat to set off the photograph and it also uses less of the dsigner papers for each page, when you are using papers that cost £1 a sheet it is a useful tool. It is particularly good for new crafters.

This album can take a minimum of 20 photographs plus storage space, and the next one I make will hold more, but this was a good starting size.


The first picture shows the album closed. For some reason I thought it would look good with the front page smaller than the back but forgot that the top of the album held the waterfall pages and therefore I needed the length, so I had to turn the album around to fill in the pages. It closes with a bellyband that has a magnet on it.

The second picture shows the flaps for the waterfall pages on the top and and the bottom flaps opened out. On the bottom section the pages are roughly 6" x 6" with the white mats being 4" x 6" to hold a standard photo. 

Third picture you open another flap and lift out another page top and bottom, and this reveals a storage section that hold more mats and a mini book for smaller pictures 

The whole album used:
Construction tape
2 sheets of hardboard
9 pieces of A4 black card 
5 sheets of 12 x 12 double sided papers from Fabrike Decoru range
2 rolls of heavy duty double sided tape 
4 sheets of white card A4
2 sets of heavy duty magnets and some good glue 

Check out Paul Ford as he has some lovely albums and does other projects as well , his tutorials are very good. 

This was a great learning curve and I have done some more research ready for my next try, so I can add more interesting pages.
I would like to try the folio method but with pages from other designs that incorporate other layers, compartments and edging.

Back soon with more simple coffee time crafts.
Dee

Tuesday, 14 April 2020

Using up Your Stash & Bargains

Hi Crafters

I know I have posted several items on using up your stash but the next couple of days there will be 2 more projects, while I set my craft room up ready for a larger project to make an Album.

Whilst in isolation I have purchased a few packs of pretty double sided papers with the intention of making some Memory Books, and now all the deliveries are in I intend to try something more involved than the smaller or mini albums I have made in the past. 

So that is what is to come, in the meantime here is a mini sticky not holder I made with some scraps and very pretty sticky notes purchased from AliExpress.. 


For today I would just like to let you know that there is an amazing deal on Craftstash.co.uk, at the present time. The Sizzix Bigshot Starter Kit that normally sells for £130 is currently on offer at just £89.99.
The kit includes :


  • 1 Big Shot Machine
  • 1 Multipurpose Platform
  • 1 Pair of Standard Cutting Pads
  • 1 Thinlits Die Set
  • 1 Bigz Die
  • 10 Cardstock Sheets
  • 1 45cm x 55cm Piece of Cotton Fabric
  • 1 Instruction Booklet   
If you are in the market for a new die cutting machine or just starting out with dies it is worth taking a look. Please bear in mind that Sizzix are launching an electric machine in May, (saw it being demonstrated on YouTube at one of the American Craft shows). But I for one love my Sizzix Bigshot and would not be without it.

 Dee

Saturday, 11 April 2020

Pretty Tissue Box

Today I am showing you a project I did after Christmas. I spotted this on  one of my favourite YouTube crafters, The Posh Paper  Lady

When I saw it I had to try it.

First you have to buy your tissues and then measure the sides. Join 2 pieces of card together and score 4 panels each 2mm bigger than the side of the box
Next cut a piece of card and cover it, this should measure 1cm bigger on each side of the square so if the sides make a square 14cm on each side the piece of card should be cut 15cm square. 
Next make your lid by adding 4.5cm to the size of your side panels, so taking the 14cm square base measurement and add 4.5 you would be cutting a lid panel 18.5 cm square
Score the piece 2cm on all four sides and make your lid.
Before putting your lid together cut a panel out the middle using a stanley knife it is best to pencil mark your cutting area before starting the cut. 
I glued the base on using gorilla clear glue, this is especially strong and will fix the very narrow edge to the base, hold in place for a while and then let it dry overnight before adding the box of tissues. and placing the lid on.

As you can see I have decorated the edge of the cut that allows the tissue to pull through, that is because I am not great at cutting out with a stanley knife and have no filing tool to make a smooth edge, but you may not need to do this . 


Hope you have a go at this project and would love to see your finished box .

The beauty of making your own box is you can make it to match your room. 

Happy Crafting 
Dee

Friday, 10 April 2020

Really Cute Mini notebook embellishments/key rings


Hi Crafters

Today I have something different for you. I saw it on YouTube, as I was trawling through Junk Book makes, and just had to make it. 


I make leather flowers sometimes and have dabbled with leather brooches, so have several bags of scraps. These mini-books are perfect to use them up

Simple cut strips of leather 3-4cm wide and 8-10cm long
Fold in 3 to represent the notebook and measure the space inside the first section.
Put several pieces of copypaper together and cut strips to fit inside this space, concertina the folds and then cut to make the pages for the notebook .

Place a small hole in the fold of the leather and add a metal ring to take your keyring or clip
Next using heavy thread or bakers twine stitch the pages into the book. to hold the notebook together wrap elastic around the notebook, if you have a very small charm thread through the elastic to decorate. 

The completed mini book can be used to hand from you handbag or as ephemera for your scrapbook projects. They are so cute, but be careful they are addictive. I have another 6 waiting to be sewn together. The finished item measures about 3.5 x 4cm 

Happy Crafting and Stay Safe
Dee

Thursday, 9 April 2020

A few more mini Memory/Brag books

Hi Crafters

Before putting away my 6 x 6 pads, I decided to make a few more mini Brag/Memory books
The 3 I made last week have all been used, and so while the projects was still clear in my mind I made another 3 to add to my Happy Mail pile.

The previous makes had been sent out to Ebay buyers and one used of the Mini Album.

Here are the new makes 


See you soon 
Dee

Wednesday, 8 April 2020

Shabby Chic Envelopes - Using up your 6 x 6 pads

Hi Crafters

Yet another idea for using up your 6 x 6 pads

I was just about to put away my pads used for previous projects when I thought of these lovely little envelopes for junk journals or mini albums

They are so quick and easy to  make and can be used for storing embellishment and beads as well as for your paper projects.

Simple score the page on 3 sides at 1.5cm
With the unscored side on the left, fold over to meet the score line on the right.
Next fold all score lines, and cut ready for an envelope
You will have something that looks like this


You can choose whether to distress the edges of the envelopes, I did, as I wanted to add interest before stamping onto the envelope.


As you can see I managed about 15 envelopes in a couple of hours 

I used Tim Holtz distress inks and some old solid wooden stamps for the prints added to the front. These envelopes will be added to Journals or to give little treats away.

Dee

Tuesday, 7 April 2020

Alternative Greeting Cards

Origami Alternative Greeting Cards

Hi Crafters

Today I went back to a Christmas project I  made for the Craft sales in 2018. I was given a pretty origami star that a friend picked up whilst in Germany. They sell them in the Christmas markets on the continent. The stars are  often exchanged at Christmas, between friends, and then used as decorations, so I think of them as friendship cards

Whilst the Christmas style are made to finish in a star, I have made them today with a simple square fold and a more ornate flower shape folded in the same way.

I had to revisit my previous makes to remind myself how to fold them, but I enjoy making them and will be making more for this Christmas. 

The first ones I made used Japanese origami papers as they are so pretty and I have a birthday coming up with someone who loves all things Japanese. 


You start with a square. Fold in half , unfold turn and fold in half the other side.
Turn the paper over and fold diagonally.
You should now be able to fold in the sides to form a square.
You will need 5 or six of these folded sqaures to make each card. Making sure they are all in the same direction, glue one on top of the other.
Using a piece of narrow ribbon or cord, fold it in half and thread the folded end through a bead, tie a knot in the folded end to form a loop and stop the bead slipping off. 
With the open ends of the card at the top add one piece of ribbon to the front centre and the other to the back centre 
Next  cut 2 squares of card to fit just inside the square and glue over the top of the ribbon 
This card is for the sentiments. Either stamp or add 3D greetings to the front, leaving the giver the back piece to write their message.

By adding the ribbon in this way when the card is flat the bead keeps it closed, you then slip the bead up unfold the folded pieces and slide the bead down again to hold the shape open. It can then be hung as a decoration.

Here are the flower shaped cards I made using the same method


 I will be selling these on Ebay as Alternative greeting cards 
They are so cute and a pretty greeting for friends and family.


Happy Crafting and stay safe
Dee


Monday, 6 April 2020

Coffee Break Stamping project

Hi Crafters

Todays post is taking us back to some simple stamping
We all need sentiments to add to our card projects and I have a large selection of stamps and dies for the job.
Today I am using my Anna Griffin set to make some glamorous sentiments, that I can store for future projects
I have decided to keep them simple as the Anna Griffin style cards I make are very ornate and so my sentiments need to be pretty but not over-embellished.

The set has 4 sets of shaped dies each set has 2 sizes and then there are several stamps that fit each shape.

As these are to be stored for future use I have used basic white and cream card backgrounds and then stamped with inks that will go with several colours .

Whilst doing this stamping I also made some of my promotion cards for my blog. I had some stamps made last year and stamp them on scraps of pretty card. When I sell anything on Etsy or Ebay I pop a card in and quite often some Happy Mail .


Back tomorrow with some alternative greeting cards.

Dee


Sunday, 5 April 2020

Folio ALbum - USing up your 6 x 6 papers

Hi Crafters

Here is a great Folio/Mini Album made with more of my 6 x 6 papers.

This album will hold 15 photographs on the waterfall section and more in the booklet added to the left flap of the file

It has been made to look like a clutch bag and is held together with an elastic button fastener.


When you open up the folio it has a waterfall on the right side and a pocket on the left side.
The folio is made from 1 sheet of A4 card. I used black 300gsm for a sturdy folder. Covered with a sheet of K & Co paper. Scored at 10cm, 10.5,11,12,12.5, 23,23.5,24,24.5,25,. Fold over all the score lines and use your corner punch at the top. This gives a curved top and bottom to the folio.


There are seven sheets of paper forming the waterfall and these are simply cut to 10cm width and with a cm fold at the top glued in place down the page. The base of the album is covered first making 15 sections altogether. Each sheets has a smaller inset piece of paper and a piece of matching size on the reverse.

The left side has had a double folded flap added so it can hold memorabilia photo mats or as with this one the booklet made yesterday. You could make a concertina panel and cut a half circle in the centre 


I have added the booklet made yesterday to this side of the folio, but you could make more photo mats and slip them in as well as Journal Tags.

I loved the papers used on the outside so have not made any decoration for the front of the album
Just made an elastic button fastener with a shell button and gold elastic. You do this by threadign your elastic through the button and tying in the middle of the ealstic then join the two ends together.
When you place the button in the centre of the folio and wrap the elastic end around the folio, slipping the joined end over the button as a closure.

Happy Crafting 
Dee

Saturday, 4 April 2020

Coffee Break Craft item - Mini Brag Book

Hi Crafters

Today more ideas to use your 6 x 6 stash of papers.

I have lots of pads bought when on sale, so this quick coffee break craft is ideal to use up some of the papers in my box.

Simple take 8 sheets of 6 x 6 and fold in half with the 
white side out. Place on your craft mat and glue one on top of the other.
After you have glued 4 together take a fine piece of ribbon about 8" long and glue onto the page on the binding side with about 3 inches of the ribbon inside the page and the rest outside the book.
Continue adding pages until you have the eight sheets together
Cut a strip of paper 6" x  3"  and glue half to the front left hand side, fold over and glue the other half to the back of the pad . Do not pull it tight as this will act as the binding for the booklet.
Next cover the front and back with matching papers cut 6" x 2.5" wide.

Add some beads or embellishments to the ribbon at the side to finish your booklet.

You can make these very quickly and decorate as much as you wish. They make great litle swaps or gifts for friends. 

Tomorrow I will show you how I added this booklet to a folio album using more of the same pad for a coordinated waterfall photograph section.

Happy Crafting
Dee

Friday, 3 April 2020

Great Gift Box - simple and quick

Hi Crafters

As promised here is the really simple gift box.
It is from a design from Crafters Companion using their A3 Scoreboard.
I am just surprised I had not thought of it before
If you have a scoreboard that acts as  a box maker or a box maker board, this is how you make this great gift box literally in minutes

Decide the depth of your box
I used a 12 X 12 sheet for the first box, and I wanted it to be 1 inch deep.
So I scored at 5.5" ,and 6.5" giving me an inch in the centre of the paper.
Turn the sheet and using the box top scoring lines score an inch down to the score lines
Turn the paper and score 1inch along the top, turn again and score 1inch again down to the middle score line. You now have an inch score line all around the top half of the sheet.

Next using the base score lines repeat the 1inch scoring around the bottom half of the sheet scoring down to the middle score line.
You now need to cut  all four corners  as you would when making a box and cut up the sides to the 1inch score line in the middle, so that the middle flaps are able to fold in .
You should now have a box where the top is just slightly bigger than the base, either store flat now or glue the corners together ready to use


Having made this box from a 12 x 12 I was ready to try an A3 piece of card and here is the result.
With this box I wanted a window top and so I scored the box as before making a 1" score line through the centre and then the top half scored an inch around with the box lid score lines and the bottom half an inch around with the box base score lines 


Before gluing together I cut our the window area on the card and this was a section 9.5cm x 16.5cm 
I cut a piece of acetate 10cm x 17cm and fitted to a sheet of paper to decorate it (again cutting out the middle section. The paper was cut at 13cm x 23cm leaving a 2cm width around the top of the box lid.

The completed box measure 25cm wide by 15cm with 1" depth . Sorry about the mix of inches and centimetre but thats how I worked out the measurements .

This box took a little longer but you could easily decorate it with a simple strip of coordinating paper and a bow and this would not take long at all . The first box took me less than 15 minutes to make the basic box. The same principles can be used to make any size box, just decide on the depth and make the sides the same width when scoring your folds.

Back tomorrow with a more ways to use your 6 x 6 papers. So be sure to pop back and please click on the FOllow button at the top of the page if you would like to comment or ask a question.

Dee  

Thursday, 2 April 2020

Double Shadow Box Card

Hi Crafters

Today is a card that was commissioned, a Double Shadow box card. Although I cannot give instructions as they are not practical for written instructions only, (you really need to see a video to  make the card) I thought you may like to see the finished item. 

If you really like it and want to have a go making it, check out  Sam Calcott - Mixed up Craft, on YouTube.


For those of you who are familiar with Shadow Box Frames these are simply 2 put together, but the tips from Sam are useful to get the flexibility in the spine for opening and closing.

The person who commisioned this card had seen it before and wanted it so the frames could be used for pictures after the Birthday. The recipient is a crafter, and so the flowers for the front were placed onto a square of card and only glued to the ribbon, thereforeo if they wished to change the front of the frames the flowers could be used for another project

The Greeting is mounted on one dimensional sticky pad for ease of removal and the stamped layer on the other side is only glued on the bottom seam, enabling a a picture to be added on top or the whole layer removed for the picture. 

I then made a little greeting notelet that sits in the fold of the left side, for the person to write their message.


Back soon with a very simple gift/mail box, that is quick to make.

Happy Crafting 
Dee